
Check your tenancy agreement first and get the landlord’s permission in writing, then set a tight budget for must-fix items like leaks, resealing, and extractor repairs. Deep-clean limescale, mould, and grout so you can keep sound fixtures and only replace touchpoints like taps, showerheads, and a toilet seat. Repaint with moisture-resistant bathroom paint, refresh silicone and grout, and add peel-and-stick tiles or vinyl for quick impact. Next, you’ll see the easiest weekend plan.
Key Takeaways
- Get written landlord approval, confirm what’s allowed, and plan for reinstatement to protect your deposit.
- Deep-clean limescale, mould, and grout first to reveal what truly needs fixing versus cosmetic updating.
- Refresh with paint, new taps/showerhead, and matching hardware finishes to modernise touchpoints without major work.
- Re-caulk and revive grout, then use peel-and-stick tiles or flooring for a quick surface upgrade with minimal disruption.
- Improve light and space with a larger mirror, brighter LED bulbs, and renter-friendly storage like tension caddies and Command hooks.
Start With Rules: What Rentals Allow

Before you buy paint or fixtures, check what your tenancy agreement and landlord will allow, because most rental bathrooms come with limits on drilling, tiling, and any “permanent” changes. Read clauses on redecoration, fittings, and repairs, then email your landlord or agent to confirm in writing. That paper trail protects your deposit and sets clear tenant permissions.
Work within common Rental restrictions: no new holes, no altering plumbing, and no replacing sanitaryware without approval. Ask about allowable fixes like swapping a shower head, changing a toilet seat, regrouting, or resealing, and whether you must use a qualified tradesperson. If you’re in a leasehold block, check building rules on noise and disposal. Finally, agree how you’ll reinstate changes at checkout.
Set a Realistic Bathroom Update Budget
Although it’s tempting to dive straight into paint and new accessories, you’ll save money (and stress) if you set a hard budget first and split it into “must-fix” and “nice-to-have” upgrades. Start by pricing essentials: plumber call-out fees, replacement taps, resealing, extractor fan fixes, and any urgent plumbing maintenance that could trigger leaks or mould.
Next, ring-fence a small pot for quick Bathroom decor wins you can take with you, like a new mirror, rail, or vinyl floor mat. Use UK pricing: check Screwfix, B&Q, and Marketplace, and add 10–15% for hidden bits like sealant, fixings, and delivery. Keep receipts for deposit disputes, and don’t exceed what the rent level justifies.
Deep-Clean First to See What’s Salvageable
Before you buy anything, give the bathroom a proper deep clean so you can see what you’re really working with. Hit grime hotspots like limescale on taps, mouldy silicone, stained grout, and extractor fan dust to reveal the true condition underneath. Once it’s clean, you can spot which fixtures are still sound (bath, basin, toilet, fittings) and save your budget for only what genuinely needs replacing.
Tackle Grime Hotspots
Once you’ve stripped the room back to the basics, start with a proper deep clean so you can tell what’s truly knackered and what just looks it. Hit the worst grime buildup first, using what you’ve already got: washing-up liquid, white vinegar, bicarbonate of soda, and a cheap scrub brush from Wilko or B&M. Soak, scrub, rinse, then dry so you can spot what’s left.
- Descale taps and showerhead with vinegar in a sandwich bag
- Shift soap scum on tiles with bicarb paste and an old toothbrush
- Degrease extractor and light fittings with warm, soapy water
- Lift limescale rings in the loo with citric acid and a toilet brush
- Clean grout lines with bleach gel (ventilate and wear gloves)
Identify Salvageable Fixtures
After you’ve deep-cleaned, you can judge what actually needs replacing and what just needed a proper scrub. Check for chips, hairline cracks, loose fixings, and limescale that won’t shift. If the basin and bath are sound but stained, try a UK enamel repair kit before swapping them out. Test taps for drips and stiff handles; new washers and cartridges often cost pennies compared with a full mixer. Keep Vintage fixtures if they’re solid and match the property’s character—tenants like charm when it works. Inspect mirrors, towel rails, and antique hardware: a soak in white vinegar, a gentle polish, and new screws can make them look intentional. Only replace items with corrosion, wobble, or persistent leaks.
Keep vs Replace: Your ROI Checklist
Where should you spend, and where can you save, when you’re updating a rental bathroom? Start with ROI analysis: keep anything structurally sound and upgrade what tenants touch daily. Your investment strategies should target reliability, easy cleaning, and fewer call-outs, not luxury.
- Keep the bath if it’s solid and uncracked; replace only if damaged or badly stained.
- Replace the toilet if it’s old, inefficient, or wobbly; dual-flush saves water and complaints.
- Keep wall tiles if they’re intact; replace only missing, drummy, or mouldy sections.
- Replace taps and shower head for better pressure and a modern look on a small budget.
- Keep the vanity carcass if sturdy; replace doors, handles, or basin if chipped.
Paint It Fast: Prep, Sheen, and Colors
Because paint delivers the quickest “new bathroom” feel for the least cash, you’ll get the best results by nailing the prep, choosing a hard-wearing sheen, and sticking to light, tenant-proof colours. Start by washing down with sugar soap, scraping loose flakes, then sanding and filling. Kill mould with a proper bathroom spray, and let everything dry fully. Prime stains and bare plaster; it stops flashing and saves topcoat. For paint durability, pick a moisture-resistant bathroom paint in eggshell or soft sheen: it wipes clean and copes with steam better than matt. Use Colour psychology to keep it broadly appealing: warm whites, pale greys, or muted sage make small rooms feel bigger and calmer. Buy trade tins, cut in carefully, and apply two thin coats.
Swap Hardware for an Instant Refresh
Even if you don’t touch the tiles, swapping tired hardware can make the whole bathroom look newer in an afternoon. Stick to renter-friendly changes you can reverse at checkout, and keep finishes consistent (matt black, chrome, or brushed brass) to sharpen your Bathroom decor. Measure existing hole centres so new pieces fit without drilling, then keep the originals in a labelled bag for return. For cost-effective Storage solutions, choose hooks and rails that reduce clutter without eating floor space.
- Replace cabinet knobs and drawer pulls (same screw size)
- Add a matching towel ring or rail near the basin
- Swap the toilet roll holder for a sturdier style
- Fit over-door hooks for robes and spare towels
- Upgrade mirror clips or add a slim shelf bracket system
Upgrade the Faucet and Showerhead (Easy Wins)
If you want the biggest visual upgrade for the least cash, change the tap and showerhead first. Stick to UK-standard sizes (most basins use 1/2″ tails; many showers are 1/2″ BSP) so you can swap without re-plumbing. Choose simple Faucet styles like chrome mono mixers or brushed stainless if your fittings match; avoid niche finishes that show limescale.
For the shower, prioritise Showerhead features that improve comfort and cut bills: a water-saving head, easy-clean rubber nozzles, and multiple spray settings. If you’re on an electric shower, pick a compatible handset and keep the hose length similar. Add PTFE tape to stop drips, tighten by hand, then quarter-turn with grips. Keep old parts to refit later.
Brighten the Room With Better Lighting
While new tiles and vanity units cost a fortune, better lighting makes a tired rental bathroom feel cleaner and more modern for very little money. Swap harsh bulbs for warm-white LEDs (around 3000K) and you’ll soften shadows without losing brightness. Choose IP-rated lighting fixtures for zones near the shower, and stick to simple styles that won’t date quickly. If your landlord’s strict, use plug-in or battery options and keep the original fittings boxed for move-out. You can also boost natural light by keeping the window clear and using a lighter blind.
- Replace bulbs with LED, high-lumen options
- Add an IP44 ceiling light if allowed
- Fit stick-on LED strips under shelves
- Use a timer or PIR sensor for convenience
- Clean shades and covers to cut gloom
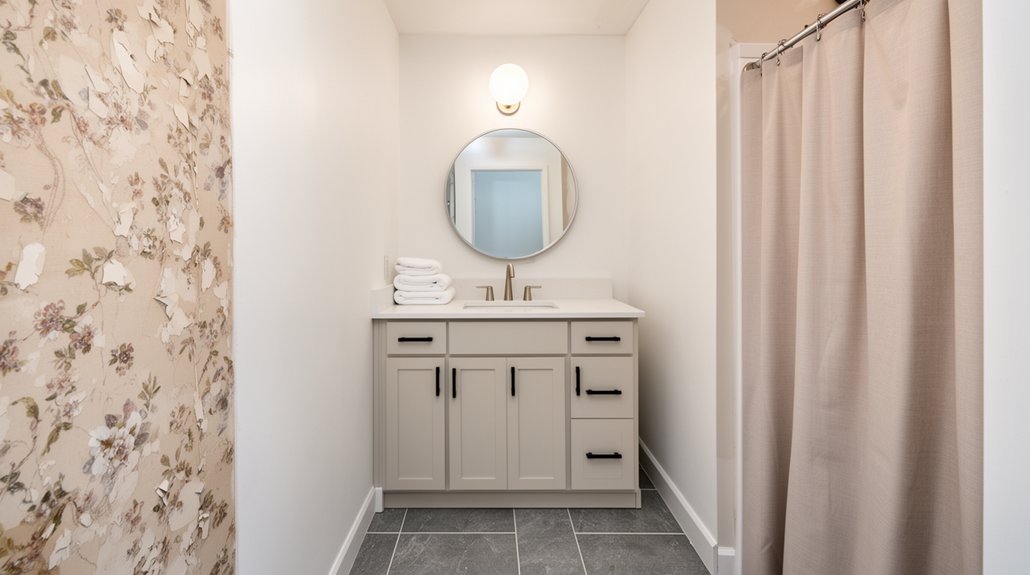
Replace the Mirror to Make It Feel Bigger
Because a mirror takes up so much visual space in a bathroom, swapping a dated one can make the whole room feel larger and brighter for very little money. Choose the biggest mirror size you can fit above the basin, ideally spanning the vanity width, to maximise visual expansion. In UK rentals, a simple frameless mirror or thin black frame looks modern and won’t clash with existing tiles. Shop B&Q, IKEA, Dunelm, or Facebook Marketplace for budget options, and measure first so you don’t need patching later. If you can’t drill, use heavy-duty mirror adhesive or Command strips rated for bathrooms, but check the landlord’s rules. Pair the new mirror with your brighter lighting to bounce light further and reduce shadows.
Re-Caulk and Touch Up Grout Like a Pro
You’ll get a cleaner, newer-looking bathroom fast by stripping out the old caulk neatly with a scraper and a bit of white spirit, then wiping everything dry. Next, you can refresh tired grout with a grout pen or cleaner and finish with a cheap sealer to keep stains and mould at bay. For crisp, pro-looking caulk lines, you’ll mask with painter’s tape, run a steady bead, and smooth it in one pass.
Remove Old Caulk Cleanly
If your rental bathroom looks tired despite a good clean, old caulk is often the culprit. Neat caulk removal makes everything look sharper, and it’s landlord-friendly if you don’t damage tiles. Work slowly, keep costs down, and you’ll avoid gouges that scream “DIY gone wrong”.
- Slice along both edges with a sharp Stanley knife, keeping the blade flat to the tile.
- Pull the bead in strips; use a plastic scraper to lift stubborn bits.
- Apply a budget caulk remover gel from B&Q or Screwfix, then wait as directed.
- Scrub residue with a non-scratch pad; this also helps with grout cleaning at the joint.
- Wipe with methylated spirits, then let the area dry fully before you do anything else.
Refresh And Seal Grout
A fresh bead of sanitary silicone and a quick grout touch-up can make even a dated rental bathroom look newly finished without spending much. Start by scrubbing grout lines with sugar soap and a stiff brush, then rinse and dry fully. If you’ve got Grout staining, spot-treat with a mild bleach solution or oxygen cleaner, testing first to protect tiles and tenancy deposits. Rake out any crumbly sections with a grout saw, then pack in ready-mix grout and wipe diagonally with a damp sponge. Once it’s cured, protect your work with a grout sealer pen or paint-on product. For badly mismatched lines, consider color sealing to even everything out fast. It’s cheaper than retiling and boosts kerb appeal instantly.
Achieve Crisp Caulk Lines
Even when the tiles stay put, crisp new caulk lines around the bath, shower tray, and basin can make a tired rental bathroom look freshly finished for the price of a cartridge and a roll of masking tape. Cut out old silicone with a scraper, wipe with methylated spirits, then dry fully. Run masking tape either side, gun in sanitary silicone, and smooth with a wet finger or profiling tool. Pull tape straight away for sharp edges. Touch up grout with a grout pen, especially where vintage fixtures meet tiled splashbacks. Keep it lasting by improving bathroom ventilation.
- Use a £3–£5 silicone tool for neat beads
- Choose mould-resistant “sanitary” silicone
- Fill gaps, don’t smear thinly
- Leave 24 hours before showering
- Open windows or run the extractor fan
Peel-and-Stick Floors That Look Legit
While a full floor replacement can blow your budget and annoy your landlord, peel-and-stick vinyl tiles let you cover tired lino fast, cheaply, and without power tools. Measure the room, then order 10% extra for cuts and wonky walls common in UK terraces and flats. Clean with sugar soap, let it dry, and fill deep dents so tiles don’t telegraph bumps. Start from the centre line, dry-lay a row, then stick tiles down firmly with a rolling pin or flooring roller. Choose groutable styles or stone-effect planks to mimic luxury upgrades without changing high end fixtures. Finish with removable silicone at the edges to stop water sneaking underneath, and keep spare tiles for quick swaps later.
Peel-and-Stick Backsplash for the Vanity Wall
You can smarten up the vanity wall fast with a peel-and-stick backsplash, but you’ll need moisture-resistant tiles that can handle steamy UK bathrooms. Prep matters: clean and dry the surface, measure carefully, and cut around sockets and edges before you stick anything down. When it’s time to move out, you can lift the tiles slowly with gentle heat so they come off cleanly without damaging paint or plaster.
Choosing Moisture-Resistant Tiles
If the vanity wall’s seen better days, peel-and-stick tiles give you a moisture-resistant backsplash without the cost or mess of traditional tiling. For UK rentals, pick PVC or gel-backed mosaic sheets rated for bathrooms, not kitchen-only packs. You’ll get better grip, wipe-clean surfaces, and fewer peeling corners when the room steams up. Look for thicker tiles and strong adhesive, and pair them with moisture barriers like clear silicone along the basin edge to stop splashback creeping behind. Choose light colours to bounce daylight and make boxy bathrooms feel bigger, while keeping the look neutral for tenants.
- “Bathroom” or “shower” rated packaging
- PVC/gel tiles over paper-backed styles
- 2–3mm+ thickness for durability
- Matte or textured finishes to hide water spots
- Simple grids that speed tile installation
Surface Prep And Measurement
Moisture-rated peel-and-stick tiles only hold up in a steamy bathroom when they go onto a clean, flat wall, so start with prep and accurate measuring. For Surface preparation, wipe down with sugar soap, rinse, and let it dry fully. Scrape off loose paint, fill small holes with lightweight filler, then sand smooth. If the wall’s glossy, key it with fine sandpaper so the adhesive grips. Check for mould; treat it before you tile.
Next, prioritise measurement accuracy to avoid wasted sheets. Measure the width of the vanity run and the height you want the backsplash, then mark a level baseline with a spirit level. Dry-lay a row on the floor to confirm tile size, spacing, and where cuts will land around sockets and mirrors.
Clean Removal Without Damage
Before the first sheet goes up, plan for a clean, deposit-safe removal later by choosing a low-tack peel-and-stick backsplash and testing it on a hidden patch of paint. When you’re ready to move out, warm panels with a hairdryer and peel slowly at a low angle to protect plaster and emulsion. Tackle residue with citrus adhesive remover or a dab of washing-up liquid and warm water, then touch up with a tester pot from B&Q.
- Keep spare tiles to replace any lifted corners
- Score along silicone lines with a snap-off blade
- Use dental floss behind edges for gentler removal techniques
- Bag sticky offcuts; don’t flush them
- Follow council rules for fixture disposal at the tip or recycling centre
Budget Vanity Refresh: Paint, Top, or Swap
When your rental bathroom looks tired but you can’t justify a full rip-out, the vanity gives you the biggest visual win for the least cash. Start with paint: lightly sand, degrease, then use a primer plus durable cupboard paint in a modern vanity color (soft sage, warm white, or charcoal). Swap handles to update hardware styles—brushed brass, matte black, or chrome—and keep the old ones to refit later.
If the unit’s sound but the top screams “1998”, overlay it with a cut-to-size laminate worktop or a simple timber top sealed with yacht varnish. For the fastest fix, replace the whole vanity with a flat-pack unit from B&Q, Wickes, or IKEA; reuse existing plumbing points to avoid extra labour.
Refresh the Shower: No Retiling Required
Even if the tiles are dated, you can make the shower look cleaner and more modern without touching a single one. Focus on quick, reversible upgrades that won’t upset your landlord or your deposit.
- Swap to a fresh Shower curtain (mildew-resistant, plain white or subtle stripe) and new rings
- Deep-clean grout and silicone with bleach gel, then re-seal where needed
- Replace the shower head with a landlord-friendly model; boost Water pressure by descaling with vinegar and checking the hose for kinks
- Add a tension caddy to keep bottles off the floor and stop that “student flat” vibe
- Fit a stick-on mirror or squeegee hook, so the screen stays clear and limescale-free
You’ll get a brighter, tidier shower for under £30–£60 from B&Q, Wilko, or Amazon UK.
Weekend Plan: A 2-Day Rental Bathroom Makeover
How much can you realistically transform a tired rental bathroom in one weekend? Quite a lot if you stick to peel-and-stick, wipe-clean, and landlord-friendly fixes that won’t risk your deposit.
Day 1: deep clean, then recaulk the bath, swap the shower hose, and fit a new toilet seat. Add stick-on vinyl to tired cabinet fronts and replace a few visible screws and caps. Refresh Bathroom decor with a neutral shower curtain, matching towels, and a framed print in a clip frame.
Day 2: tackle Storage solutions—over-toilet shelving, adhesive hooks, and a slim caddy for bottles. Upgrade bulbs to warm-white LEDs and add a large stick-on mirror to bounce light. Finish with a plant and a limescale spray top-up.
Frequently Asked Questions
How Can I Make Updates Reversible for Move-Out and Security Deposit Return?
You’ll keep updates reversible by using Temporary fixtures and Removable decals, avoiding drilling, and storing originals. Use Command strips, peelable sealant, and non-permanent grout pen; photograph condition, keep receipts, and reinstate fittings before checkout.
What Renter-Friendly Upgrades Can Reduce Moisture and Prevent Mold Long-Term?
Like a brolly in a downpour, you’ll cut damp by fitting a decent extractor with timer, using peel-and-stick moisture barriers, sealing gaps, wiping condensation, and applying mould resistant paint on ceilings; run fans after showers.
Which Tools Should I Buy Versus Borrow for a Quick Bathroom Refresh?
Buy a decent drill/driver, quality rollers for wall paint, and a silicone gun; you’ll reuse them. Borrow an SDS drill, tile cutter, and step ladder for fixture replacement or heavy jobs. Save pounds.
How Do I Update Ventilation if There’s No Exhaust Fan?
Around 1 in 5 UK homes report damp or mould risk, so act fast: use ventilation alternatives like a window trickle vent, £20 timer extractor through-wall kit, plus a dehumidifier for moisture control.
What Budget-Friendly Changes Help Accessibility for Kids, Seniors, or Guests?
You can boost Child safety and Senior accessibility by fitting stick-on grab rails, non-slip bath mats, a raised toilet seat, lever taps, and a handheld shower. Add a nightlight, softer-close seat, and clear signage.
Conclusion
You’re like a gardener in a borrowed plot: you can’t move the fence, but you can coax new life from tired soil. Check your tenancy rules, set a sensible budget, then clean until the truth shows. Keep what works, replace only what pays you back. With quick paint, peel-and-stick, a refreshed vanity, and a smarter shower clean-up, you’ll turn “dated” into “decent” by Sunday—without blowing your deposit.


