
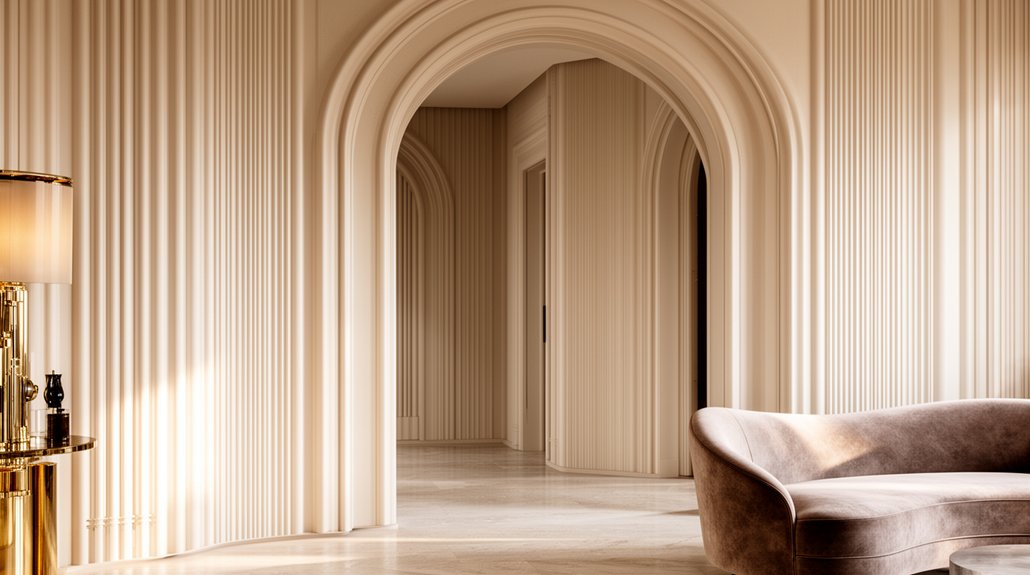
Replicate the New Deco look by keeping everything disciplined: centre your arch on the main sightline, run tight vertical flutes in consistent modules, and hold clean reveals for sharp shadow lines. Choose luxe-but-tough finishes—dark walnut tones, brass or bronzed accents, smoked glass, and satin paint. Mock up proportions with masking tape before fixing panels to a dead-straight backing board. Add warm 2700–3000K side lighting to wash the texture and elevate the symmetry—next you’ll see the best layouts and spacing.
Key Takeaways
- Start with New Deco rules: clean geometry, symmetry, strong verticals, and disciplined contrast inspired by 1920s–30s glamour.
- Choose luxe, modern materials: fluted MDF or microcement, dark walnut, brass/bronze accents, smoked glass, and satin or eggshell paint.
- Plan proportions first: mark layouts with tape, align to sightlines, and size panels full-height or balanced half-height for the room.
- Build arches with restraint: use radius or shallow segmental shapes, keep reveals 100–150mm, and center openings to maintain symmetry.
- Install precisely: set plumb reference lines, use consistent flute modules, mitre returns at corners, fill and caulk seams, then light with warm, dimmable side-wash.
Define the New Deco Look (Key Cues)
If you strip Art Deco back to its essentials and rebuild it for today, the New Deco look comes down to confident geometry, luxe materials, and disciplined contrast. You take the Historical context—1920s optimism, ocean-liner glamour, pared-back classicism—and translate it into cleaner lines and tighter proportions that suit UK terraces and new-builds alike. You prioritise symmetry, strong verticals, stepped profiles, and crisp thresholds between matt and gloss. You specify brass or bronzed accents, smoked glass, mirror, and dark-stained walnut, then temper them with warm neutrals and inky paint. Material innovation matters: choose reconstituted stone, microcement, large-format porcelain, and durable lacquers that mimic period sheen but cope with modern wear. Keep lighting sculptural, with opal globes and ribbed shades.
The 5-Step Plan for Fluted Walls + Arches
Start by planning your layout and scale: set centre lines, check sightlines from key doorways, and size ribs and arch radii to suit UK ceiling heights and skirting details. Next, you’ll install the fluting with consistent spacing—template your runs, keep reveals crisp, and allow for sockets and switches before you fix and fill. Then frame your arches with ply formers or flexible MDF, guarantee symmetry with a laser level, and lock in clean junctions where the curve meets the fluted wall.
Plan Layout And Scale
Before you buy a single length of fluted MDF or sketch an arch, lock in the layout and scale so the Deco details look intentional rather than stuck on. Start by measuring wall width, ceiling height and existing stops, then mark a centreline and key sightlines from your main entry and sofa. Factor in Furniture placement: keep panelling out of knock zones behind dining chairs and allow clearance for radiators, sockets and TV brackets. Decide where the arch lands in relation to door casings and cornices, and keep reveals symmetrical. Use masking tape to mock up fluted zones and arch edges at full size. Check Window treatments too: guarantee curtains, poles and blinds won’t clash, and align vertical flutes with window mullions where possible.
Install Fluting, Frame Arches
Once your tape mock-up looks right from every key sightline, you can move straight into the build: fix a dead-straight backing board, set out plumb reference lines, then install the fluted MDF in consistent modules so the shadows read evenly across the wall. Use a laser level, not guesswork, and dry-fit two lengths to confirm your pitch. Apply grab adhesive in beads, then pin with 18g brads into studs or the backing board; wipe squeeze-out immediately. Mitre returns at external corners so flutes wrap cleanly. For arches, cut 9–12mm MDF templates, then laminate two skins for stiffness and screw into the studwork. Keep the arch reveal consistent, add flexible MDF or kerf-cut lining, and sand flush. You’ll nail Wall aesthetics that match current Decor trends.
Pick the Best Wall for Fluted Panels
Where will fluted panels make the biggest impact in your room? Choose the wall you naturally face: behind the sofa, the bed’s headboard wall, or the chimney breast. These spots read as intentional features and suit Deco symmetry, especially when you centre an arch or artwork.
Check the Wall material before you commit. Solid plaster and sound plasterboard take adhesive and screws well; crumbly plaster needs stabilising, and dot-and-dab may need longer fixings into studs or masonry. Avoid walls with active damp, fresh lime plaster, or frequent knocks in tight hallways. Map sockets, pipes, and radiators so panels don’t clash with trims. Finish the elevation with matching skirting lines and neat reveals, and upgrade the look with decorative hardware on nearby doors or cabinetry.
Get Fluted Spacing Right (MM/In Guide)
You’ve picked the feature wall; now get the spacing right, because fluted panels only read as Deco when the rhythm looks deliberate and balanced. Aim for centres of 40–60mm (1.6–2.4in) for fine Fluted detailing, or 70–90mm (2.75–3.5in) for bolder, more architectural lines. Keep groove widths consistent; 10–15mm (0.4–0.6in) grooves with 10–20mm (0.4–0.8in) flats look crisp in typical UK rooms. Mark out with a laser level and a story stick so every repeat lands true, then dry-lay a short run to confirm the read from the doorway. For Wall arch integration, centre a flute on the arch apex and let the pattern die into the curve cleanly, avoiding awkward slivers at the returns.
Choose Fluted Panel Height: Full vs Half
Choose full-height fluted panels when you want maximum Deco impact, as they draw the eye up and sharpen the room’s vertical lines. Opt for half-height panels when you need balance—adding texture and structure without overpowering furniture, radiators, or wall art. You’ll get the best result by matching panel height to your room’s proportions, especially ceiling height and wall width, so the detailing looks intentional rather than stretched or squat.
Full-Height Panel Impact
If you want fluted panelling to deliver true Deco drama, the height you specify matters as much as the profile. Full-height runs floor to ceiling, stretching sightlines and making modest UK rooms feel taller, sharper, and more architectural. It’s a confident choice in today’s decor trends, because it turns wall textures into a deliberate backdrop for arches, brass, and lacquer.
- Run panels tight to the ceiling line for a clean shadow break
- Keep spacing consistent; irregular grooves look DIY-fast
- Use moisture-resistant MDF in bathrooms and utility spaces
- Paint in satin or eggshell to catch light without glare
- Stop neatly at cornices, or scribe for Victorian ceilings
You’ll get a hotel-lobby effect without widening the footprint.
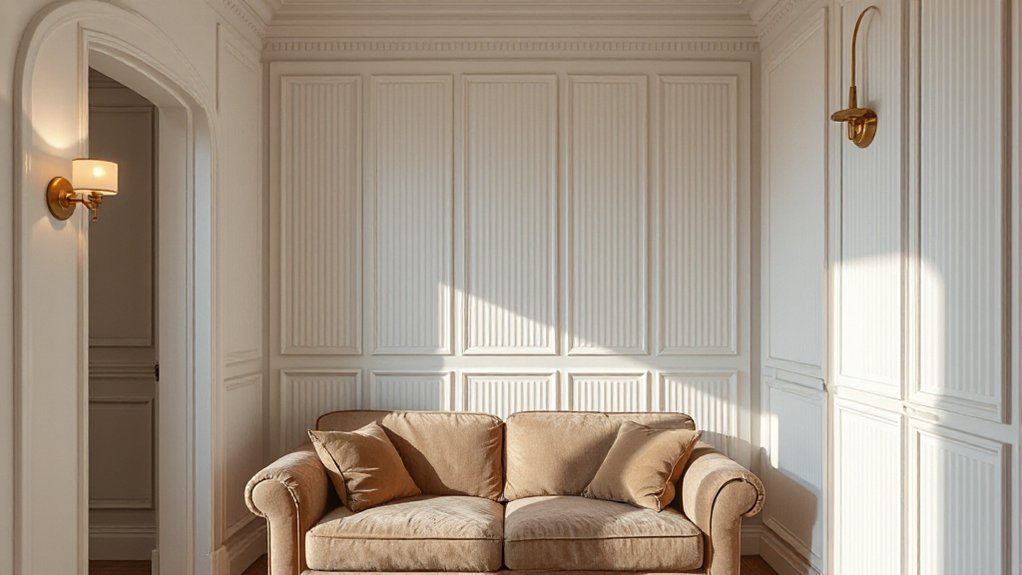
Half-Height Panel Balance
Full-height fluting brings the hotel-lobby punch, but half-height panelling often suits UK homes better when you want Deco structure without overpowering the room. You keep the fluted rhythm where it’s most readable—around seating and circulation—while leaving upper walls freer for paint, artwork, or arches.
Set your datum like a modern dado: align the cap with switch plates or door handles, then run consistent module spacing so corners and returns look intentional. Prioritise Material durability by choosing moisture-resistant MDF or timber-faced boards in hallways and dining zones, and specify a hardwearing satin finish. Build Texture contrast by pairing crisp flutes with a smooth rail, then use a slightly deeper skirting to visually anchor the detail. Add discreet shadow gaps for a cleaner, sharper edge.
Room Proportion Considerations
While fluted panelling looks glamorous in magazine spreads, the right height depends on your room’s proportions and how much visual weight your walls can carry. In UK terraces with 2.4m ceilings, half-height often keeps things airy; in taller Victorian rooms, full-height can emphasise grandeur if you control rhythm and shadow lines. Decide by measuring, not guessing, and let sightlines lead.
- Ceiling height: under 2.5m favours half-height
- Cornice and picture rail: align panel tops deliberately
- Furniture placement: don’t trap radiators, sofas, or sideboards
- Window treatments: full-height demands cleaner blinds or tall curtains
- Light levels: north-facing rooms need lighter tones and spacing
If your walls feel busy, stop at 1100–1200mm and add an arch above.
Budget Fluted Wall Materials (Pros/Cons)
Because fluted walls read as pure Deco, you don’t need bespoke joinery to get the look—budget-friendly materials can deliver the same ribbed rhythm, so long as you match the product to the room’s wear-and-tear. Your Budget options typically include MDF fluted panels, pre-primed timber strips, flexible PVC, and acoustic felt slats. MDF gives crisp grooves and a smooth paint finish for hallways and lounges, but it hates damp, so avoid bathrooms and leaky external walls. Timber costs more yet offers better Material durability and sharper impact resistance, though knots can telegraph through paint. PVC handles steam and splashes, but can look plasticky on close inspection and dents under heat. Felt-slat systems add warmth and sound control, but they’re bulkier and need careful edge planning around sockets and skirting.
Install Fluted Panels: Cut, Glue, Fill, Caulk
Once you’ve picked your panels, the install comes down to four clean steps: cut them square, bond them properly, tidy the joins, then seal the edges. Set out a level datum line, dry-fit, and mark sockets so your Wall textures stay crisp under paint and grazing light. Cut with a fine-tooth blade and back-support to prevent breakout.
- Mitre saw or track saw, sharp 60T blade
- Solvent-free grab adhesive (UK rated) and cartridge gun
- Panel pins or brads for temporary hold
- Lightweight filler and flexible sanding block
- Decorator’s caulk for top and side perimeters
Butter the panel back, press, and check plumb. Fill nail holes and seams, sand flush, then caulk the perimeter for a shadow-free finish that suits modern colour schemes. Let everything cure before priming.
Make Fluted Panels Seamless at Corners/Edges
Even if your cuts are dead square, corners and outer edges will still telegraph seams under raking light unless you plan the returns and groove alignment. For Seamless corners, don’t butt two fluted faces together; wrap one panel around using a mitred return, or add a matching return strip so the profile continues.
Dry-fit first and mark a “master groove” line across both faces. Trim from the back so the flute centres meet at the arris, not the flat. Where profiles can’t meet cleanly, stop the flutes short and introduce a crisp shadow gap or 6–9mm planted stop for deliberate Edge detailing.
On external edges, cap with a square MDF lipping, then route shallow flutes into it to match. Fill pinholes, sand, and caulk lightly only.
Add an Arch Without Major Demo (3 Methods)
Three low-mess methods let you add an Art Deco arch to a doorway or wall opening without touching the lintel or moving electrics: a removable MDF “arch pack” fixed to the existing jambs, a ply/MDF rib-and-skin insert that creates a new curved head inside the opening, or a plasterboard arch formed on flexible track and skimmed for a seamless finish. You’ll gain the look fast, then integrate Decorative moldings and Wall paneling for cohesion. Keep tolerances tight, and you won’t fight cracks or shadow lines.
- Scribe MDF packs to wonky reveals; add quadrant trims
- Rib-and-skin: rout a template, glue, pin, and fill
- Plasterboard: use flexi-track, stagger joints, skim twice
- Prime all cut edges; seal for stable paint uptake
- Fix with grab adhesive plus lost-head nails; sand flush
Choose an Arch Shape for New Deco Rooms
After you’ve created the opening, the arch profile you choose sets the whole Deco read—get it right and the rest of the trim lines up effortlessly. For New Deco, start with a clean radius arch for a softened, 1930s-influenced look, or choose a shallow segmental arch when you want restraint and modern edge. A stepped, faceted arch suits bolder schemes and pairs neatly with fluted panelling lines. Keep corners crisp and symmetry obvious; wonky reveals kill the effect. Your Material options matter: MR MDF for painted joinery, plasterboard on a timber former for seamless curves, or lightweight GRP when you need repeatable profiles. Lock it in with Color schemes—tonal neutrals for quiet luxury, or high-contrast trims to underline geometry.
Size Your Arch for 8–12 Ft Ceilings
Because ceiling height dictates how “Deco” an opening feels, size your arch so it reads as a deliberate frame rather than a cramped curve. For typical UK 8–12 ft ceilings (2.4–3.6 m), keep the spring line high enough to elongate the opening, but not so high it looks mean. Aim for an overall height around 70–80% of the wall height, with a clear width that suits the circulation route and furniture sightlines.
- Set arch height: 2.0–2.2 m for 2.4 m ceilings; 2.4–2.7 m for 3.0 m.
- Keep reveals 100–150 mm to cast clean shadows.
- Match Wall textures to scale: finer flutes on lower ceilings.
- Use darker Color schemes to deepen the frame.
- Centre on existing openings to avoid awkward nibs.
Pair Arches and Fluting: 3 Foolproof Layouts
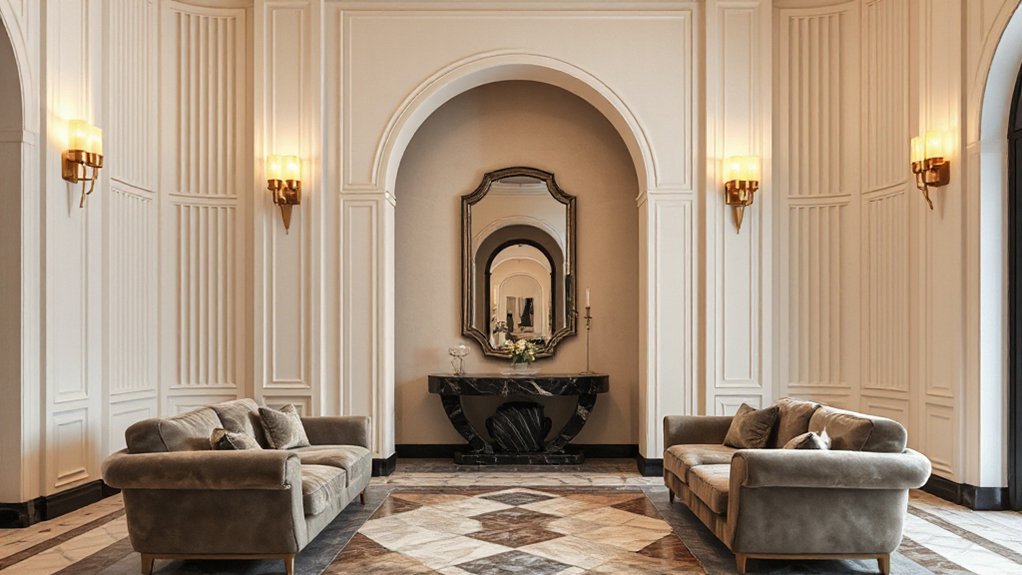
Start with a centred arch and run tight vertical flutes straight up to the cornice to lock in that Deco symmetry, even in a typical UK room. Next, frame the opening with fluted pilasters so the arch reads as a proper portal rather than a cut-out. For longer walls or hallways, set a repeating niche-arch rhythm and keep the fluting spacing consistent so the whole elevation looks intentional.
Centered Arch, Vertical Flutes
If you want a Deco look that feels intentional rather than themed, centre an arch and run vertical flutes through or alongside it to emphasise height and symmetry. Keep the arch as the focal point, then use evenly spaced flutes to sharpen the geometry without overwhelming the room. In UK homes, this reads crisp in narrow halls, chimney breasts, or a simple TV wall, especially with restrained Decorative accents.
- Set the arch centreline from your room’s main sightline (doorway or sofa).
- Match flute spacing to arch width (typically 30–50mm for MDF).
- Stop flutes cleanly at the arch springline or continue to skirting for lift.
- Choose moisture-resistant MDF or primed timber for Material durability.
- Finish in a satin or eggshell to catch light without glare.
Fluted Pilasters Framing Arches
Once you’ve centred an arch and used vertical flutes to lift the line of sight, you can make the whole feature feel more architectural by adding fluted pilasters either side. Layout one: run pilasters full height to the cornice line, with a simple plinth and cap; it reads properly Deco and crisps up plasterboard edges. Layout two: stop the pilasters at springing height, then add a narrow flat band to trace the arch; you’ll get clean shadow lines without overworking the wall. Layout three: thicken the pilaster by 10–20mm and set it proud of the fluted field; it frames the opening like joinery. Use MDF only in dry rooms; choose MR board or plaster for Material durability. Keep Decorative accents minimal.
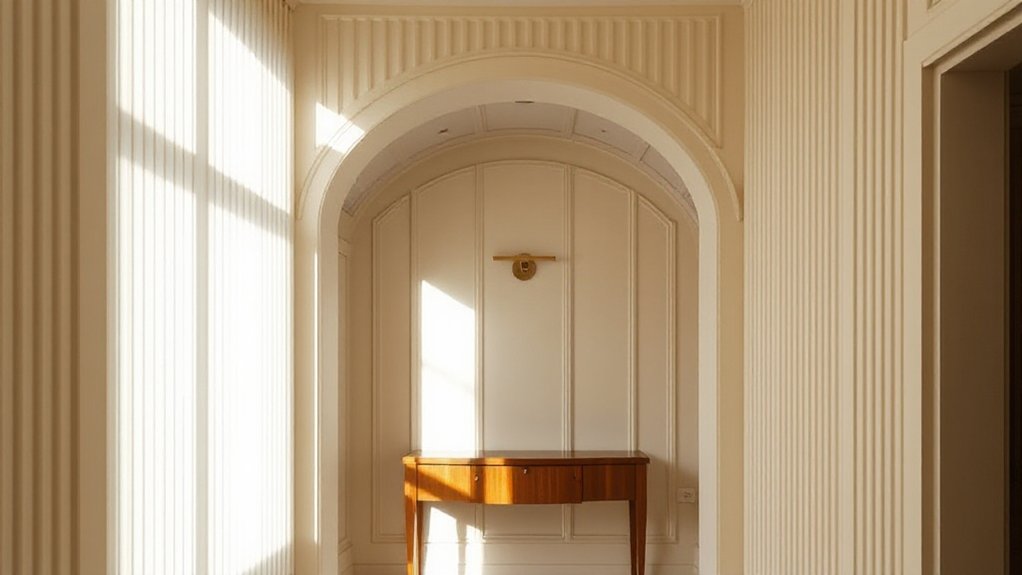
Repeating Niche Arch Rhythm
Whether you’re working with a single recess or a full run of alcoves, repeating niche arches in a measured rhythm gives a wall that unmistakable Deco order, especially when you pair each curve with tight vertical fluting. Keep your Rhythm pattern consistent: set a datum line at skirting height, then repeat arch centres at equal bays so reveals align and shadows read crisply under UK daylight.
Choose one of these foolproof layouts:
- Single hero niche accent: one arch, fluting only inside the reveal.
- Triptych: three equal arches, fluted pilasters between.
- Run-and-endcap: repeated arches with a wider terminal bay.
- Offset pair: two arches, one narrower for shelving.
- Arch-over-plinth: arch above a 900mm ledge for styling.
Use MDF flutes, caulk seams, and paint satin.
Soft New Deco Color Palettes That Feel Modern
While classic Deco leans on high-contrast black, gold, and jewel tones, the new approach softens the look with layered, chalky palettes that still read unmistakably glamorous. Start with warm greige, stone, or putty on main walls, then add muted accents—clay pink, celadon, petrol blue, or smoked aubergine—on arches or fluted panels for depth without drama. Keep colour harmony by repeating one undertone throughout: if your base is warm, choose terracotta and brass; if it’s cool, lean into sage and nickel. For furniture integration, match timber warmth and upholstery weight to the palette: walnut with ecru bouclé, or ash with dove velvet. Finish with satin paint for a gentle sheen.
Lighting Angles That Flatter Fluted Texture
Because fluted texture relies on shadow as much as shape, you’ll get the most Deco impact by lighting it from the side rather than head-on. Aim your Lighting techniques so the beam skims across the ridges, exaggerating depth and making Wall textures read crisp, not flat. In UK homes, that often means adjusting downlights, adding wall lights, or using picture-style fittings to create controlled graze.
- Place a wall washer 200–300mm off the fluted face
- Set beams at 15–30° for strong shadow lines
- Use warm 2700–3000K to keep arches flattering
- Choose a narrow beam for drama, wide for softness
- Dim in the evening to avoid harsh scalloping effects
DIY vs Pro + The Biggest Mistakes to Avoid
If you want Deco detailing to look crisp rather than “DIY-ish”, decide early what you can realistically tackle yourself and what needs a tradesperson. You can DIY paint, lining out, and lightweight MDF flutes on straight runs; you should hire a pro for plaster coving, curved arches, electrics, and any load-bearing alterations under UK Building Regs.
Biggest mistakes: skipping a level datum line (your flutes will “creep”), ignoring Historical influences (oversized ribs and random radii look wrong), and under-speccing substrates (dot-and-dab walls need fixing grounds). Don’t rush jointing: imperfect seams telegraph through satin paint. Prioritise Material sustainability by choosing FSC timber/MDF, low-VOC primers, and repairable plaster over foam. Finally, test one bay before committing to a full wall.
Frequently Asked Questions
How Do I Soundproof a Room With Fluted Panels?
You’ll soundproof with fluted panels by fixing them over acoustic felt and a resilient batten system, sealing edges with acoustic mastic. Choose high-density panels for decorative textures and measurable acoustic improvements, and add mineral wool behind.
Are Fluted Panels Safe Near Fireplaces or Heat Sources?
You can use fluted panels near fireplaces, but you must follow fire safety guidance—don’t play with fire. Keep required clearances, choose non-combustible boards, fit a heat shield, and add thermal insulation behind panels.
Can I Remove Fluted Wall Panels Later Without Damaging Drywall?
Yes, you can, if you’ve used removable adhesive or screws into studs; you’ll patch and skim minor holes. For Decor installation, avoid grab adhesives. Choose Wall texture options like paintable MDF to ease future removal.
Do Fluted Walls Trap Dust, and How Should I Clean Them?
Yes, fluted walls can trap dust in the grooves; you’ll notice it more with Decorative textures. For Maintenance tips, you should vacuum using a soft brush, then wipe with a damp microfibre cloth, fortnightly.
Will Fluted Panels Interfere With Outlets, Switches, or Wall-Mounted TVS?
They won’t, unless you fit them without planning—done right, they’re effortless as a magician’s trick. You’ll manage Electrical interference by extending back boxes. For aesthetic considerations, you’ll recess TV brackets and notch panels precisely.
Conclusion
You’ve now got the New Deco formula: crisp fluting, confident arches, and calm colour. Keep your spacing precise, choose the right panel height, and let lighting rake across the grooves. UK renovators know detail pays—Houzz reports 47% of homeowners prioritise “improving design and aesthetics”, so you’re in good company. Don’t overcomplicate it: commit to one feature wall, align arch centres to flute runs, and you’ll land a modern, tailored finish.


