
On your first survey of your newly purchased Timber‑Framed Cottage, you may find a single rotten sill has pushed a stud 8–10 mm out of plumb, like one loose mortice peg shifting an entire frame. You start with a measured survey, moisture checks, and temporary propping, then plan minimal repairs around listed-building consent. You choose lime, oak, and hemp to keep the walls breathable, and you fix joints with pegs and scarf splices before you touch infill. But the first damp source isn’t where you think…
Key Takeaways
- Survey the frame for rot, beetle holes, moisture, and movement; photograph, label timbers, and prioritize active water ingress and structural defects.
- Stabilize first with propping and temporary weatherproofing; make the building weathertight by repairing roofs, gutters, and breathable walling.
- Repair timber traditionally using scarfed oak and pegged joints without glue, supporting loads before removing decayed wood.
- Rebuild infill with riven oak or chestnut laths and lime-based panels, leaving a 10–15mm slip joint to accommodate frame movement.
- Manage damp by keeping ground levels low, ensuring drainage falls away, maintaining rainwater goods, and keeping sub-floor ventilation and airbricks clear.
Survey and Triage a Timber‑Framed Cottage

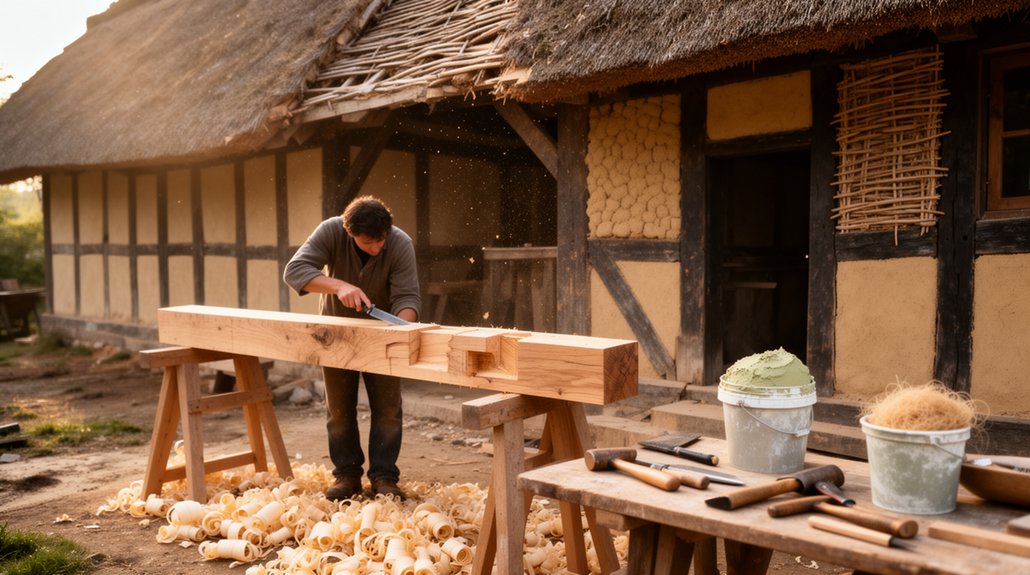
Before you touch a post or peel back a limewash, you should survey the cottage methodically and triage what’s urgent. Walk the perimeter, note ground levels, splashback zones, leaking gutters, and any cement pointing that traps moisture. Inside, map deflection, racking, and uneven floors; mark cracked infill panels and bulging daub. Probe suspect timbers with an awl: sound heartwood resists, while softened fibres indicate decay; record moisture content and beetle flight holes. Use a torch and mirror to inspect sole plates, jowl posts, and tie beams at bearings. Photograph every bay, label members, and sketch joints so you don’t lose evidence of original Craftsmanship techniques. Prioritise active water ingress and structural movement for Timber preservation.
Plan Repairs: Order of Work and Permissions
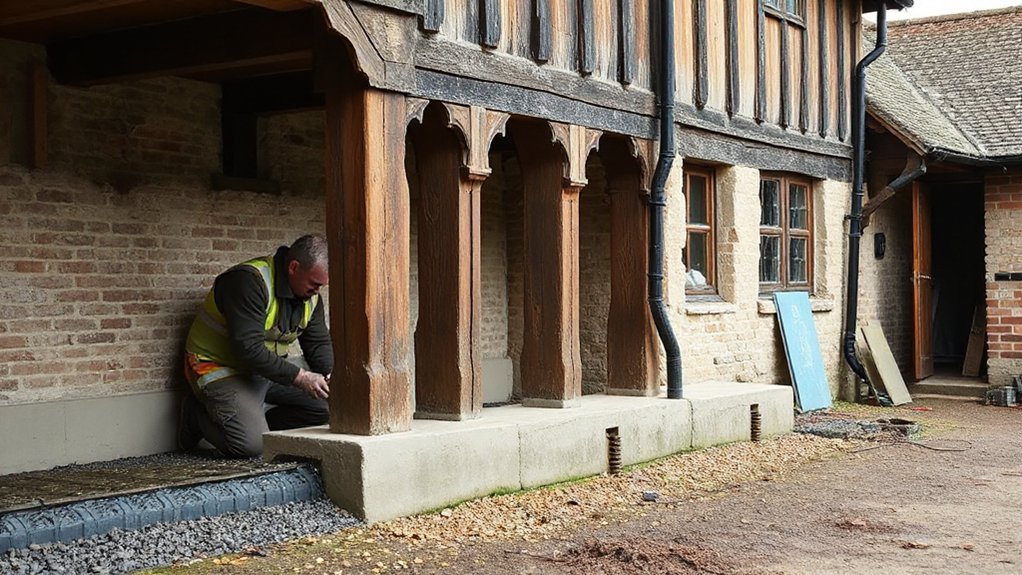
You’ll turn your survey findings into a prioritised schedule, separating urgent structural defects and moisture ingress from later fabric repairs. You’ll sequence works to keep the frame stable—temporary propping and making-safe first, then repairs from primary structure and weathering elements through to infill, services and finishes. If the cottage is listed or in a conservation area, you’ll confirm what needs Listed Building Consent (and any planning permission) with the local authority before you start.
Survey Findings And Priorities
Although the survey report can read like a long defects list, you should treat its findings as a prioritised repair programme that protects the timber frame first, then the envelope, and only then the finishes. You’ll tag defects by risk: active water ingress, structural movement, beetle activity, and cementitious trapping that drives decay. For Heritage conservation, you’ll record significance (original posts, braces, wattle-and-daub) and justify minimum intervention with reversible, breathable materials. Note which items need immediate temporary protection (tarpaulins, propping, rainwater goods clearance) versus monitored issues. Then map actions to consents: listed building consent for like-for-like scarfing, infill replacement, or window changes; building control for thermal upgrades and services. Specify Craftsmanship techniques: oak repairs with pegged joints, lime mortar, and riven laths, supported by method statements.
Sequence Repairs For Stability
Once you’ve set priorities from the survey, sequence the repairs so the structure can’t move or get wetter while work proceeds: start with immediate stabilisation (temporary propping, raking shores, and weatherproof sheeting), then make the building weathertight (clear/renew rainwater goods, repair flashings and roofing, reinstate breathable walling where missing), and only then open up for timber-frame repairs (scarf new oak into decayed posts and plates with pegged joints, consolidate joints, and reinstate infill in lime). Keep loads continuous: support beams before you cut out rot, and brace bays before removing infill. Use your timber assessment to mark keep/replace lines and to avoid over-cutting sound heartwood. Stage internal strip-out last, controlling ventilation to limit rapid drying and shrinkage. Record each intervention for historical accuracy, with measured sketches and photo logs.
Listed Building Permissions
Before you order oak, strip plaster, or open up bays, confirm what needs Listed Building Consent (and, where relevant, planning permission or Building Regulations) so your repair sequence doesn’t stall mid‑job. Start by checking the listing description and speaking early with the local authority conservation officer; you’ll need consent for alterations affecting character, not just “improvements”. Submit a measured survey, photos, and a method statement covering frame repairs, infill, lime plaster, joinery profiles, finishes, and like‑for‑like timber species. Flag any structural intervention (splicing, scarf joints, new sole plates) and explain why minimal intervention protects Architectural heritage. If you propose thermal upgrades, show vapour‑open build‑ups and moisture risk management. Keep records and agree inspection hold points to satisfy preservation regulations and discharge conditions efficiently.
Choose Breathable Materials (Lime, Oak, Hemp)
You’ll get the best long‑term performance from a timber‑framed cottage if you specify breathable materials that manage moisture rather than trap it. Use lime plaster to accommodate frame movement and vapour‑open drying, helping reduce interstitial condensation and decay risk in laths, studs, and infill. Pair green oak repairs with hemp‑lime (hempcrete) or hemp insulation so the whole wall build‑up stays capillary‑active and compatible with traditional UK timber framing.
Lime Plaster Benefits
Although gypsum and modern cement renders can look neat on day one, they often trap moisture in a timber‑framed cottage, so lime plaster is usually the better technical choice because it stays vapour‑permeable and lets the wall “breathe”. You reduce interstitial condensation around studs and laths, protecting Structural integrity by keeping timbers drier and limiting decay, beetle risk, and salt crystallisation. In UK conditions, lime’s capillary action buffers humidity swings, then releases moisture as temperatures rise. You also gain tolerance to minor movement: lime flexes and self‑heals microcracks through carbonation, so repairs stay local rather than wholesale. For aesthetic enhancement, you can float a softer, hand‑worked finish that suits historic elevations, takes limewash evenly, and avoids hard, shiny edges common with gypsum skim. It’s also readily patchable.
Oak And Hemp Pairing
When you pair green or seasoned oak with hemp‑lime infill and lime plaster, you keep the whole timber frame in the same vapour‑open, capillary‑active system that traditional UK cottages rely on. That oak pairing lets moisture migrate and buffer without trapping it against pegs, tenons, or sole plates, reducing soft‑rot risk.
- Detail a 10–15mm perimeter slip joint so oak movement doesn’t crack the hemp‑lime.
- Specify NHL2 or feebly hydraulic lime where exposure’s low; keep cement out.
- Add hemp reinforcement: stitch with hessian scrim at junctions and around openings.
- Finish with limewash for vapour permeability and easy future maintenance.
You’ll also limit thermal bridging at studs, improve airtightness, and retain repairability using UK‑available materials.
Repair Timber‑Frame Joints (Pegs, Scarfing)
Before you touch any decayed post or leaning bay, assess the timber‑frame joints, because failed pegs and weakened scarf joints often drive the movement rather than the members themselves. Map each joint, mark witness lines, and check drawbore offset, peg diameter, and crush around mortices. If a peg joint has loosened, you’ll bore out to clean sound timber, then fit a new riven oak peg, slightly oversize, with the offset re‑established to pull the tenon home. Avoid glue; rely on mechanical lock and seasoning. For scarf repairs, prop and unload the bay, cut back to sound fibres, and replicate the original scarfing technique—typically a stop‑splayed, tabled scarf with under‑squinted abutments. Use matching oak, tight housing, and concealed oak trenails, then recheck plumb and racking.
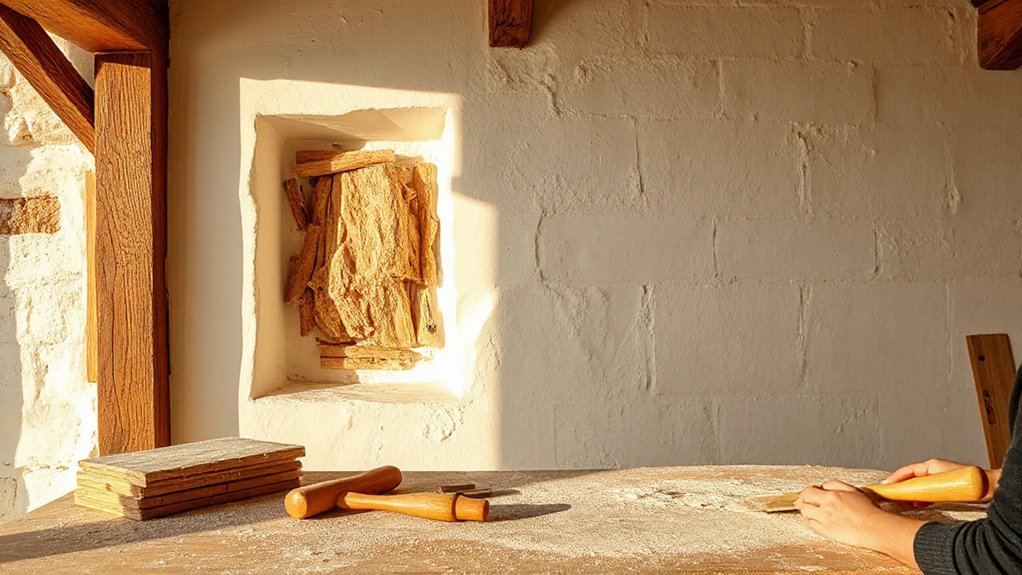
Rebuild Infill Panels With Lath and Lime
With the frame joints pulled tight and the bay sitting true, you can rebuild the infill panels so they brace the structure without trapping moisture. Rake out loose daub to sound edges, then check studs and rails are clean and free of salts. Use riven oak or chestnut laths; avoid sawn softwood that twists. For Lath installation, fix with stainless ring‑shank nails or cleft pegs, leaving 8–10mm gaps, and keep ends clear of posts to prevent splitting.
- Offer up laths, crown out, and stagger joints.
- Apply a haired base coat Lime infill, well pushed through.
- Scratch-key, then add a second coat to flush.
- Finish with a fine lime putty skim, ruled and trowelled tight.
Stop Damp: Drainage, Gutters, Ventilation
Although a timber‑framed cottage can tolerate occasional wetting, it won’t cope if you let water sit at the base of the frame or drive it into the panels, so start your damp strategy outside: sort the drainage falls, keep rainwater goods sound, and maintain steady ventilation to let the structure dry. Aim for 1:60 falls away from walls, clear French drains, and keep ground levels 150mm below sole plates; these Drainage improvements reduce splashback and capillary rise. Fix leaking joints, ensure downpipes discharge to gullies or soakaways, and add leaf guards where trees overhang. Schedule gutter maintenance twice yearly, checking for sagging brackets and blocked outlets. Inside, don’t seal the frame: keep airbricks open, free up sub‑floor voids, and avoid wet‑trapping insulation.
Finish With Limewash and Traditional Oils
Once the structure’s dry and sound, finish it with breathable coatings that suit historic fabric: limewash for masonry infill and traditional oils for external joinery, rather than modern film‑forming paints that can trap moisture and drive decay. You’ll keep vapour permeability, improve salt tolerance, and preserve Historical authenticity while choosing Eco friendly finishes suited to UK weathering.
- Brush on 3–5 coats of limewash over dampened lime plaster; keep edges wet, avoid frost, and protect for 48 hours.
- Add tallow or casein only where exposure demands; don’t seal with acrylics.
- Oil oak or softwood with raw linseed or tung‑based blends; work into end grain and wipe off surplus.
- Recoat seasonally, monitor blackening or algae, and adjust detailing to shed water effectively.
Frequently Asked Questions
How Do I Estimate Total Restoration Costs Before Starting Work?
You estimate total restoration costs by commissioning a UK RICS building survey, itemising labour/materials, and applying Cost estimation rates. You’ll set budgeting strategies: contingency 15–25%, VAT allowances, planning/listed‑consent fees, and staged cashflow.
Will My Home Insurance Cover a Timber‑Frame Restoration Project?
Usually yes, but only if you notify your insurer upfront—like a blueprint guiding risk. Check Insurance coverage for structural works, review Policy exclusions for subsidence/rot, confirm listed-building endorsements, and get written approval under UK conditions.
How Long Will the Cottage Be Uninhabitable During Restoration?
You’ll likely face 6–20 weeks uninhabitable, depending on structural scope, drying times, and approvals. Historic preservation surveys and listed‑building consent can extend it. Craftsmanship techniques, like lime plastering and oak repairs, slow schedules.
How Can I Find Qualified Traditional Craftspeople Near Me?
You’ll find qualified traditional craftspeople by contacting Local craft associations and checking artisan directories, then verifying UK accreditations (SPAB, IHBC, FMB Heritage), requesting references, inspecting similar projects, and confirming insurance plus conservation-grade method statements.
What Ongoing Maintenance Schedule Keeps a Timber‑Framed Cottage Healthy?
70% of decay follows trapped moisture, so you’ll inspect monthly and after storms. You’ll clear gutters quarterly, check ventilation, and log damp readings. You’ll schedule annual timber preservation checks, plus five‑yearly limewash/paint maintenance and repointing.
Conclusion
Step back and you’ll see the cottage breathe again: oak uprights tight on new pegs, scarfed splices neat as a joiner’s pencil line. Lime‑lath panels sit flush, chalk‑pale and vapour‑open, while hemp and lime knit warmth behind the frame. You’ve chased damp from the doorstep with falls, sound gutters, and steady cross‑ventilation. Finish with thin limewash coats and traditional oils, and you’ll leave a dry, honest shell that’ll weather UK seasons.


