
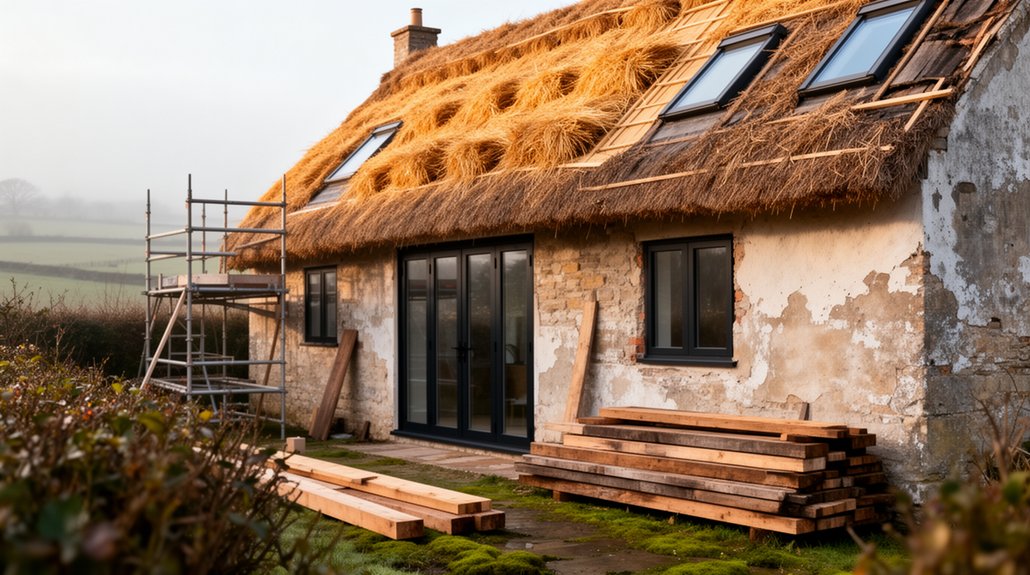
You’re not just fixing a cottage; you’re negotiating with time. You start with a full survey of the thatch, chimney, and primary timbers, then you rank repairs by risk: water first, structure next, services last. You plan permissions early so you don’t undo compliant work later. You keep materials breathable, upgrades discreet, and details sharp enough to feel original. Next, you’ll decide where to intervene—and where to leave well alone…
Key Takeaways
- Commission a specialist thatch-and-timber survey to document defects, moisture risks, service routes, and priorities before designing upgrades.
- Stabilize the roof first: repair ridge, valleys, fixings, flashings, and vulnerable junctions to stop wind uplift and water ingress.
- Manage damp by improving drainage, lowering ground levels, clearing ventilation paths, and replacing cement renders with breathable lime finishes.
- Add vapour-open insulation and controlled ventilation, detailing eaves and reveals to prevent condensation while improving comfort and energy use.
- Secure planning or listed-building consents early with heritage and method statements, keeping interventions like-for-like where possible.
Start With a Full Thatched Cottage Survey
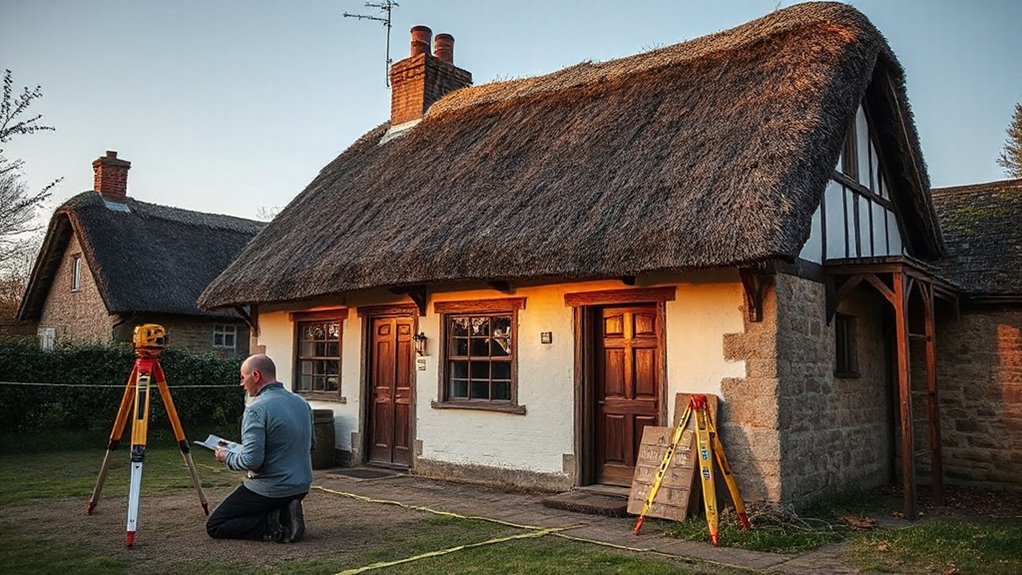
Before you price materials or sketch layout changes, commission a full thatched cottage survey to establish exactly what you’re working with. You’ll need a specialist who understands thatch depth, ridge condition, fixings, fire barriers, and ventilation, plus how moisture moves through lime, timber, and earth floors. Insist on clear photos, measured notes, and a risk map that flags rot, beetle activity, movement, chimney defects, and outdated electrics without jumping to solutions. This evidence anchors Historic preservation, so you protect original fabric and avoid over‑specifying replacements. It also frames Modern adaptations: you can test headroom, daylight potential, insulation options, and service routes while staying within breathable construction. Ask for priorities, budget ranges, and planning constraints so your design decisions stay disciplined.
Prioritize Repairs: What to Fix First
Start at the top: you’ll repair the roof and ridge first, because they control water, wind uplift, and the cottage’s overall silhouette. Next, you’ll stabilize any compromised structural timbers so openings stay true and new finishes don’t crack or shift. Then you’ll resolve damp and drainage—fix gutters, ground levels, and ventilation—so every design upgrade lasts.
Address Roof And Ridge
Even if the cottage looks sound from the lane, the roof and ridge decide how quickly moisture gets in and how much damage follows, so you should prioritise repairs there first. Start with a close survey: look for thin thatch, slumps, open fixings, and soft spots around chimneys, valleys, and dormers where water tracks. Specify Roof reinforcement only where the coat has lost its bind—targeted re-fixing and netting beats wholesale re-thatching and preserves the cottage’s profile. Then plan Ridge restoration: a failed ridge is a wick, so renew it early with tight, well-patterned work that sheds water and sharpens the silhouette. Insist on clean drip lines, correct eaves thickness, and discreet fire barriers to protect both fabric and finish.
Stabilize Structural Timber
Once you’ve secured the roofline, turn to the structural timbers, because they dictate whether the cottage stays square while you repair everything else. Start with a survey: check sills, posts, tie beams, and lintels for deflection, insect galleries, and failed joints. Mark movement, then shore loads with adjustable props and spreader plates before you disturb any finishes.
Replace only what you must; keep character by scarfing in matching species and grain, pegged or bolted to traditional patterns. Specify timber preservation early: clean back to sound fibers, consolidate where appropriate, and apply targeted wood treatment to vulnerable end grain and concealed faces. Finish with breathable detailing—recessed steel where needed, hidden packing, and crisp junctions that protect the frame and support later upgrades.
Resolve Damp And Drainage
With the frame shored and holding its geometry, tackle damp and drainage next, because persistent moisture will undo timber repairs and contaminate interior finishes. Start with Moisture analysis: map tide marks, salts, and timber readings; check gutters, thatch drips, downpipes, and ground levels bridging the plinth. Clear air paths—open blocked vents, reinstate breathable lime finishes, and remove cement renders that trap water.
Then set Drainage solutions that respect the cottage: regrade falls away from walls, add French drains with clean gravel and geotextile, and connect downpipes to soakaways set well clear of foundations. Keep internal floors breathable; avoid membranes unless you’ve proven groundwater pressure. Once you’ve stabilized moisture, you can specify insulation and joinery confidently.
Sort Planning Permission and Listed Consent
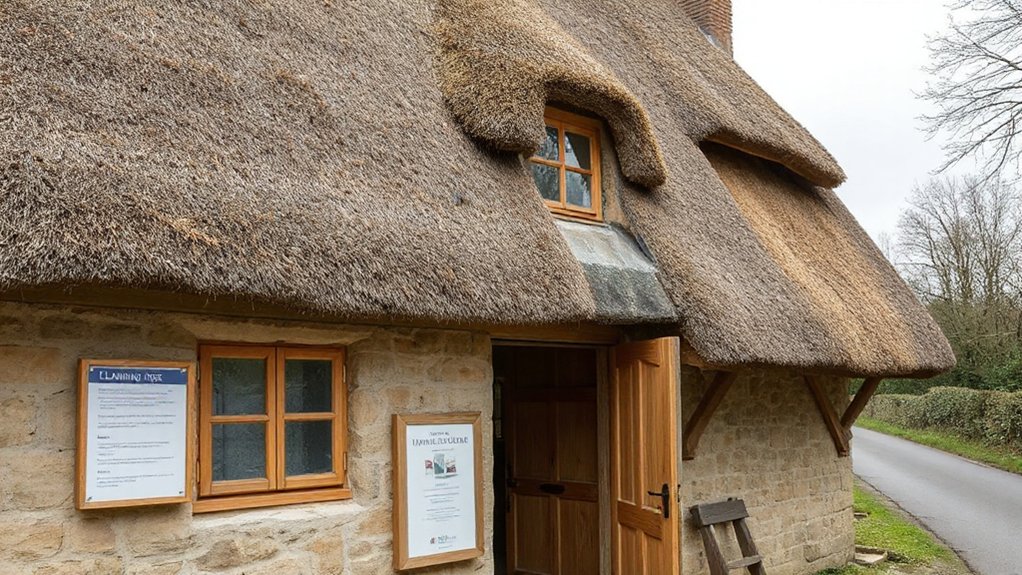
Before you sketch solutions, you’ll confirm exactly which works need planning permission, listed building consent, or both, so your design stays compliant from day one. You’ll coordinate early with the local planning authority and conservation officer to align materials, details, and sequencing with their expectations. Then you’ll submit a tight application pack—measured drawings, heritage statement, method statements, and specs—that makes your case clearly and speeds decisions.
Understand Consent Requirements
Although thatch repairs can feel like straightforward maintenance, you’ll need to sort consent early so the design you choose doesn’t stall at the last hurdle. Start by checking whether works count as like-for-like repair or material change: new ridge profile, altered pitch, rooflights, chimneys, or insulation upgrades can trigger planning permission and, if listed, Listed Building Consent. Treat interiors similarly—moving partitions, exposing beams, or replacing windows often needs consent because it affects historic fabric. If you’re not the freeholder, confirm tenant rights and any lease limits before you commission drawings. Assemble legal documentation now: title, listings, prior approvals, and a brief explaining the traditional details you’ll keep and the modern performance you’ll add. That clarity protects the design intent.
Coordinate With Local Authorities
Once you’ve pinned down what changes you’re proposing, book an early conversation with the planning officer and conservation officer so you can shape the design around what they’ll actually support. Walk them through your priorities—thermal comfort, discreet services, safer access—then ask what triggers planning permission and what needs listed building consent. Use their feedback to steer massing, openings, materials, and detailing toward Historic preservation, not cosmetic pastiche.
Request a site visit if the cottage’s setting, thatch condition, or boundary treatments influence visibility. Confirm constraints from highways, drainage, ecology, and fire guidance, and agree how they’ll be consulted. Keep neighbours in the loop: simple Community engagement often reduces objections and helps officers back a balanced, design-led upgrade. Record decisions and next steps in writing.
Prepare Strong Application Documents
Planning and conservation officers can only support what they can clearly assess, so turn your early discussions into a tight, evidence-led application pack that separates planning permission from listed building consent. You’ll frame change as repair-led design: conserve the thatch, improve performance, and protect setting.
- Submit drawings that distinguish external works (roof, chimneys, Garden landscaping, access) for planning, from fabric interventions (rafters, lime plaster, joinery) for listed consent.
- Add a heritage statement with photos, significance grading, and a method statement showing reversible fixes and matching materials.
- Provide a schedule of finishes covering Interior decoration, lighting, and services routes, proving you won’t harm historic surfaces.
Cross-reference every sheet, keep labels consistent, and pre-empt conditions with clear phasing notes.
Stabilize Structure: Frame, Floors, and Foundations
Before you repair plaster or think about a new kitchen, you’ve got to make the cottage stand true: stabilize the frame, floors, and foundations so every later detail lasts. Start with a measured survey: plumb the walls, map settlement cracks, and confirm load paths through posts, beams, and joists. For Historical restoration, you’ll document what’s original and why it matters; for Material preservation, you’ll keep sound timber, limecrete, and stone in place and repair like-for-like. Lift sagging floors with discreet jacking, then sister or scarf-repair joists rather than replacing whole runs. Improve subfloor ventilation, manage damp with perimeter drainage and breathable materials, and repoint masonry with lime. Finally, add hidden steel only where the design demands it.
Repair the Thatch: Roof, Ridge, and Details
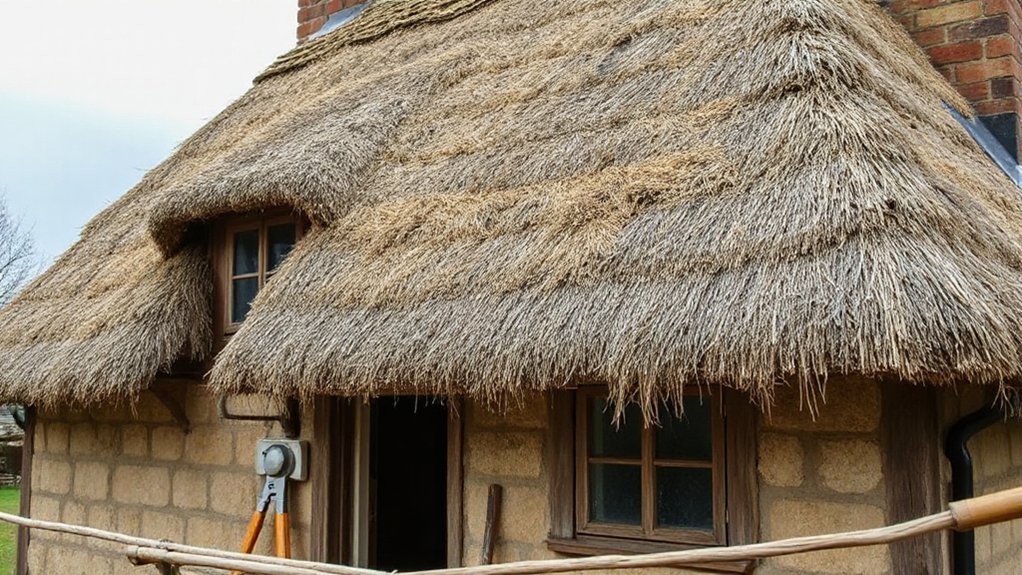
Start by evaluating the thatch condition—check depth, tightness, and any bald patches so you can target repairs without changing the roof’s silhouette. Repair the ridge and valleys next, keeping the lines crisp and the pitch true while you replace worn material and re-pin securely. Finish by securing flashings and eaves, because tight junctions and clean drip edges stop water ingress and protect the details you can’t afford to lose.
Assess Thatch Condition
How do you know whether your thatch needs a full recoat or just targeted repairs? You start with a calm, design-led inspection that treats the roof as your cottage’s defining texture, not a disposable skin. Check pitch lines, surface tightness, and how cleanly water sheds after rain; sagging or a “spongy” feel signals deeper decay in the Thatch materials.
Focus your assessment on three signals:
- Surface wear: bare fixings, broken spars, and widespread thinning that exposes underlayers.
- Moisture behavior: slow drying, dark streaking, algae mats, or persistent damp at eaves and around penetrations.
- Wildlife intrusion: pecked holes, pulled straw, droppings, or nesting voids that create drafts and localized rot.
Document findings, then brief a master thatcher with photos and measurements.
Repair Ridge And Valleys
Even if the main coat still sheds water cleanly, the ridge and valleys usually fail first because they take the hardest weather and concentrate runoff. Start by checking for open fixings, thin spots, and bird-pecked channels that telegraph damp into the coat below. Plan ridge repair as a crisp, design-defining line: strip the failed top, tighten the ridge spars, then relaunch fresh straw in a compact, well-dressed profile that matches the cottage’s proportions. For valley restoration, you’ll re-cut the valley line, remove soft material, and rebuild with dense, neatly packed thatch so water sheds without pooling. Keep shoulders generous, rake the surface to close pores, and comb edges clean for durable, legible geometry.
Secure Flashings And Eaves
Because water always hunts the easiest route, you need flashings and eaves to read as intentional, continuous lines that throw runoff clear of the coat. On a Historic roof, every junction is a design decision: you’re shaping drip paths, not hiding patches. Specify lead or stainless where appropriate, dress it tight to masonry, and stop capillary creep with clean laps and fixings that won’t telegraph through the thatch.
- Set flashings to a constant chase depth, then wedge and seal so wind can’t lift edges.
- Keep eaves crisp: trim the skirt, clear gutters, and maintain a sharp drip line for reliable Eaves maintenance.
- Protect vulnerable details—chimney abutments, dormer cheeks, and verge returns—with saddles and soakers sized to local rainfall.
Make Chimneys Safer: Liners and Spark Arrestors
While a roaring fire suits a thatched cottage, you’ve got to control what travels up the flue and what can escape at the top. Start with a properly sized liner—stainless for most upgrades, pumice or ceramic for heavy-use hearths—so fumes draft cleanly and creosote can’t cling to rough brick. Specify insulation and the correct termination to meet local code, then book annual Chimney maintenance to keep joints tight and deposits low.Finish with a spark arrestor and bird-guard cap that matches the roofline: fine stainless mesh, solid rain skirt, and a profile that won’t look bolted-on. You’ll cut ember throw, keep rain out, and raise Fire safety without compromising the cottage’s silhouette.
Improve Insulation Without Trapping Moisture
If you insulate a thatched cottage like a modern airtight box, you’ll drive moisture into the fabric and invite rot, mould, and cold spots. You need thermal barriers that respect traditional breathability, and moisture barriers that manage liquid water without sealing vapour into walls and roofs. Aim for continuous, gentle performance rather than extreme airtightness.
- Choose vapour-open insulation like wood fibre, hemp-lime, or sheep’s wool, and fit it tightly to avoid convection gaps.
- Pair it with a smart membrane or capillary-active layer so moisture barriers adapt seasonally, staying dry to the touch.
- Detail junctions: insulate reveals, eaves, and skirting lines, and use lime plaster finishes to keep the surface warm and resilient.
You’ll cut heat loss while keeping timbers, masonry, and thatch safe.
Add Ventilation That Prevents Condensation and Mold
Breathable insulation keeps moisture moving safely through a thatched cottage, but you still need controlled ventilation to clear the water vapour you generate every day from cooking, bathing, and drying clothes. Start with source extraction: fit quiet, humidistat-controlled fans to kitchen and bathrooms, and vent them outdoors, not into the roof void. Balance that with background airflow using discreet trickle vents and, where possible, a small whole-house system tuned for low air speeds. Keep pathways clear: don’t block eaves, maintain chimney ventilation, and allow air to circulate behind wardrobes and headboards. Use simple monitoring—humidity and temperature sensors—to spot risk periods and adjust your Ventilation strategies. You’ll cut condensation at cold bridges and support dependable mold prevention.
Use Breathable Lime Plaster and Paint Systems
Because a thatched cottage manages moisture by letting it move and evaporate, you should finish walls and ceilings with lime plaster and vapour-open paints rather than gypsum and vinyl emulsions. Lime buffers humidity, resists salt blistering, and keeps timber and thatch ends drier, supporting Historical preservation without trapping damp. Design it for a Modern interior by using crisp arrises, shallow reveals, and a soft, light-reflective finish.
- Specify haired lime base coats and fine lime putty skim on lath or masonry; let each coat carbonate fully.
- Detail junctions with flexible mesh and gentle movement gaps to prevent cracking around beams.
- Paint with limewash, casein distemper, or silicate mineral paint in layered tones for depth and repairability.
Choose Conservation-Style Glazing and Draught Fixes
While you upgrade comfort and energy performance, you’ll protect a thatched cottage’s character by choosing conservation-style glazing and targeted draught fixes instead of heavy-handed window replacements. Specify slim-profile conservation glazing that matches historic sightlines, with putty-fronted timber sections and period-accurate bars. If you keep original casements, refurbish them: splice-in rotten rails, reset loose panes, and upgrade ironmongery so windows shut square. Add discreet brush seals to meeting stiles and compressible gaskets to frames; that draught sealing cuts rattles and cold edges without trapping moisture. Fit secondary glazing on the room side where permitted, using low-iron glass and minimal frames. Detail vents carefully, and keep reveals breathable so the cottage stays dry and elegant.
Add Heating Upgrades That Suit Old Cottages
Even if you’ve tightened up glazing and draughts, you’ll get the best results by choosing heating upgrades that work with an old cottage’s low, steady heat demand rather than fighting it with high-flow blasts. Aim for gentle, even warmth that protects timbers, plaster, and thatch, while delivering Modern comfort without losing Historic charm.
- Choose low-temperature heat emitters: slimline radiators or underfloor heating in suitable floors, run cooler for consistent comfort.
- Add smart zoning: heat occupied rooms first, keep bedrooms cooler, and avoid overheating thick-walled spaces.
- Prioritise controllable heat sources: a high-efficiency boiler or heat pump paired with weather compensation, so the system tracks outdoor changes smoothly.
You’ll cut peaks, reduce running costs, and keep the cottage’s ambience intact year-round.
Run Electrics and Plumbing Discreetly, Then Maintain
Once your heating runs smoothly, you’ll get the cleanest result by routing electrics and plumbing so they disappear into the building’s fabric without cutting away historic character. Plan Electrical wiring routes through existing voids: behind skirtings, within floor zones, and along chimney breasts where linings already change. Use surface-mounted heritage conduit only where concealment would mean loss. For plumbing upgrades, keep new runs short and accessible; cluster wet rooms back-to-back and stack services in one discreet cupboard. Specify isolation valves and accessible junction boxes so you won’t open walls later. Protect thatch by keeping penetrations minimal, sleeved, and sealed, and site extract ducts away from rafters. Then maintain: label circuits, photograph runs, test annually, and fix minor leaks or loose fittings before they stain lime plaster.
Frequently Asked Questions
How Do I Budget Realistically for a Full Thatched Cottage Renovation?
You budget realistically by surveying structure and thatch, pricing specialists, and adding 20–30% contingency. Prioritize Historical preservation, then phase upgrades for a Modern interior. Get fixed-scope quotes, track cashflow monthly, and stage inspections.
How Long Will the Renovation Take From Start to Finish?
You should plan on 6–12 months start to finish, but complex Historic preservation can push it to 18. You’ll keep momentum by locking designs early, sequencing trades tightly, and scheduling Garden landscaping last.
Can I Live in the Cottage During Restoration, or Must I Move Out?
You can’t usually live there; you’ll likely move out. Like scaffolding around a nest, restoration disrupts Cottage traditions. You’ll regain Modern amenities faster by vacating, ensuring safer phasing, cleaner detailing, tighter finishes.
How Do I Find Qualified Thatchers and Conservation‑Experienced Tradespeople?
Start by contacting the National Society of Master Thatchers and your local conservation officer. You’ll shortlist vetted crews with Traditional craftsmanship and Historic preservation portfolios. Check references, visit past roofs, and demand method statements, warranties, insurance.
Will Restoring a Thatched Cottage Increase Resale Value and Insurability?
Yes, you’ll likely boost resale value and insurability if you restore properly. You’ll document historic preservation, specify eco friendly materials, and upgrade fire barriers. You’ll also secure specialist surveys and insurers to price risk.
Conclusion
Treat your thatched cottage like it’s survived a century-long storm—because it has. Start with a rigorous survey, then tackle structure, chimney, and moisture paths before you touch the “pretty” bits. Get consents locked in, repair the thatch with craft, and keep every layer breathable with lime. Upgrade glazing, draught-proof hard, and add low-impact heating. Hide services intelligently. Maintain relentlessly, and you won’t just save it—you’ll make it feel impossibly warm, calm, and current.


