
You can’t begin restoring a Victorian town house well until you decide what “done” looks like, then match every choice to that goal. You start with a proper survey that flags structure, moisture, and roof or façade failures, then you rank defects by risk and cost and set a budget with a hard contingency. You also check listing or conservation rules before touching original windows, joinery, services, or insulation—because one wrong upgrade can trap damp and trigger bigger repairs…
Key Takeaways
- Define restoration goals, modern comfort priorities, and non-negotiable original features before designing layouts, services, or finishes.
- Commission a Victorian-experienced survey with intrusive checks for roof, chimneys, subfloor ventilation, moisture patterns, and fabric condition.
- Confirm planning, heritage, and party-wall requirements early, and document original details to guide repair, replication, and approvals.
- Diagnose structural movement with crack mapping and monitoring, then fix causes like drainage, timber decay, failed ties, or roof spread.
- Manage damp by identifying ingress, rising damp, or condensation, then prioritize roof, gutters, flashing, and breathable lime-based repairs.
Define Your End Goal (Restore, Renovate, or Both)
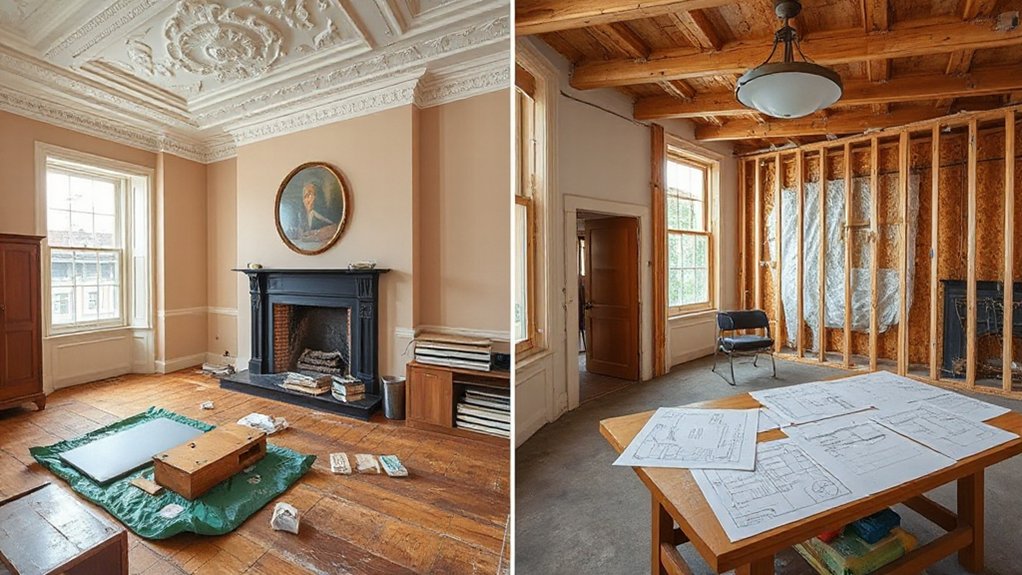
Before you pick up a pry bar or call a contractor, decide exactly what “success” looks like for your Victorian town house: a true restoration that returns original details and layouts, a renovation that adapts the home to modern living, or a deliberate blend of both. List the elements you won’t compromise on—stair balusters, plaster cornices, encaustic tile, original doors—and rank them by Historical significance. Then name the comfort outcomes you need, such as better insulation, safer wiring, added storage, or an updated kitchen workflow, and label these Modern adaptations. Set nonnegotiables for proportions and sightlines so new work doesn’t fight the period shell. Finally, set your tolerance for change: will you reconfigure rooms, or keep circulation intact and upgrade services discreetly?
Get a Victorian Townhouse Survey (What to Ask For)
Even if the house looks solid at a glance, you need a survey that treats a Victorian townhouse as a complex, moving system—not a generic property checkbox. Hire a surveyor experienced in Victorian architecture and conservation work, and ask for an intrusive-minded inspection where access allows, plus clear photos and annotated plans. Request commentary on roof coverings, chimneys, parapets, rainwater goods, and subfloor ventilation, because moisture drives many hidden issues. Ask them to trace damp sources, distinguish condensation from ingress, and use moisture profiling rather than guesswork. Insist on a fabric-first assessment: brick, lime mortar, stone, timber joinery, and original sash performance. Confirm historical significance, likely alterations, and any heritage constraints. Ask for maintenance priorities and monitoring advice.
List Defects and Rank Them by Risk and Cost
Now you’ll list the usual Victorian trouble spots—damp from failed gutters, timber rot, roof leaks, movement cracks, outdated wiring, and tired plumbing—so nothing serious hides behind cosmetic fixes. Rank each defect by risk first (immediate safety and active water ingress at the top, then structural stability, then energy and comfort, and finally finishes) so you know what must be tackled before you move in. Assign rough cost bands—low for minor repairs, medium for partial renewals, high for major structural or full-system replacements—so you can set priorities and keep the budget realistic.
Identify Common Victorian Defects
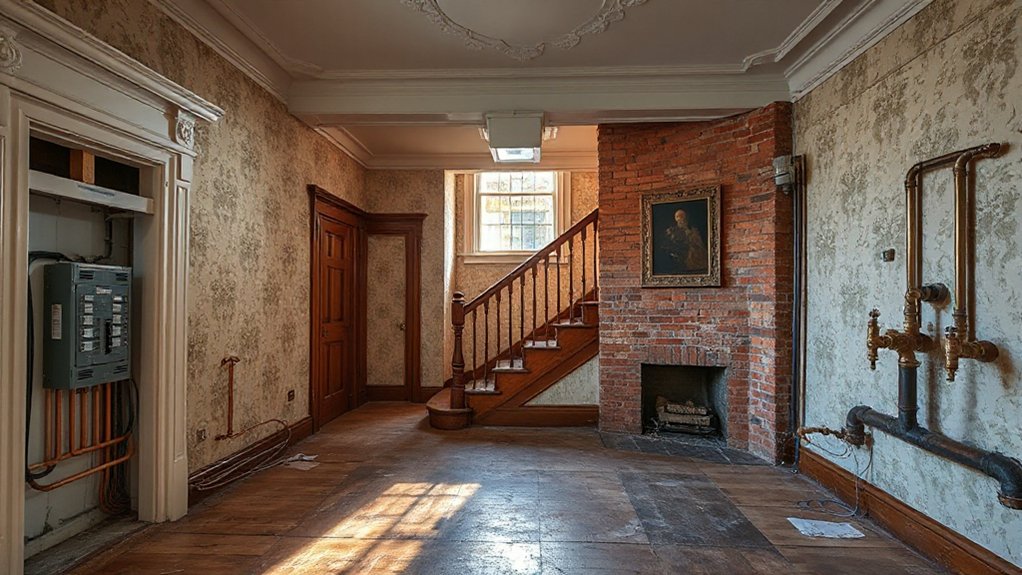
Because Victorian houses were built with solid walls, suspended timber floors, and breathable lime-based materials, the defects you’re most likely to face tend to cluster around water ingress, timber decay, and movement—and they don’t all carry the same urgency or price tag. Start by spotting damp drivers: failed gutters, cracked rainwater goods, bridged DPCs, cement pointing, and blocked air bricks that trap moisture in walls and floors. Check for rotten joist ends, woodworm, fungal growth, and sagging floorboards around chimney breasts and bay windows. Look for structural clues: stepped cracking, bulging brickwork, loose lintels, and leaning stacks from settlement or corroded ties. Inspect services too: perished lead, outdated electrics, and undersized drainage. Finally, assess Victorian ornamentation—damaged cornices, plasterwork, and joinery—so you can repair with historical accuracy.
Rank Defects By Risk
Once you’ve spotted the usual Victorian trouble spots—damp drivers, timber decay, movement, tired services, and damaged detailing—you need to rank them so you tackle safety and fabric protection first, then prevent ongoing moisture damage, and only then spend on finishes. Put immediate hazards at the top: unsafe electrics, gas leaks, failing flues, unstable chimneys, loose slates, and rotten floor joists. Next, address Foundation concerns and structural movement: stepped cracking, bulging walls, spread roof timbers, and failing lintels. Third, stop water ingress and trapped moisture: blocked gutters, failed flashings, bridged DPCs, cement renders, and poor subfloor ventilation. Then treat timber decay and beetle attack once sources are fixed. Finally, handle historic preservation details—sash repairs, plaster, joinery, and decoration—after the building’s dry and stable.
Estimate Repair Cost Bands
After you’ve ranked defects by risk, you’ll get far better control of the project by assigning each item a simple cost band alongside its urgency, so you can see what must happen immediately, what needs budgeting this year, and what can wait. Use three bands: Low (DIY or under £500), Medium (£500–£5,000), High (over £5,000 or specialist). Attach each defect to a band using real quotes for structural, roof, damp, electrics, and joinery. Split combined problems: a leaking gutter might be Low, but rotten joist ends beneath can be High. Note dependencies: rewiring before replastering; drainage before landscaping. Protect Historic charm by specifying like-for-like materials. Test Interior layout changes against cost bands early, because moving walls often escalates quickly.
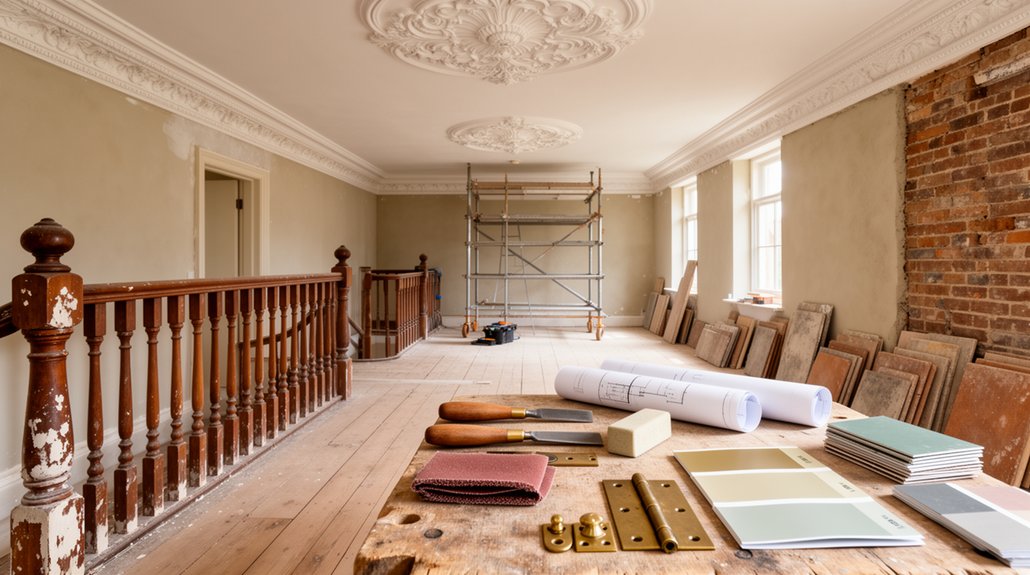
Set a Budget + 15–25% Contingency
A clear, itemised budget keeps your Victorian townhouse restoration under control, so don’t start work until you’ve priced every major scope—structure, roof, damp, electrics, plumbing, heating, windows, plaster, joinery, and finishes—and written those numbers down. Build your budget from quotations, not guesses: include labour, access, skips, scaffolding, surveys, and making-good. Then add a 15–25% contingency to cover hidden rot, failed lintels, obsolete wiring routes, and damp behind finishes that only appear once you open up. Ring-fence it; don’t spend it on upgrades. If you’re aiming for Historical accuracy, cost authentic profiles, hardware, and traditional mixes early, because Material sourcing lead times can force expensive substitutions. Track spend weekly against line items and reprice any scope you change immediately.
Check Planning, Listing, and Conservation Constraints
Before you strip out original joinery or swap sash windows, confirm exactly what planning rules apply to your Victorian townhouse and get them in writing. Check whether it’s listed, within a conservation area, or subject to Historic zoning overlays, then request the official designation maps and any area appraisals. Call the planning office and ask for pre-application advice in writing so you can verify what needs consent.
Next, identify which approvals your scope triggers: planning permission, listed building consent, advertisement consent, and party wall notices. Ask what drawings, heritage statements, and method statements they’ll expect, and how long determinations take. Don’t rely on a contractor’s opinion—trace requirements to written policy and secure legal permits before ordering materials or booking trades.
Decide What Original Features to Keep and Repair
Once you’ve confirmed what you’re legally allowed to change, walk the house room by room and decide which original elements you’ll keep, repair, or replicate—because that decision drives your budget, your programme, and the quality of the finished restoration. List priorities: stair balusters, cornices, skirting, fireplaces, sash windows, doors, and floorboards. Photograph details, note profiles, and record hardware patterns so you can match missing parts with Historical accuracy. Test what’s salvageable: strip paint carefully, splice rotten timber, re-pin loose plaster, and refurbish ironmongery instead of replacing it. Where replacement’s unavoidable, specify like-for-like Material choices: slow-grown softwood, lime plaster, slate, encaustic tiles, and period glass. Keep patina where it reads as age, not neglect, and document every decision.
Stabilise Structural Movement Before Cosmetic Work
Before you replaster or redecorate, you need to diagnose any movement and its causes—look for stepped cracking, sloping floors, sticking doors, and check drainage, leaking pipes, and nearby ground changes. You’ll then plan structural remediation that matches the fault, whether that’s stitching and tying walls, repairing or replacing rotten lintels and joist ends, improving subfloor ventilation, or underpinning where necessary. Once the work’s done, you can’t rely on guesswork—monitor and verify stability with dated crack gauges, level checks, and follow-up inspections before you commit to cosmetic finishes.
Diagnose Movement And Causes
Although it’s tempting to jump straight into replastering and redecorating, you’ll save time and money by diagnosing any movement first and pinning down its cause. Start by mapping cracks, noting width, direction, and whether they taper; photograph and date each area, and check doors, skirtings, and cornices for fresh distortion. Keep historical accuracy in mind: Victorian materials move differently, and earlier alterations to the interior layout often trigger stress.
- Use crack gauges or tell-tales to confirm active movement over weeks
- Check guttering, downpipes, and ground levels for saturation and washout
- Inspect subfloor ventilation and timber bearings for rot and settlement
- Look for roof spread, failed ties, and chimney lean or bulging brickwork
- Compare findings room-to-room to separate local defects from global movement
Plan Structural Remediation
Your crack map and moisture checks tell you what’s moving and why, so use that evidence to plan remediation that stops the cause rather than masking the symptom. If shallow foundations are washing out, prioritise drainage: repair gutters, add gullies, regrade soil, and fix leaking services before you touch plaster. Where masonry has spread, specify discreet tying, localised rebuilding, or lintel renewal, choosing details that preserve Historical accuracy. For bulging walls, consider stitching with stainless helical bars and compatible lime grout, not hard cement that drives new cracking. If timbers have deflected, replace failed ends with scarf repairs and treat the moisture source, keeping Material authenticity with matching species and traditional fixings. Sequence work so structural fixes happen first, then gentle re-leveling and making good.
Monitor And Verify Stability
Once you’ve completed the structural fixes, set up a simple monitoring regime so you can prove the building has actually settled and you’re not just pausing the damage. You’ll only proceed with plaster, joinery, and finishes when the data shows movement has stopped or slowed to an acceptable rate, seasonally adjusted.
- Install crack gauges across key fractures and photograph them monthly with a scale.
- Level-check floors and window heads using a laser and fixed reference points.
- Schedule a Foundation inspection to confirm underpinning, pads, and drainage remain sound.
- Record rainfall, nearby tree works, and groundwater changes to interpret Soil stability.
- Recheck services: leaking drains and gutters often restart settlement.
Keep logs for 6–12 months, then ask your engineer to sign off before redecorating.
Diagnose Damp Properly (Don’t Just “Tank” It)
Before you reach for “tanking” slurry or a chemical DPC, you need to pin down exactly where the moisture’s coming from, because Victorian walls often handle water very differently to modern cavity construction. Start with symptoms: tidemarks, salt blooms, mould, rotten skirtings, musty odours. Check if moisture rises evenly from the floor (possible rising damp) or appears as isolated patches (often leaks or cold-bridge condensation). Use a carbide meter or salt analysis; cheap resistance meters misread salts as “wet.” Test Indoor humidity with a data logger; high RH plus cold surfaces points to condensation, not failed masonry. Review internal finishes: cement render, vinyl paint, and non-breathable Moisture barriers can trap moisture in solid walls. Open up small inspection areas, then specify breathable repairs, not blanket “tanking.”
Stop Water Fast: Roof, Chimneys, Gutters, Flashing
Start at the top: inspect the roof coverings for slipped slates, failed nails, cracked ridges, and open joints that let water in fast. Repoint chimneys and parapets with an appropriate lime mortar, and renew any loose pots, haunching, or defective lead so rain can’t track down the stack. Then clear and test gutters and downpipes, and check all flashing for splits, pinholes, or lifted edges—fixing these first stops most internal damp at the source.
Inspect Roof Coverings
Because a Victorian town house sheds water through layers that are often original, patched, and fragile, you’ve got to inspect the roof coverings first and treat any defect as urgent. Start with a disciplined roof inspection from ground, ladder, and loft, noting daylight, staining, and wind-lifted edges. Confirm covering materials match the pitch and exposure, and don’t let “good enough” repairs trap moisture beneath.
- Check slipped, cracked, or spalled slates/tiles and nail fatigue at the head.
- Probe valleys for pinholes, failed laps, and debris dams.
- Examine flashings at abutments and dormers for splits and loose chases.
- Inspect ridge and hip lines for open joints and missing fixings.
- Test gutters, outlets, and overflows for leaks, backfall, and blockages.
Record locations, photograph defects, and prioritise temporary weathering-in immediately.
Repoint Chimneys And Parapets
Although slates and flashings take the blame, failed pointing on chimneys and parapets often drives the fastest, most stubborn leaks by letting wind-driven rain soak straight into the masonry core. Start by raking out loose joints to a sound depth, avoiding brick arrises, then mist the work so new mortar cures slowly. Match the original lime-based mix and joint profile; hard cement traps moisture and accelerates spalling. Rebuild open bed joints at the chimney crown, and check the flaunching for cracks that funnel water down the stack. On the parapet parapet, repoint both faces and the top courses, and reset any loose coping stones. Tool joints tight, brush back, and protect from sun and frost.
Clear Gutters And Flashing
Sound pointing keeps water out of the masonry, but you’ll still chase leaks if gutters and flashing can’t shed rain quickly. Start with safe access and work methodically from the highest outlet to the downpipes, clearing debris and checking fall. Treat Gutter maintenance as routine, not a rescue job: a blocked hopper can saturate brickwork in a single storm. Then inspect joints at valleys, abutments, and chimney bases; poor Flashing installation lets water track behind slates and into ceilings.
- Scoop silt, then flush to confirm free flow
- Clear and cage downpipes; test with a hose
- Re-seat slipped brackets and reset correct gutter pitch
- Replace split liners, loose nails, and failed sealant at joints
- Dress lead neatly, fixings sound, and lap correctly over tiles
Make the Building Weathertight: Doors, Windows, Pointing
Once you’ve stabilised the structure and stripped back what needs removing, you must make the house weathertight as quickly as possible by tightening up the three weak points that let most water and draughts in: doors, windows, and failing mortar joints. Start at the front and back doors: adjust hinges, renew thresholds, fit brush seals, and add a letterbox cowl; you’ll cut wind-driven rain without touching Historic paint or upsetting interior decor. At windows, focus on perimeter sealing only: replace perished mastic, capillary gaps, and loose beading with compatible, paintable sealant, and check head drips. Then tackle pointing: rake out loose cement patches by hand, match the original lime mix, and repoint flush to shed water. Protect repairs from frost and drying.
Restore Windows and Joinery (Repair vs Replace)
With the house now tightened up against rain and draughts, you can turn from temporary sealing to the longer job of restoring the windows and other joinery properly. Start by assessing what’s sound: old timber often outlasts modern softwood, so repair first and replace only when rot is structural or sections are missing. Strip paint carefully, treat decay, then splice in matching wood; keep profiles crisp to preserve character and fit.
- Check sills, glazing bars, and box linings for moisture traps
- Overhaul pulleys, cords, and weights; ease binding sashes
- Re-bed loose panes, renew putty, and fit discreet draught seals
- Consolidate minor rot, then use scarf joints for joinery repair
- If replacing, copy mouldings, sightlines, and glazing patterns exactly
Upgrade Electrics and Plumbing to Modern Standards
Next, you’ll plan an electrical rewiring strategy that respects original plasterwork while giving you enough circuits, RCD/RCBO protection, and sensible placement for modern loads. You’ll modernize the plumbing by replacing tired pipe runs, upgrading supply and waste layouts, and confirming pressure, flow, and hot-water capacity suit today’s fixtures. You’ll finish with compliance and safety checks—test and certify electrics to current regs, pressure-test pipework, and document everything before walls and floors are closed up.
Electrical Rewiring Strategy
Although a Victorian town house can look solid on the surface, its wiring and pipework often hide unsafe DIY splices, undersized circuits, and aging lead or galvanized runs that won’t meet today’s loads or codes. You’ll start with an electrical survey, then plan a full rewire around your room-by-room power needs, future tech, and strict Electrical safety requirements. Choose wiring materials that balance authenticity with performance: modern twin-and-earth in walls, heat-resistant cabling near lighting, and metal-clad protection where impact’s likely. Keep chases minimal, use existing voids, and document every route before plastering.
- Upgrade to an RCD/RCBO consumer unit
- Add dedicated circuits for kitchen and laundry
- Rebond and test earthing and equipotential bonding
- Replace brittle rubber/cloth-insulated cable throughout
- Fit tamper-resistant sockets and compliant junction boxes
Plumbing System Modernization
How do you modernize a Victorian town house’s plumbing without turning every room into a demolition site? Start by mapping every run: trace risers, isolate branches, and identify any remaining Historic plumbing such as lead, iron, or undersized supply lines. You’ll stage the work vertically—top floor down—so you can reuse chases and limit openings to liftable floorboards and targeted wall pockets. Replace supply lines with copper or PEX, upsizing where pressure drops, and install accessible isolation valves at each bathroom and kitchen. Renew waste stacks with quiet PVC or cast-iron equivalents, keeping vent routes intact to prevent slow drains. Preserve Victorian fixtures by rebuilding taps and fitting discreet adapters, while hiding modern traps and connectors behind panels. Pressure-test before closing.
Compliance And Safety Checks
Before you close up those new pipe runs and patched wall pockets, lock in compliance and safety checks so the upgraded plumbing and electrics meet modern standards and don’t create hidden hazards. You’ll protect occupants, preserve Historical authenticity, and document work for future owners.
- Book certified inspections: electrician tests RCD/RCBO protection, earthing, bonding, and load calculations.
- Pressure-test water lines, verify backflow prevention, and confirm correct pipe gradients and venting.
- Check fire-stopping around penetrations and specify intumescent collars where needed.
- Validate material selection: use WRAS-approved fittings, correct cable ratings, and compatible metals to avoid galvanic corrosion.
- Compile certificates, photos, and as-built drawings; label circuits and isolation valves clearly.
If defects appear, fix them now—access is cheapest before finishes go on.
Improve Insulation and Ventilation Without Trapping Moisture
When you insulate a Victorian town house, you’re also changing how moisture moves through the building, so you must pair every thermal upgrade with a clear ventilation plan. Keep walls and floors vapour-open where possible: use wood fibre, sheep’s wool, or mineral wool with lime plaster, and avoid foil-backed boards on solid masonry. Add Moisture barriers only where construction demands them, such as under suspended floors, and tape joints so air leakage doesn’t drive condensation.
Improve Indoor air quality by controlling sources first: fix gutters, downpipes, and rising damp, and vent kitchens and bathrooms with quiet, humidistat fans. Create a steady background supply with trickle vents or a demand-controlled system, and verify performance with humidity readings and cold-spot checks.
Plan Phases, Hire Trades, and Manage the Project
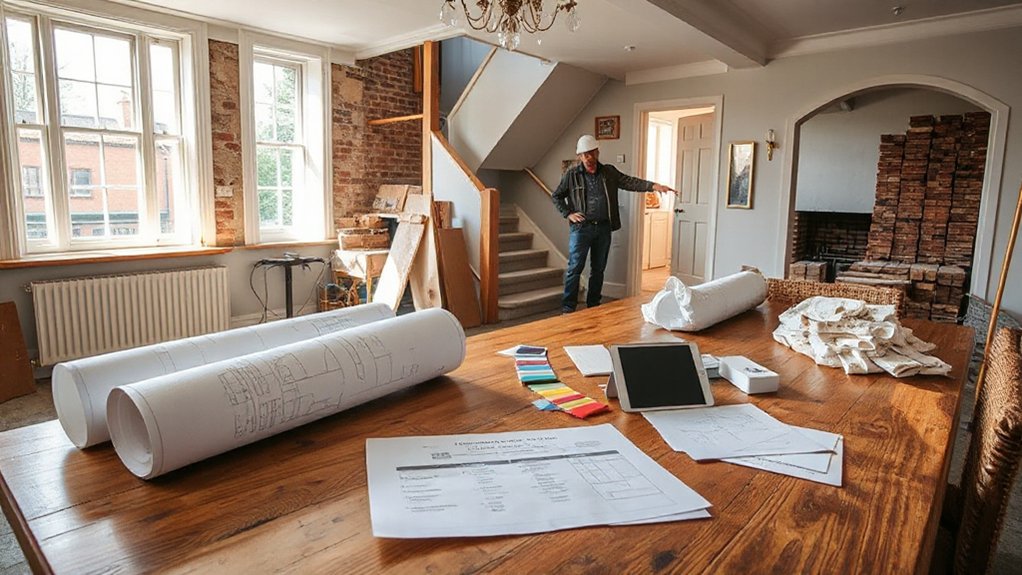
Even if you’re tackling only one room at a time, you’ll get a better result by treating the restoration like a staged project with clear decision points, because Victorian houses hide surprises that can derail budgets and timelines. Start with a measured survey, then lock the scope before you open walls. Sequence messy structural and services work first, then finishes, so you don’t damage Historic materials you’ve saved.
- Define phases: strip-out, structure, services, envelope, finishes
- Prequalify trades with proven Preservation techniques and references
- Write a spec: materials, profiles, tolerances, and repair standards
- Track costs weekly; approve variations only in writing
- Hold site meetings; photograph progress and log decisions daily
Frequently Asked Questions
How Do I Source Period-Appropriate Materials Like Slate, Lime, and Bricks?
You source period-appropriate slate, lime, and bricks through salvage yards, reclamation dealers, and heritage suppliers; verify provenance and match samples. Use Historical craftsmanship specialists, demand Authentic sourcing documentation, and test lime mixes and brick porosity.
What Insurance Do I Need During Restoration Works and While the House Is Vacant?
Like a safety net under tightrope work, you’ll need specialist vacant property and renovation Insurance coverage, plus public liability, contractors’ all-risks, and employers’ liability. Tie it to Restoration permits, disclose works, secure sites, inspect frequently.
How Can I Live in the House Safely While Major Restoration Is Underway?
You can live safely by zoning work areas, sealing dust, maintaining clear fire exits, and installing temporary smoke/CO alarms. Keep Modern amenities on dedicated circuits. Coordinate daily with builders; adjust Interior design plans.
What Are Common Victorian Restoration Mistakes That Cause Costly Rework Later?
Nearly 30% of rework costs come from premature finishes. You’ll cause costly rework by trapping moisture with cement, stripping Victorian architecture details, ignoring movement, skipping surveys, and bending restoration ethics on cheap replacements.
How Do I Document and Photograph Works for Resale, Warranties, and Approvals?
You’ll create a dated photo log: before/during/after, wide-to-detail shots with scale, metadata, and labeled folders. Keep receipts, specs, permits, warranties, and notes on Historical accuracy and Preservation techniques for approvals and resale.
Conclusion
You’ll get the best Victorian townhouse result when you treat it like a disciplined process, not a makeover. Set your end goal, commission a proper survey, and rank defects by risk before you spend. Budget with a 15–25% contingency, then confirm planning and listing constraints early. Repair windows and joinery where possible, upgrade electrics and plumbing safely, and add insulation with ventilation to avoid trapped moisture. Phase the work, manage trades, and keep a spreadsheet like it’s 1999.


