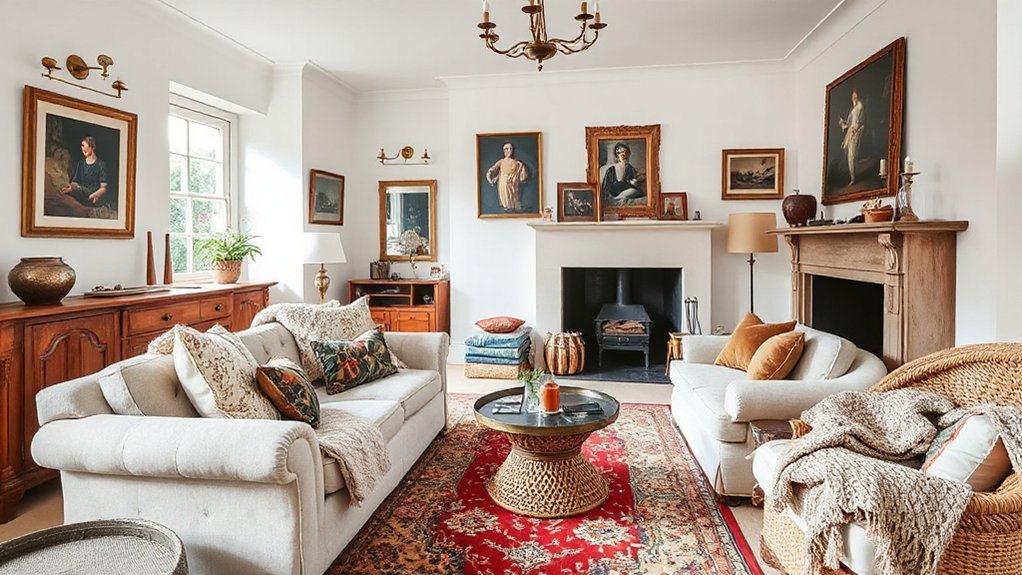
Heritage maximalism gives your new build instant soul because you’re curating history, not copying it. You fix builder-grade flatness with historically scaled trim, layered moldings, patinated metals, and saturated hues like oxblood or bottle green. Start with one anchor—an heirloom-style rug, bold art, or a classic sofa—then stack patterns in three families and repeat motifs for cohesion. Finish with high, wide drapery, gallery walls, and three-layer shelves for collected depth. Keep going to see the simplest first upgrades.
Key Takeaways
- Heritage maximalism replaces builder-grade sameness with layered trim, arches, tile, and lighting that instantly reads intentional and character-rich.
- It curates historic references with modern function, creating a home that feels collected over time rather than staged or theme-like.
- Deep, heritage colors and edited pattern layering add mood, depth, and a clear point of view beyond neutral new-build palettes.
- Honest materials—wood, linen, wool, aged brass—bring patina and texture that make new surfaces feel warm, grounded, and lived-in.
- Mixing modern foundations with select antiques adds cultural story, craftsmanship, and memorability without sacrificing comfort or durability.
Define Heritage Maximalism (In One Minute)

If you love old-world character but you’re building new, heritage maximalism is the design approach that layers historically rooted details—moldings, arches, paneling, vintage-inspired tile, antique or antique-look lighting—into a richly decorated, high-personality interior. You don’t copy a period room; you curate it, mixing references with modern performance standards. You prioritize cultural significance by choosing motifs, materials, and craft traditions that connect to place—think regional stone profiles, classic millwork proportions, or patterned encaustic-look floors. You use preservation techniques as a playbook: authentic trim reveals, limewash-style finishes, brass patina, and historically scaled hardware. Then you amplify with saturated color, collected art, and textiles, keeping every layer intentional, edited, and durable over time.
Why New Builds Feel Bland (and How This Fixes It)
When you walk into most new builds, you’re seeing builder-grade uniformity: flat drywall returns, generic trim profiles, and a safe, all-over neutral palette designed to offend no one. That formula reads clean but characterless because it strips away the layered cues—moldings, patina-friendly materials, and era-referential proportions—that make older homes feel collected. Heritage maximalism fixes it by putting those heritage details back in, on purpose, so your space lands polished, personal, and current rather than showroom-blank.
Builder-Grade Uniformity
Although new builds often nail energy efficiency and open-plan flow, they still read as “builder-grade” because every visible decision gets value-engineered toward sameness: flat drywall returns, short untrimmed baseboards, identical black hardware, one-note greige paint, and a single lighting package repeated room to room. You’re not imagining the blandness; you’re seeing builder standards at work—spec’d for speed, warranty, and broad resale appeal, not character. When every sightline repeats the same profile, sheen, and temperature, your home loses hierarchy: no room feels “important,” and nothing anchors the eye. Uniform design also flattens acoustics and light, so spaces feel louder and colder despite new materials. The fix starts by identifying the defaults you’re inheriting and deciding where you’ll break the repetition first.
Layered Heritage Details
Why do new builds feel visually “flat” even with good layouts and fresh finishes? Because they’re missing layered heritage details—small, intentional cues that create depth and memory. You fix it by stacking eras: a reeded oak vanity with a deco mirror, plaster crown with clean-line lighting, and aged brass with honed stone. Anchor each layer in Historical context so it reads curated, not chaotic: reference local architectural motifs, period hardware profiles, or regional tile geometries. Then add Cultural symbolism through pattern and craft—block-printed textiles, hand-thrown ceramics, heirloom art—so the home feels lived-in on day one. Keep a tight palette, vary sheen, and repeat one motif across rooms. You’ll get character without losing new-build ease.
Start With One Anchor Piece (Rug, Art, or Sofa)
You’ll get heritage maximalism to land in a new build faster if you start with one anchor piece that sets the palette, scale, and attitude. Choose a statement rug to ground the room, lead with bold art to establish narrative and contrast, or invest in a sofa with strong lines and lasting upholstery as your daily driver. Once that anchor’s in place, you can layer pattern, patina, and trim details with confidence instead of guessing.
Choose A Statement Rug
If you want heritage maximalism to feel intentional in a new build, start with one anchor piece—and a statement rug is the fastest way to set the room’s tone. Choose Rug patterns with lineage: Oushak florals, Persian medallions, or checked kilims that reference old-world rooms without feeling theme-y. Then dial in Textile textures—hand-knotted wool, flatweave cotton, or a silk highlight—to add depth against smooth drywall, wide-plank floors, and builder-basic trim.
Scale matters: go large enough that front legs of seating sit on the rug, so the pattern reads as architecture, not an afterthought. Work a color story you can repeat—one grounded neutral plus two saturated accents—and let the rug dictate pillows, drapery, and paint undertones.
Lead With Bold Art
While a new build can read a little too polished, bold art gives it instant history and point of view. Treat it as your anchor: one oversized canvas, a vintage oil, or a graphic print with a deep frame can set the palette and mood faster than any paint chip. Go large enough to feel intentional, not like an afterthought.
- Pick one dominant hue to echo in trim, pillows, and books.
- Mix eras: antique portrait + contemporary abstract keeps it heritage, not themed.
- Use lighting—picture lights or angled sconces—to add museum-level depth.
- Layer scale: pair your main piece with smaller companions for rhythm.
Curate statement pieces with patina, texture, and confident contrast.
Invest In A Sofa
Bold art sets the mood fast, then the sofa carries that attitude through daily life. Treat it as your heritage-maximalist anchor: choose a classic silhouette—rolled arms, tight back, or tuxedo—then scale it generously so your new-build proportions feel intentional, not empty. Prioritize kiln-dried hardwood frames, eight-way hand-tied or high-resilience springs, and Comfortable cushions with a down-wrap or dense foam core for structure that still relaxes. Go for saturated velvet, plaid, or a tapestry weave to layer pattern against clean drywall and wide-plank floors. If you want flexibility, pick Stylish slipcovers in washed linen or performance cotton; they read tailored, soften modern lines, and let you swap color seasonally without replacing the piece.
Choose Deep, Heritage-Style Colors
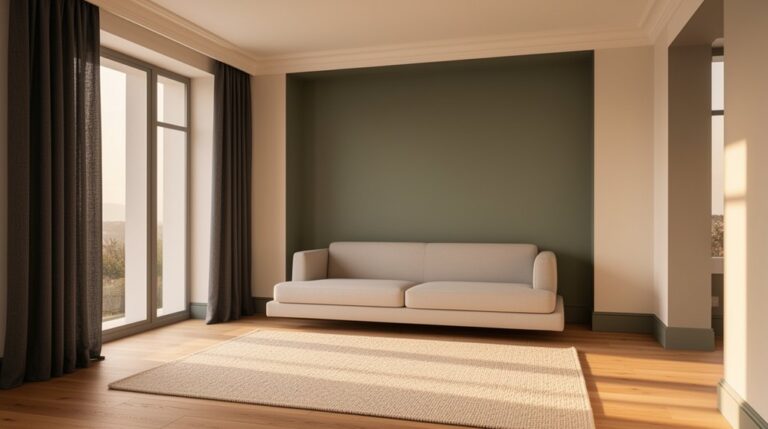
Because color does most of the heavy lifting in a new build, deep, heritage-style shades instantly add the age and gravitas that fresh drywall and crisp trim can’t. You’ll get the richest payoff by choosing complex, historically rooted hues—oxblood, bottle green, inky navy, smoked aubergine—then committing to them with confident placement.
Use Color psychology to steer the mood: darker warms feel enveloping; cooler depths read tailored and architectural. Prioritize pigment longevity by picking high-quality paints with proven fade resistance, especially in sunlit rooms.
Anchor the scheme with:
- A saturated wall color in eggshell
- A moody ceiling for height control
- Trim in a softened off-black
- A single antique-gold accent for glow
Layer Patterns: Scale, Contrast, and Repeats
Even if you’ve already nailed your heritage palette, pattern is what turns a new build from “freshly finished” to convincingly collected. Start with one hero motif at a large scale—botanical, stripe, or classic check—then layer mid-scale geometrics and a tight micro-print to keep the eye moving. Use color contrast deliberately: pair warm grounds with inky outlines, or echo a single accent hue across two patterns to make the mix feel intentional. Keep repeats in conversation by matching one element—line weight, curve shape, or spacing—so nothing fights. Add texture variation through pattern types (woven-look grids, block prints, embroidery-style florals) rather than piling on more colors. Limit to three pattern families per zone, then repeat them elsewhere for cohesion.
Add Texture Fast: Wood, Metal, Linen, Wool
Pattern gives you rhythm, but texture gives a new build its patina. You’ll get heritage maximalism faster by stacking honest surfaces—wood grain, burnished metal, rumpled linen, and nubby wool—so every glance reads lived-in, not showroom-smooth. Aim for Textural contrast: matte beside sheen, coarse beside sleek, warm beside cool. Nail Material pairing with a tight, repeatable toolkit:
- Wood: wire-brushed oak or walnut on tables, frames, or shelving.
- Metal: aged brass or blackened steel in pulls, lamps, and trays.
- Linen: slubby drapery and relaxed pillows for soft diffusion.
- Wool: bouclé throws or flatweaves to anchor acoustics and depth.
Keep palettes cohesive; let surfaces do the storytelling.
Fake “Old-House” Details With Easy Millwork
You can fake “old-house” character in a new build by adding DIY crown, picture-frame panels, and a simple chair rail—millwork that reads custom without custom labor. Choose vintage-inspired trim profiles (ogee, bead, stepped casing) in off-the-shelf MDF or poplar, then stack and space them like period casing for instant depth. Keep the proportions tight—taller baseboards, slightly oversized headers, and consistent reveals—so the room feels inherited, not newly decorated.
DIY Crown And Panels
While new-build drywall can feel a little too crisp, DIY crown and wall panels let you layer in “old-house” architecture fast using off-the-shelf millwork, a level, and clean layout lines. Start by mapping a consistent top rail height around the room, then build your grid so it aligns with doors, windows, and furniture zones. For DIY crown, prioritize crisp miters, tight coping at inside corners, and a dead-straight reference line to prevent waves. For Panel detailing, keep proportions classic: wider stiles at corners, equal reveals, and intentional spacing that looks drawn, not guessed. Nail into studs, add construction adhesive, and caulk sparingly so seams disappear after paint.
- Snap layout lines
- Dry-fit every run
- Shim for flatness
- Fill, sand, prime
Vintage Trim Profiles Made Easy
If your new build reads a little too “builder-basic,” vintage trim profiles fix it fast by stacking simple, store-bought mouldings into shadowy, period-style layers. Start with a flat stock backband, add a smaller cove, then cap with an ogee; you’ll mimic old plasterwork without custom knives. Keep returns crisp, align reveals with a spacer strip, and run everything past outlets and casing so it looks intentional. For doorways, build a beefy header with a 1x and add corner blocks to fake Craftsman joinery. Paint it all one color for believable depth, or highlight edges in a satin sheen for trend-forward contrast. This approach delivers Vintage charm fast, with repeatable trim profiles that look bespoke. Measure twice, caulk lightly, sand, then topcoat.
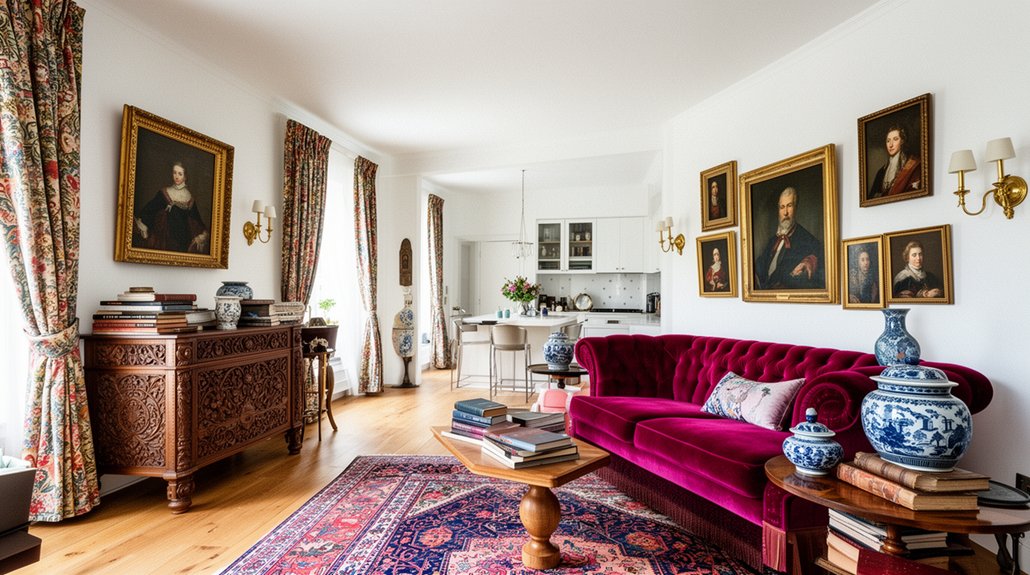
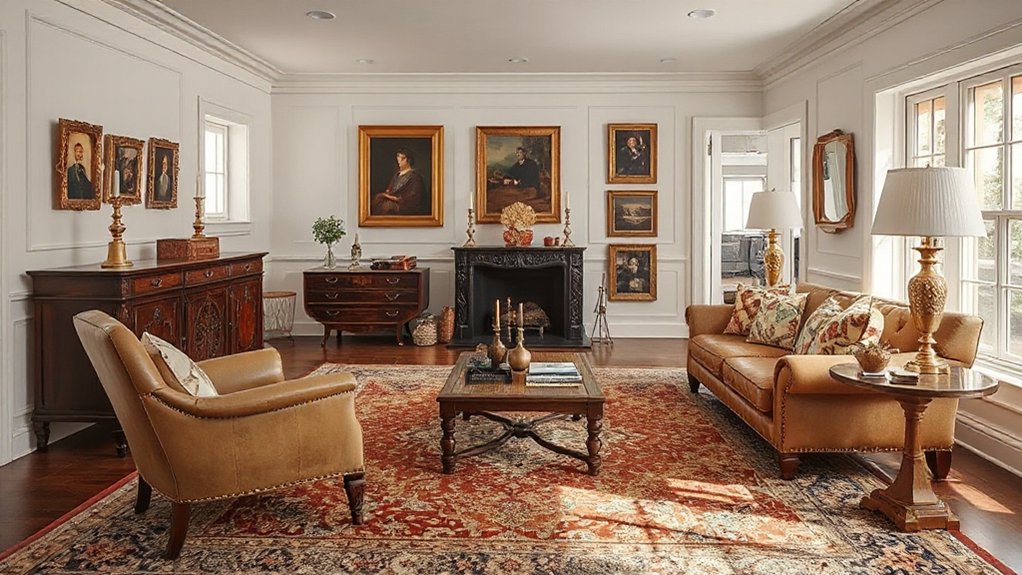
Mix Antiques With Modern (the 70/30 Rule)
Because new builds often read as sleek and anonymous, the fastest way to give them heritage-maximalist depth is to follow a simple 70/30 mix: aim for roughly 70% modern foundations (sofas, built-ins, lighting performance, durable textiles) and 30% antiques or vintage statement pieces (a patinated credenza, carved mirror, pair of lamps, or an oil portrait). This Antique Fusion works because Modern Contrast keeps the room feeling current, not staged. Anchor with clean-lined upholstery, then drop in one age-marked hero per zone and repeat its material once.
- Pair crisp silhouettes with patina.
- Match undertones: warm oak with brass, cool walnut with nickel.
- Scale antiques up; tiny “finds” read cluttered.
- Edit to one focal antique per wall.
You’ll get character without sacrificing function.
Find Vintage-Look Pieces Without Overpriced “Antique” Tags
Even when you’re chasing real-age character, you don’t have to pay “antique store” markups to get it. Start with Vintage shopping in overlooked places: estate sales, church rummage, Facebook Marketplace, and regional auction apps, where sellers price for speed, not story.
Shop by silhouette and material, not era labels. You’ll get Antique inspiration from turned legs, reeded glass, brass gallery rails, and patinated wood—even on later pieces. Learn quick tells: dovetail drawers, solid-wood edges, and weighty hardware beat “distressed” MDF. Negotiate politely, bundle items, and ask for cash discounts. If the bones are right, refinish lightly: clean, wax, swap pulls, or re-upholster in a traditional textile to make it read collected, not staged.
Make Lighting Feel Collected, Not Matchy
While a single “lighting set” can make a new build read like a showroom, a layered mix of fixtures gives you that lived-in, inherited feel fast. Skip identical finishes and instead repeat undertones—warm brass, aged nickel, or oil-rubbed bronze—so the room coheres without looking cataloged. Anchor each space with one statement piece, then let supporting lights vary in era and silhouette. Vintage lighting works best when you treat it like jewelry: intentional, not uniform. Blend eclectic fixtures by balancing scale and shade temperature, and you’ll get depth at every hour. Use this quick checklist:
- Mix pendant shapes, keep bulb color consistent.
- Pair one patina’d piece with one crisp modern.
- Repeat one material (glass, linen, or metal) twice.
- Add a dimmer everywhere possible.
Window Treatments That Add Height and Softness
You’ll get instant heritage scale when you hang floor-to-ceiling drapery panels high and wide, letting the fabric kiss the floor to visually lift the room. Layering tailored shades with airy sheers adds softness, controls glare, and keeps the window feeling dressed even when you want light. Choose richer trims, subtle patterns, or lined textiles so the treatments read collected and architectural, not builder-basic.
Floor-To-Ceiling Drapery Panels
If your new build’s windows feel a little too crisp and underscaled, floor-to-ceiling drapery panels fix it fast by stretching the sightline upward and adding a layer of heritage softness. Mount the rod close to the ceiling (or into crown) and run it wider than the casing so the stack-back clears the glass. That Window framing move makes panes look larger and rooms feel taller.
For heritage maximalism, prioritize Fabric layering within the panel itself: lined, interlined, and weighty enough to hang cleanly without looking fussy. Get the details right:
- Choose pinch pleats or goblet pleats for tailored fullness.
- Use 2–2.5x fabric for a luxe wave.
- Let hems kiss the floor, not puddle.
- Finish with a contrast banding or trim.
Layered Shades And Sheers
Because new-build glazing often reads stark and flat, layered shades and sheers give the window instant dimension—crisp control up top with a soft, heritage veil at the glass. Pair a tailored Roman or woven shade with a relaxed linen sheer to add height and diffuse light without sacrificing privacy. Keep the shade inside-mount and the sheer on a rod set high and wide, so you visually stretch the opening and soften sharp drywall returns. For a heritage-maximalist look, tune your Color palette: warm ivories, tobacco, ochre, or dusty blues echo patinated woods and antique brass. Lean into fabric layering with subtle stripe-on-solid or voile over slubby linen; the contrast reads collected, not cluttered. Finish with rings or pleated headers for tailored movement.
Build Walls With Art, Mirrors, and Frames
While new-build walls can read as flat and oversized, a tightly curated mix of art, mirrors, and frames gives them instant heritage depth and scale. Start with artful layering: mix oil-style landscapes, modern abstracts, and black-and-white portraits so your wall feels collected, not staged. Add mirror accents to bounce light and break up long expanses, especially in hallways and open-plan rooms. Keep proportions intentional—overscale one hero piece, then support it with smaller works and varied frame widths for a salon-style rhythm. Use these pro moves:
- Anchor with one large work at eye level.
- Repeat two frame finishes for cohesion.
- Stagger spacing: tighter clusters, wider edges.
- Add a mirror near lamps for glow.
Style Shelves With the 3-Layer Formula
Even when your new-build comes with sleek, shallow built-ins, you can give shelves that lived-in, heritage heft by styling them in three deliberate layers: back, mid, and front. Start with the back layer: lean framed sketches, gilt mirrors, or a woven tray to create height without eating depth. Build the mid layer with book stacks, lidded boxes, and ceramic vessels, varying matte and gloss for quiet contrast. Finish the front with small, tactile pieces—brass animals, match strikers, or a single shell—so the vignette reads curated, not cluttered. Keep negative space like a design element: leave 20–30% of each shelf open. These shelf styling display techniques make new carpentry feel collected and timeless, instantly.
Room-by-Room Starter Checklist for New Builds
Styled shelves set the tone, but heritage maximalism really lands when each room in your new build gets a few intentional “instant history” moves. Use this room-by-room starter checklist to anchor your Personalization tips and keep color palette choices cohesive, not chaotic.
- Entry: Add a vintage runner, a framed oil portrait, and a patinated brass hook rail.
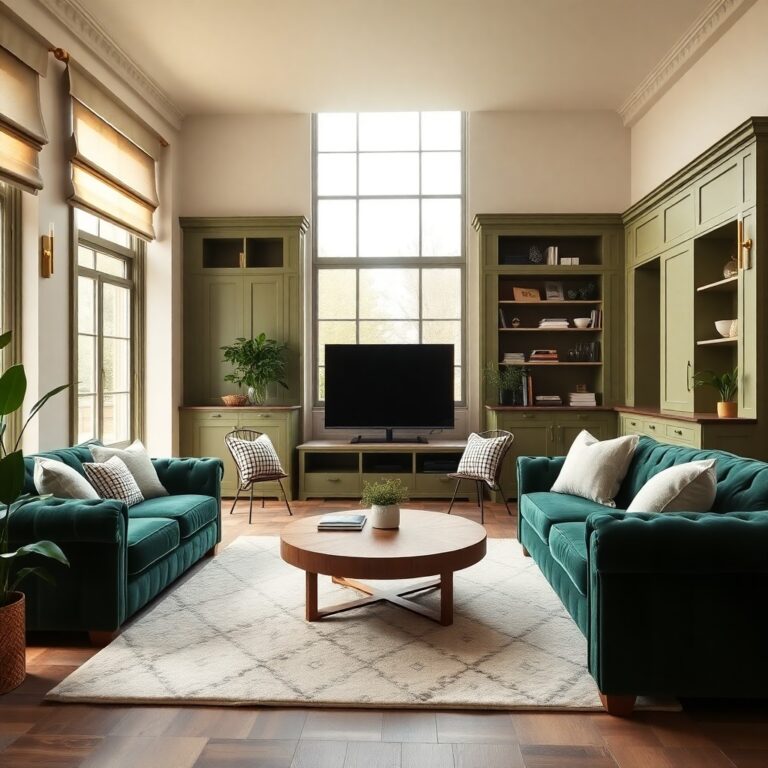
- Living: Mix a traditional rug with a bold floral drape; swap builder lights for pleated shades.
- Kitchen/Dining: Layer in antique chairs, a gallery wall, and unlacquered hardware that’ll age fast.
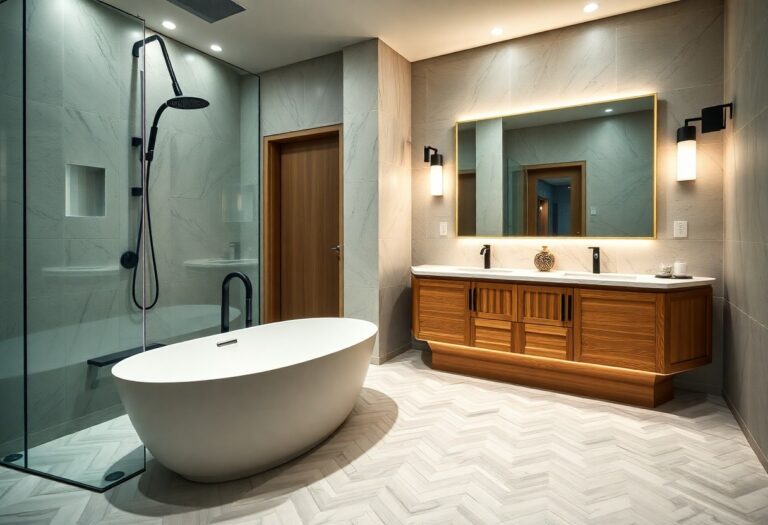
- Bedroom/Bath: Choose a moody paint, embroidered textiles, and a reclaimed mirror; finish with stoneware and scent.
Repeat one metal and one motif throughout for polish.
Frequently Asked Questions
How Do I Avoid Making Maximalism Feel Cluttered or Chaotic?
You avoid chaotic maximalism by editing hard: keep Minimal clutter with hidden storage, repeat key motifs, and use color coordination across textiles, art, and rugs. Vary scale, anchor with neutrals, and leave breathing space.
What Budget Should I Plan for a Heritage Maximalist Refresh?
Plan $3k–$15k for a heritage maximalist refresh; go “gallery-to-country-estate” bold. You’ll nail Cost estimation by prioritizing statement pieces, then refine Material selection: vintage textiles, brass, lacquer, wallpaper, custom trim, lighting.
Which Paint Finishes Work Best for Deep, Heritage-Style Colors?
You’ll get the best deep heritage colors with matte/eggshell walls for rich color saturation, and satin or semi-gloss on trim for finish durability. Use washable matte in busy rooms; reserve full gloss for doors.
How Can I Make Heritage Maximalism Work in an Open-Concept Layout?
Treat your open plan like a curated gallery: anchor each zone with bold color blocks and layered lighting. Add Ornamental moldings as “frames,” and use Vintage textiles to stitch seating, rugs, and drapery together.
How Do I Balance Heritage Maximalism With Pets and Kids?
You balance heritage maximalism by choosing washable, high-contrast textiles, anchoring antiques behind barriers, and layering durable patterns. Use nursery decor with wipeable wallpapers, and apply pet proofing strategies: scratch-resistant rugs, secured frames, and closed storage.
Conclusion
You don’t have to live with blank-box builder basics. Heritage maximalism works like seasoning a new recipe: you start with a bold anchor piece, then add deep heritage color, scaled pattern, and tactile layers until the whole room tastes intentional. You’ll lift ceilings with proper drapery, give drywall gravitas with art and mirrors, and keep shelves crisp with a three-layer edit. Follow the checklist room by room, and your new build finally feels lived-in.