
You can’t restore a forgotten gatekeeper’s cottage responsibly until you’ve proved its fabric can be saved and its setting understood. You start with a measured survey, defect mapping, and a photographic record that captures joinery profiles, masonry bonds, and roof junctions before you touch anything. You then prioritize stability and weather-tightness, using breathable, period-compatible repairs while planning discreet service routes. The critical question is which interventions you can justify without erasing the cottage’s authority…
Key Takeaways
- Begin with a full site and structural assessment, mapping moisture paths, cracks, settlement, and documenting all original fabric with consistent records.
- Stabilize hazards early with fencing, bracing, safe scaffolding, temporary roof and gutter repairs, and ventilated boarding to secure openings.
- Repair structure conservatively using reversible methods: props and needle beams, lime-compatible underpinning, and stainless helical stitching for fractured masonry.
- Restore roof and masonry as breathable systems, reusing matching tiles or slates, detailing leadwork correctly, and repointing with vapor-open lime mortar.
- Upgrade services discreetly by mapping routes, minimizing penetrations, adding modern electrical protection and plumbing isolation, and matching interior finishes to historic evidence.
Decide If the Gatekeeper’s Cottage Is Worth Restoring
Although the romance of a gatekeeper’s cottage can be compelling, you should first validate that restoration is technically feasible and financially rational. Survey load paths, wall plumb, and roof spread; probe sill beams for rot; map rising damp and salt bloom; and confirm chimney stability. You should document original fabric—brick bonds, lime render, sash proportions—so your design decisions respect historical significance rather than chase novelty. Evaluate daylight, circulation, and ceiling heights against your intended use, and test whether small interventions can solve comfort without erasing character. You should also review site drainage, boundary setbacks, and access for services. Apply Gardening tips by preserving sightlines to the gate, reinstating period hedging, and selecting shallow-rooted planting near foundations.
Budget, Permits, and Hiring the Right Restoration Team
Once you’ve confirmed the cottage’s structure and fabric can be responsibly saved, you need to turn that feasibility into a controlled scope, a defensible budget, and a compliant approvals path. Build contingencies for concealed decay, lead paint, and services upgrades, and cost each trade against conservation priorities that protect Historical significance. Secure planning and heritage permits early, align drawings with local policy, and document repair methodologies so reviewers can assess reversibility and material compatibility. Hire a team that can execute like-for-like joinery, lime-based mortars, and moisture-safe insulation without erasing patina, and use community engagement to reduce objections and surface local knowledge.
- Prepare a phased cost plan: urgent stabilization, envelope, then interiors
- Require method statements and mock-ups before irreversible work begins
- Select consultants with conservation accreditation and insured subcontractors
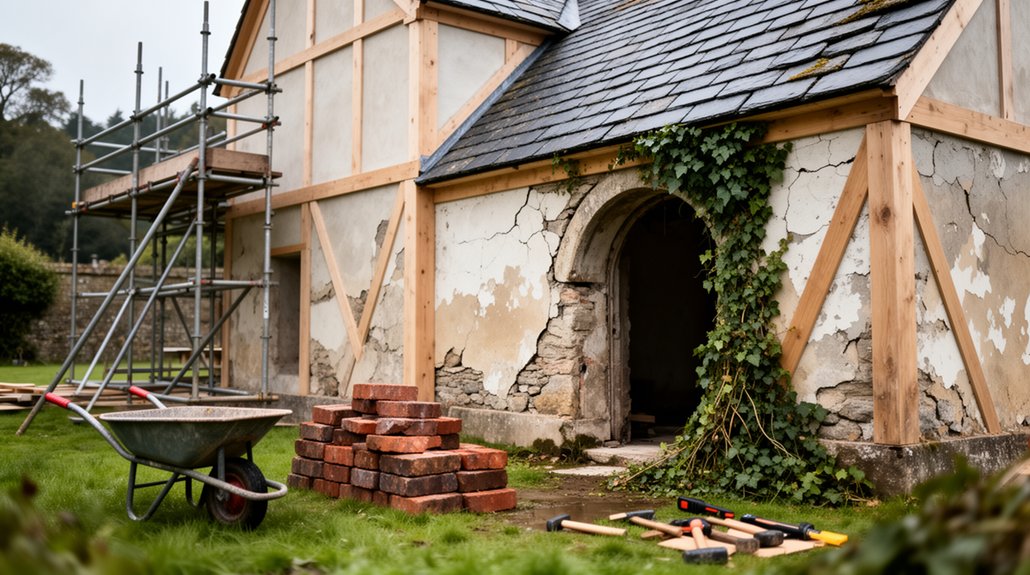
Photograph and Record the Gatekeeper’s Cottage First
Before you disturb any fabric, you’ll photograph and record existing conditions room by room, noting dimensions, material shifts, moisture staining, and structural irregularities. You’ll capture key architectural details—joinery, trim profiles, fenestration, masonry bonds, and hardware—with scaled references and consistent lighting to preserve accurate proportions. You’ll then compile a searchable photo archive with filenames, locations, dates, and annotations so your design and restoration decisions remain traceable.
Document Existing Conditions
To set an accurate baseline for design decisions, photograph and record the gatekeeper’s cottage as it exists today, capturing both overall context and fine-grain details. You’ll confirm Historical significance by tying visible changes to dated maps, permits, and estate narratives, then log current performance constraints that will shape interventions. You should document moisture paths, settlement indicators, site drainage, and vegetation pressures to support Landscape integration without guesswork. Maintain a consistent naming convention, scale references, and geotagging so your record becomes a reliable coordination tool across disciplines.
- Create a room-by-room condition matrix noting cracks, staining, rot, and biological growth
- Produce measured sketches and baseline dimensions for walls, openings, and floor levels
- Archive utilities locations, access routes, and temporary protection needs for safe work
Capture Key Architectural Details
As you begin recording the cottage in detail, prioritize the architectural elements that define its period character and drive restoration scope—door and window profiles, casing and sill geometry, hardware patterns, eave and verge conditions, chimney form, masonry bonds, and any surviving site-gate interfaces. Measure each assembly, note section profiles, and sketch corner conditions so you can replicate joinery and weathering details accurately. Identify glazing types, muntin dimensions, hinge throws, latch backsets, and thresholds; they’ll determine compatible repairs and security upgrades. Map roof pitches, rafter tails, flashing laps, and chimney crowns to control water management. Record foundation plinth heights, damp lines, and site grades where Garden landscaping meets masonry. Cross-reference these findings with Historic significance statements to justify retention, targeted replacement, and reversible interventions within conservation standards.
Create A Photo Archive
Although measured drawings will drive your restoration set, you’ll build the most reliable baseline by photographing the gatekeeper’s cottage first and organizing those images into a structured archive that captures context, condition, and assembly logic. Shoot systematic elevations, room grids, and detail macros with a scale card, then log filenames to locations, dates, and weathering notes. Include wide shots that relate thresholds to paths, boundary walls, and Garden landscaping, so later design decisions respect circulation and sightlines. Record anomalies—settlement cracks, moisture staining, insect damage—before you disturb finishes, preserving historical significance and evidentiary value.
- Create a folder taxonomy: exterior/roof, interior/room, joinery/services; mirror it in your drawing sheet index.
- Use consistent metadata: lens, focal length, orientation, and a unique element ID.
- Add photo keys on plans and tag assemblies (sashes, hinges, lintels) for reinstallation.
Make the Gatekeeper’s Cottage Safe and Watertight
Before any restoration work can hold its value, you’ll need to make the gatekeeper’s cottage structurally safe and reliably watertight. Begin with a controlled site setup: fence hazards, post temporary bracing where walls or chimneys appear unstable, and provide safe access with rated scaffolding and edge protection. Secure openings with ventilated boarding to deter intrusion while limiting moisture trapping. Strip failing gutters, then install temporary downpipes to discharge away from the fabric; coordinate with Landscaping improvements so surface water doesn’t pond at thresholds. Inspect the roof covering, flashings, valleys, and abutments; patch with compatible materials and renew leadwork where splits exist. Clear ventilation paths, treat active timber decay, and isolate electrical risks. Every intervention must respect historical significance and remain reversible where feasible.
Repair Foundations and Stabilize the Cottage Structure
You’ll begin by evaluating foundation damage through level surveys, crack mapping, and moisture-path tracing to determine settlement patterns and load transfer failures. You’ll then specify targeted stabilization—pinning, grout injection, or localized underpinning—based on soil capacity and the original masonry’s tolerances. To secure the envelope’s geometry, you’ll install structural supports such as adjustable steel shores, discreet wall ties, and temporary bracing that maintain alignment while permanent repairs cure.
Assess Foundation Damage
Once the interior finishes are stripped back, assess the cottage’s foundation damage by mapping cracks, checking for differential settlement, and confirming moisture pathways that undermine bearing capacity. You’ll document crack width, direction, and activity with gauges, then correlate patterns to load paths and original wall geometry to protect historical significance. Verify soil conditions and drainage performance with hand augers, level surveys, and targeted moisture readings, so you can distinguish shrink-swell movement from structural distress. Coordinate findings with community engagement goals by sharing clear, non-alarmist diagrams and a monitoring schedule.
- Photograph and scale-draw each elevation and footing line, noting prior repairs and mortar types
- Record floor levelness on a grid, referencing a fixed benchmark and seasonal dates
- Trace water sources: grading, downspouts, perimeter drains, capillary rise, and salt efflorescence
Install Structural Supports
With crack maps, level grids, and moisture pathways documented, you can now size and place structural supports that arrest movement without overwriting the cottage’s original load paths. Start by shoring openings with adjustable steel props, then install needle beams to transfer wall loads while you underpin. Use lime-compatible grout for voids, and specify helical piers or mass-concrete pins only where bearing has failed. Stitch fractured masonry with stainless helical bars set in low-modulus mortar, and add discreet ring beams where racking persists. You’ll coordinate drainage and Garden landscaping so surface water sheds away from new footings. Finally, you’ll record every intervention, keeping details reversible where possible to protect the cottage’s historical significance and satisfy conservation review.
Restore the Gatekeeper’s Cottage Roof Properly
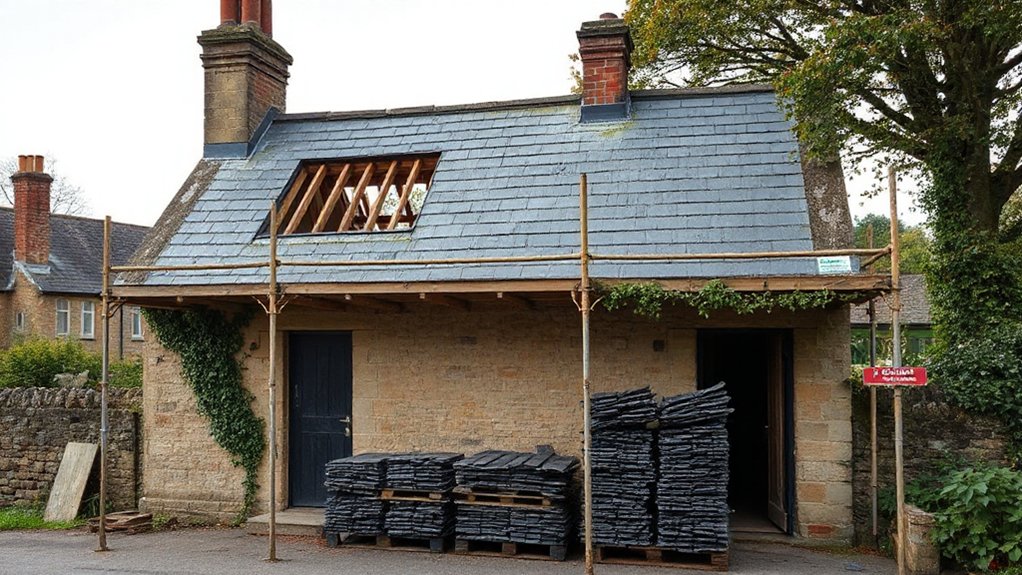
Although the roof may look like a straightforward repair, it functions as the cottage’s primary environmental control layer, so you must restore it as a complete system rather than a patchwork of tiles and timber. Survey rafter lines, then set breathable underlay and continuous ventilation to control interstitial moisture. Reuse sound slates or clay tiles to preserve historical significance, and match nail type, gauge, and coursing for visual discipline. Detail leadwork at abutments and valleys with correct laps and drips, and integrate discreet snow guards where exposure demands.
- Specify a vapor-open sarking, counter-battens, and eaves vents for airflow continuity.
- Rebuild flashings, gutters, and downpipes to manage runoff without saturating walls.
- Align rainwater discharge with garden landscaping, using soakaways and fall grading to protect foundations.
Repoint the Gatekeeper’s Cottage Stonework With Lime
After you’ve rebuilt the roof’s moisture-control strategy, the stone walls must shed water and dry predictably, and that performance depends on lime repointing rather than hard, impermeable cement. You’ll rake joints by hand to a sound depth, protect arrises, and remove salts and dust so the new bond can carbonate evenly.
Choose a Lime mortar matched to the original in color, aggregate grading, and compressive strength, keeping it weaker and more vapor-open than the masonry. You’ll pre-wet the wall, pack in lifts, and tool a slightly recessed, compacted finish that honors the facade’s shadow lines. Control curing with misting, shade, and windbreaks; rapid drying causes shrinkage cracks. This method supports stone preservation by allowing sacrificial joints to weather, not the stone.
Save Original Cottage Doors, Windows, and Hardware
Once the stonework and moisture paths behave as intended, you can turn to the cottage’s doors, windows, and ironmongery, because these assemblies define both the façade’s proportions and the building’s air‑ and water‑control layers. You’ll document each leaf, sash, and hinge, then repair rather than replace, retaining tool marks that carry historical significance. Strip paint with low-heat methods, splice decayed timber with matching grain, and bed glazing in linseed putty to keep sightlines crisp.
- Salvage original locks, latches, and keep plates; burnish, oil, and refit to true margins.
- Rehang doors on tightened screws and shimmed hinges so they close without racking.
- Weather-check frames, then repoint perimeter joints with lime for controlled drainage.
Align finishes to Garden landscaping views and estate hierarchy.
Insulate and Heat the Gatekeeper’s Cottage Without Damp
You’ll specify breathable insulation—such as wood fibre, hemp-lime, or sheep’s wool—to raise thermal performance while preserving vapour permeability through the wall build-up. You’ll pair that fabric-first approach with damp-proof heating strategies, favouring low-temperature radiant systems, correctly sized heat pumps, and controlled setpoints that avoid cold-surface condensation. You’ll then lock in performance with ventilation and moisture control via continuous extract, balanced MVHR where feasible, and measured humidity targets to keep interstitial moisture in check.
Breathable Insulation Choices
Because the gatekeeper’s cottage relies on hygroscopic masonry and lime-based finishes to manage moisture, your insulation strategy must remain vapour-open so the wall can dry in both directions rather than trapping interstitial condensation. Specify breathable insulation that pairs capillary activity with moderate thermal resistance, and favour natural materials that tolerate seasonal humidity swings. You’ll also need continuity at junctions, so the upgraded envelope reads as a coherent architectural layer rather than piecemeal patches.
- Woodfibre boards: high heat capacity, good capillarity, and robust fixing substrates for lime plaster.
- Hemp-lime or cork: low embodied carbon, resilient to salt migration, and compatible with irregular stonework.
- Cellulose in service voids: dense-pack to limit convection while keeping vapour diffusion predictable.
Detail reveals and skirtings to protect historic profiles, and keep membranes to vapour-variable, not impermeable, where necessary.
Damp-Proof Heating Strategies
Although breathable insulation reduces heat loss, it won’t prevent damp unless the heating system actively stabilises surface temperatures and manages moisture loads. You should design for continuous, low-temperature heat so masonry stays above dew point; avoid short, high-output bursts that chill between cycles and drive condensation at reveals and corners.
Specify oversized emitters—radiators or underfloor loops—running at 35–45°C flow, paired with weather compensation and setback limits. Maintain even heat in closed rooms with thermostatic zoning, and prioritise rapid warm-up only where you can hold temperature. Integrate Damp proofing membranes at ground interfaces, then keep floor surfaces warm with perimeter circuits. Use Humidity barriers only where vapour risk is predictable, and detail junctions to prevent thermal bridging and cold spotting.
Ventilation And Moisture Control
How do you insulate and heat a gatekeeper’s cottage without trapping moisture in its masonry? You’ll treat the wall as a vapour-open assembly, pairing breathable insulation with deliberate Air circulation so latent humidity can migrate and be exhausted. Keep heating steady and moderate; rapid temperature swings drive interstitial condensation. Specify lime plaster and capillary-active boards to buffer moisture, then detail junctions to avoid cold bridges at reveals and eaves. For mold prevention, you’ll control internal moisture loads and verify performance with measurement, not guesswork.
- Install continuous mechanical extract in kitchen and bath, sized to occupancy and run-on timers.
- Add trickle vents or a passive stack to maintain background airflow through the plan.
- Monitor RH and dew point; target 40–60% and adjust heat and ventilation seasonally.
Plan Gatekeeper’s Cottage Electrics and Plumbing Routes
Before you close up floors or lime-plastered walls, map the Gatekeeper’s Cottage’s electrical and plumbing routes as a single coordinated services layout, fixing cable and pipe runs to structure, wet zones, and appliance positions. Set a riser strategy: keep hot, cold, and waste stacked, minimize penetrations through joists, and sleeve any masonry crossings. Specify RCD-protected ring finals, dedicated radials for heat pump, immersion, and kitchen loads, and bonding for all metal pipework. Route data and alarm cabling separately to prevent interference. For plumbing, grade wastes to fall, place rodding access, and allow isolation valves at each branch. Coordinate incoming mains and ducting with Landscaping design, and document all interventions for Historical accuracy and future maintenance.
Match Interior Finishes to the Cottage’s Original Era
Once you’ve fixed the hidden services strategy, match the cottage’s interior finishes to its original era by specifying materials, profiles, and surface treatments that align with the building’s construction date rather than modern default systems. You’ll start by mapping surviving evidence—paint ghosts, nail patterns, and skirting shadow lines—then replicate with compatible substrates and vapour-open coatings.
- Specify lime plaster repairs with horsehair or cellulose reinforcement, then finish in distemper or casein for correct sheen.
- Reproduce joinery: ovolo architraves, tapered skirtings, and panelled doors, using linseed-oil paint and hand-planed edges.
- Select Vintage wallpaper on rag or woodpulp stock, and anchor rooms with period furniture scaled to low ceilings.
You’ll avoid gypsum overcladding, acrylic gloss, and oversize trims that visually redate the plan and proportions.
Frequently Asked Questions
How Do I Research the Cottage’s Original Gatekeeper and Estate History?
You research the original gatekeeper and estate history by consulting Local archives, parish registers, census schedules, and estate ledgers; cross-reference maps, deeds, and tax rolls. Compile Historical documentation into a provenance dossier guiding authentic material and layout decisions.
Can the Restored Cottage Be Used as a Short-Term Rental Legally?
You can, if you meet zoning, licensing, and occupancy codes, plus Historic preservation approvals. You’ll document egress, fire separation, accessibility, and parking. You’ll also plan Community engagement to mitigate nuisance, traffic, and impacts.
What Insurance Is Needed During Restoration and After Completion?
You’ll need Restoration insurance: builder’s risk for materials/works, general liability, and workers’ compensation for contractors. After completion, meet Insurance requirements with property and liability coverage, plus rental/landlord endorsement, code-upgrade, and professional-design liability.
How Can I Prevent Bats or Protected Birds From Delaying Work?
Schedule ecological surveys early, then phase work around findings. Specify bat deterrents at eaves and soffits, and integrate bird nesting prevention meshes. You’ll seal entry gaps, install one-way valves, and document compliance.
Are There Grants or Tax Reliefs Specifically for Estate Outbuildings?
Yes—you can access heritage grants and tax incentives for qualifying outbuildings, especially if listed or within a conservation area. You’ll need conservation-led specifications, approved drawings, and costed schedules to support eligibility and claims.
Conclusion
You’ll finish by proving the cottage’s value lies in restraint: document what you’ve kept, then make every new layer readable, breathable, and reversible. You might object that period-accurate repairs cost more, yet compatible lime mortar, salvage joinery, and discreet services prevent trapped moisture and future failure. When your roof is watertight, structure stable, and finishes historically tuned, you won’t just restore a building—you’ll re-establish its estate role with quiet precision.


