
You walk into the barn and watch thin blades of daylight cut through weathered boards, tracing the dust in the air. Before you sketch open-plan living or add big glazing, you’ve got to test what you’re actually working with: frame stability, roof spread, foundation depth, and whether the timber’s sound or compromised. Then you align the layout with the best light and the strictest planning constraints, because one early assumption can lock in every later decision…
Key Takeaways
- Start with a measured survey and engineer review to confirm structural integrity, foundations, and roof load paths before designing openings.
- Secure planning permission early, especially for listed or conservation settings, and test window, cladding, and access ideas via pre-application sketches.
- Maximise daylight with carefully positioned rooflights and openings that respect bay spacing, headroom, and the barn’s external character.
- Create family-friendly flow using a clear circulation “spine,” open-plan anchors, and subtle zoning via ceiling drops, floor finishes, and built-ins.
- Build a warm, dry envelope with continuous roof insulation, airtight and vapour control detailing, breathable wall build-ups, and correctly commissioned ventilation.
Is This Barn Suitable to Convert?
Before you fall in love with the volume and patina, you need to confirm the barn can take the structural, moisture, and regulatory demands of a home. Start with a measured survey: check foundation depth, wall plumb, and roof spread, then test timber for rot, beetle damage, and undersized members. Map where you can add insulation without trapping moisture; you’ll likely need breathable build-ups, capillary breaks, and repaired gutters to control driving rain. Review floor levels, headroom, and bay spacing so your layout fits without fighting the frame. Plan daylight carefully: existing openings dictate where glazing can land while preserving Barn aesthetics and rustic charm. Finally, confirm access, drainage capacity, and services routes so upgrades don’t compromise the shell.
Do You Need Planning Permission for a Barn Conversion?
Although a barn might sit quietly in open countryside, converting it into a home almost always triggers a planning conversation because you’re changing the building’s use and, in many cases, its external appearance. You’ll typically need full planning permission, or you may qualify for permitted development if the site and proposal meet strict legal requirements. Start by checking whether the barn is listed, within a conservation area, or tied to agricultural occupancy; each condition narrows design freedom and elevates historic preservation duties. Bring your concept sketch to a pre‑application meeting so you can test window positions, cladding choices, and access strategy before spending heavily.
- A new glazed gable framing long field views
- Slim rooflights puncturing dark corrugated sheets
- A discreet driveway sweeping past hedgerows
- Reclaimed brick infill softening old openings
Barn Conversion Surveys: Structure, Roof and Foundations
Once you’ve mapped out the planning route, you need evidence that the barn can take the design load you’re proposing, not just visually but structurally. Commission a measured survey alongside an engineer’s review so your drawings reflect reality, not assumptions, and so you can prove Structural integrity early. Ask for clear spans, wall thicknesses, levels, and any movement indicators, then translate them into a buildable grid for openings, insulation build-ups, and floor depths.
For the roof, you’ll want a timber appraisal, member sizing, and load paths, especially if you’re adding rooflights or a new ceiling line. Your foundation assessment should confirm bearing capacity, depth, and moisture conditions, guiding whether you can use a slab, suspended floor, or discreet underpinning approach.
Common Barn Defects (and How to Fix Them)
Because barns were built for storage and livestock rather than airtight comfort, you’ll typically uncover defects that look cosmetic but behave structurally—ongoing movement, water ingress, timber decay, and poorly tied masonry. Start by mapping cracks and levels; if they’re active, stabilise with discreet steel, better restraints, or local underpinning before you chase finishes.
- Sagging purlins above vintage tools: sister new timbers, add hidden plates, and improve bearing ends.
- Damp splash zone by old agricultural machinery bays: lower ground, add French drains, lime repoint, and breathable renders.
- Rotten sole plates at thresholds: splice with treated oak, introduce capillary breaks, and keep edges ventilated.
- Bulged stone walls: rebuild local lifts, stitch with helical bars, and install through-ties where needed.
Seal later, once the structure’s calm.
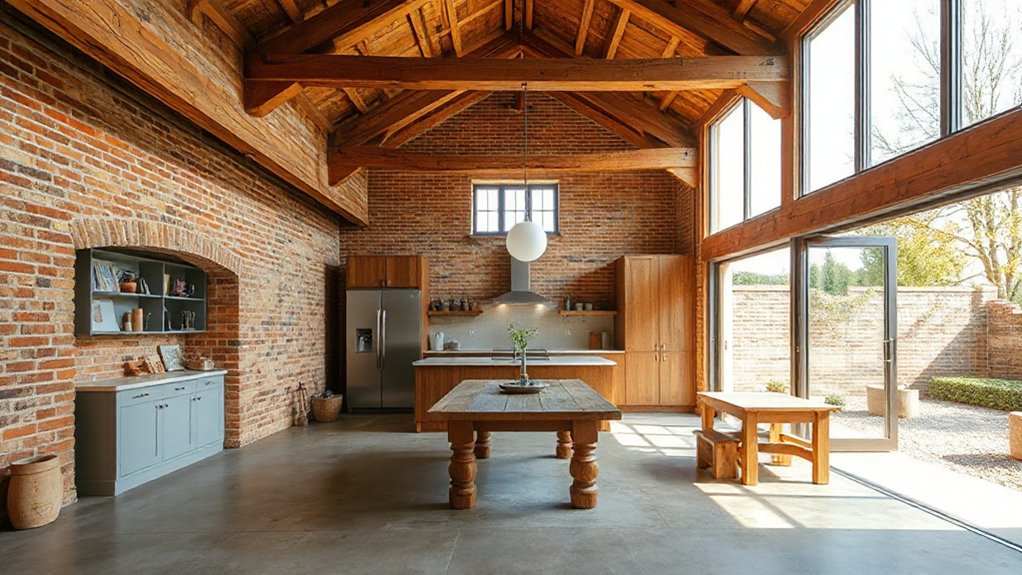
Family-Friendly Barn Conversion Layouts That Work
You’ll get the best family performance from a barn conversion when you organize an open-plan living zone around clear, functional anchors—kitchen, dining, and a snug—so sightlines stay long and supervision stays easy. You should then map kid-safe circulation paths that avoid cutting through cooking and stove areas, keeping routes wide, direct, and free of door-swing pinch points. If you align these paths with existing bays and openings, you’ll reduce structural changes while making daily movement calmer and safer.
Open-Plan Living Zones
How do you keep a barn’s big-volume drama without turning daily life into an echo chamber? You zone the open plan with structure, not walls. Put kitchen, dining, and lounging on a clear axis, then use ceiling drops, changes in floor finish, and built-ins to signal “rooms” acoustically and visually. Anchor the heart with a solid island and a long table; you’ll tame scale and simplify routines. Add sound absorption early—soft furnishings, lined curtains, and timber slats—so conversation stays easy. Display Barn art where sightlines end, and tuck utility functions near former animal shelters to keep mess out of view.
- A matte oak slat “cloud” hovering over the sofa
- A polished concrete “runway” to the kitchen
- A fireplace block as a visual stop
- Low storage benches framing a play-friendly rug
Kid-Safe Circulation Paths
Zoning an open-plan barn keeps the volume legible; next, make the routes between those zones safe for kids without clogging the space. You’ll reduce collisions by setting a clear “spine” corridor, then branching to rooms with generous sightlines. Keep pinch points wider than 1.1m, and avoid furniture drift by using built-in benches or low storage as soft edges. Specify non-slip, matte flooring and flush thresholds; if you need level changes, use 1:20 ramps, not single steps. Add glazing or internal windows at child height so you can supervise without shouting. Protect corners with radiused joinery and place doors so they don’t swing into play zones. Extend the spine to the patio for Outdoor aesthetics and garden integration.
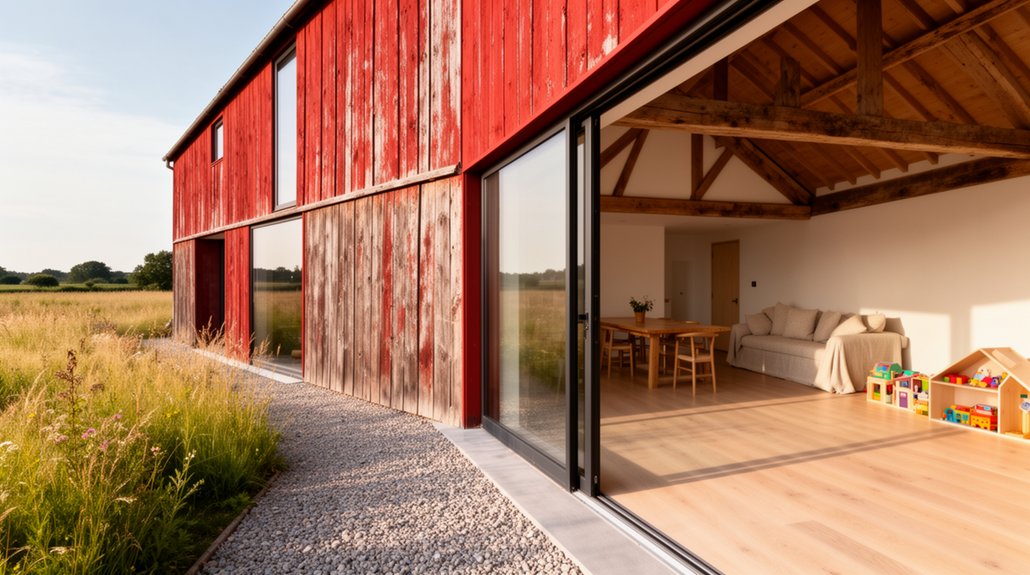
Glazing Ideas That Keep the Barn Character
While generous glazing can flood a barn conversion with daylight, it only works if the openings respect the original rhythm and robustness of the structure. Keep new apertures aligned to existing bays, posts, and door heads so the elevation still reads as agricultural, not suburban. Choose slim profiles but weighty detailing: deep reveals, expressed lintels, and shadow gaps that echo thick walls.
- A full-height screen set behind original timber doors, so the barn face stays intact
- Steel-framed picture windows tucked between posts, with dark powder coat
- Rooflights aligned to rafters, sitting low to avoid a “glass strip” look
- Small panes near Rustic decor zones, matching sightlines to Traditional fixtures
Use shutters, internal reveals, and consistent mullion spacing to maintain character.
Insulation Options for a Barn Conversion
Because a barn’s charm often comes from uninsulated masonry, open rafters, and irregular timber frames, you’ll get the best result by treating insulation as a design decision as much as a thermal upgrade. Start by deciding what you want to keep visible: if you’re preserving stone or brick internally, use breathable Insulation materials such as wood fibre boards or lime-compatible systems to control moisture while improving Thermal performance. Where you can add build-up, warm-roof assemblies with rigid wood fibre or high-density PIR give strong U-values without chunky rafters. For uneven frames, sprayed cellulose or hemp batts infill neatly and reduce gaps, but you’ll need a robust air-tight layer to prevent drafts. Detail junctions around steel, sills, and eaves to avoid cold bridges and staining.
Heating and Ventilation for a Barn Conversion
You’ll get the best results if you design heating and ventilation as one system, starting with low‑carbon options like an air‑source heat pump paired with underfloor heating or oversized radiators. Your insulation strategy must lock in heat and reduce peak loads, so you’re not oversizing equipment or paying for avoidable losses. Then you’ll control moisture with purposeful airflow—MVHR where the envelope is tight, or zoned extract and trickle vents where it’s not—so the barn stays dry, comfortable, and durable.
Low-Carbon Heating Options
After you’ve tightened the building fabric and mapped heat demand room by room, choose a low‑carbon heating system that works with the barn’s thermal mass and open volumes rather than fighting them. An air‑to‑water heat pump pairs well with low‑temperature emitters, while a ground‑source system rewards you if you’ve got land for trenches. Add Solar panels to offset electrical load, and use smart thermostats to zone mezzanines, bedrooms, and double‑height living areas so you’re not heating empty air. Keep airflow deliberate: supply where people sit, extract where moisture forms, and let heat circulate gently rather than blasting.
- A slim plant room tucked behind oak posts
- Quiet underfloor loops threading across stone flags
- A compact cylinder beside the utility wall
- Roof‑mounted PV catching winter sun
Insulation And Heat Retention
While a heat pump can deliver low‑carbon warmth, insulation and heat retention decide whether that warmth stays where you live. Start by mapping the barn’s thermal envelope: roof, walls, slab, openings, and junctions. Prioritise continuous Thermal insulation at the roof first, because warm air rises, then treat walls with systems that respect uneven masonry and maintain internal dimensions. Keep insulation layers unbroken at eaves, corners, and around steelwork to avoid cold bridges that drive up running costs. Upgrade glazing and doors, but design reveals and frames so insulation returns meet them cleanly. Seal draught paths at thresholds and service penetrations, since uncontrolled air leakage defeats Heat retention. Finally, size insulation thickness against heritage constraints and daylight goals, balancing U‑values with finish build-ups.
Ventilation And Moisture Control
Because a converted barn shifts from a leaky, breathable shell to a sealed, insulated envelope, you must design ventilation and moisture control as a deliberate system rather than an afterthought. Aim for consistent air change rates, not occasional purge ventilation, so Air quality stays stable across seasons. Use a balanced MVHR where ducts can run cleanly, and pair it with targeted extract in kitchens, baths, and utility spaces. Detail airtight layers and vapour control to prevent interstitial condensation; moisture management starts at junctions, not with dehumidifiers. Commission the system and verify flows after fit‑out, when resistance increases.
- A slim duct run tucked along a timber truss bay
- A quiet extract grille over a steamy shower
- A concealed condensate drain from the MVHR core
- A humidity sensor blinking near the boot room door
Water, Drainage and Electrics in a Barn Conversion
Even if the structure’s already sound, you’ll only get a comfortable, light‑filled home once you’ve planned water, drainage, and electrics as a single, coordinated layout rather than three separate jobs. Start by mapping “wet” rooms back‑to‑back to shorten pipe runs, reduce heat loss, and simplify Water management. Design drainage with proper falls, rodding access, and venting, and confirm where you’ll connect to mains or treat on site without compromising levels or thresholds.
Next, treat electrics as part of the architecture: route cables through service zones, not historic masonry, and keep ceiling voids clear where you want clean rooflines and rooflights. Separate circuits for kitchen, heating, and outbuildings, protect all outdoor runs, and locate the consumer unit for easy access. Prioritise electrical safety with RCD/RCBO protection and bonded services.
Barn Conversion Costs, Timeline and Avoidable Mistakes
You’ll keep design decisions on track only if you map a clear budget breakdown that includes hidden fees like surveys, structural steel, connection charges, and contingency. You should phase the build realistically—weatherproof shell, services, insulation, then interiors—so your timeline matches lead times and inspections. You’ll avoid expensive rework by locking in openings, levels, and daylight strategy early, and by resisting last‑minute layout changes once trades are on site.
Budget Breakdown And Hidden Fees
Three figures shape every barn‑conversion budget: the shell you can realistically keep, the performance upgrades you can’t skip (insulation, airtightness, glazing), and the “invisible” compliance costs that rarely show up in early sketches. Price the shell by condition, not romance: rot, movement, and roof spread trigger steel, stitching, and new trusses. Lock your thermal strategy early because window sizes and reveals drive both cost and daylight quality. Then audit constraints: Historical preservation can dictate lime mortars, matching timber profiles, and specialist labor. Material sourcing affects lead times and waste, so specify reclaimed versus new upfront and confirm grades.
- Engineer’s trial pits and drain runs under the yard
- Scaffold wraps hugging weathered boards for weeks
- Fire‑rated linings hidden behind crisp oak slats
- Utility upgrades: new supply, meter moves, trenching
Realistic Phasing And Timeline
Once you’ve priced the shell, the performance upgrades, and the compliance items that hide in the background, map them onto a build sequence—or the programme will punish you with downtime, rework, and rushed detailing. Start with surveys, trial pits, and structural design, then lock in planning and listed-building conditions so Barn preservation measures aren’t value-engineered late.
Phase 1: enabling works and stabilisation—temporary weathering, underpinning, timber repairs—so you protect historical significance before you open up the frame. Phase 2: new foundations, slab, and drainage, then first-fix services while access is clear. Phase 3: envelope upgrades—roof, airtightness layer, windows, insulation—before interior partitions. Phase 4: second-fix joinery, kitchen, bathrooms, and finishes. Allow curing and lead times; programme inspections at each milestone.
Common Pitfalls To Avoid
Although barn conversions look straightforward on paper, the costs and timeline often unravel through a handful of repeatable mistakes: underestimating hidden compliance work (structure, fire strategy, acoustics, drainage), committing to a layout before the frame and levels are properly surveyed, and specifying “heritage” details without a buildable junction strategy. You’ll stay on budget if you test assumptions early and design details you can actually build, balancing Historic preservation with modern aesthetics. Lock your scope before pricing, and keep contingency for unknowns you can’t see until strip‑out. Avoid bespoke glazing and steelwork until you’ve measured openings, tolerances, and movement. Watch for these red flags:
- Bowed rafters casting uneven shadow lines
- Damp plumes rising from a bare slab
- Patchwork stonework rejecting new insulation planes
- Temporary props turning into permanent “solutions”
Frequently Asked Questions
How Do You Manage Acoustics and Reduce Echo in Open Barn Spaces?
You manage acoustics by breaking up reflections: add Acoustic panels, thick rugs, curtains, and upholstered furniture. Use Soundproofing techniques like insulated stud walls, resilient channels, and sealed gaps. Vary ceiling heights, add baffles.
Can You Add a Mezzanine Floor Without Losing Natural Light?
Yes—you can add a mezzanine floor without sacrificing natural light if you keep the mezzanine design shallow, use open balustrades, align voids with windows, choose light finishes, and integrate skylights strategically overhead.
What Are the Best Ways to Control Dust From Exposed Timber Beams?
Like a gramophone, you’ll control dust by prioritizing Dust prevention: vacuum-brush beams, run HEPA filtration, and maintain humidity. For Beam treatment, seal with matte clear coat or wax; avoid flaky stains, and schedule periodic wipe-downs.
How Do You Design Safe Play Areas in Double-Height Barn Rooms?
You design safe play areas by zoning with soft flooring, guarding edges with compliant balustrades, and adding impact-rated glazing. Prioritize playground safety and child proofing strategies: anchored furniture, stair gates, corner padding, clear sightlines.
How Can You Preserve Original Features While Meeting Modern Fire Safety?
In one listed farmhouse retrofit, you kept beams exposed by adding intumescent coating, hidden sprinklers, and fire-stopped service runs. For Historical preservation, you’ll match linings; for Modern insulation, you’ll use mineral wool behind fire-rated boards.
Conclusion
Nearly 60% of a barn conversion’s heat loss can escape through the roof if you don’t upgrade insulation and airtightness, so you’ll want to start there and design the shell before the interiors. Keep the original volume, but carve flexible zones with glazed openings that pull daylight deep into the plan. You’ll avoid costly rework by sequencing surveys, permissions, and services early—then you can layer efficient heating, balanced ventilation, and durable finishes.


