
You’ll start by checking headroom, usable floor area, ridge/eaves limits, roof type (cut or trussed), and obstacles like tanks, chimneys, and party-wall interfaces. Choose a rear dormer, hip-to-gable, or compact dormer that stays within Permitted Development, then secure Building Regs approval (structure, Part B fire escape, Part K stairs, Part L insulation/ventilation) and consider a Lawful Development Certificate. Plan the ensuite around the soil stack with short falls, and upgrade acoustic/fire linings. Next, you’ll see how layout, stairs, and services come together.
Key Takeaways
- Check headroom, roof structure, and obstacles; confirm compliant access, escape route, smoke alarms, and fire doors before committing to a layout.
- Choose the best conversion type for a mid-terrace (rear dormer, hip-to-gable, compact dormer), keeping within Permitted Development limits.
- Plan the master suite zones: bed along the ridge in full-height areas, bathroom near existing soil stack, and storage built into knee walls.
- Design a compliant staircase (≤42° pitch, consistent rise/going, adequate headroom) and route services efficiently with correct pipe falls and rodding access.
- Deliver Building Regulations requirements: structural calculations, fire resistance, soundproofing to party walls, and robust insulation, vapour control, and ventilation to prevent condensation.
Check If Your Mid-Terrace Loft Is Suitable
Before you commit to turning your mid-terrace loft into a master suite, you’ll need to confirm the space can legally and safely support a habitable room. Measure head height and usable floor area, check ridge and eaves constraints, and verify the ceiling joists aren’t being asked to act as floor joists without strengthening. Identify water tanks, chimney stacks, and party-wall interfaces that may restrict layout or require agreements.
Confirm safe access and means of escape compliance: stair geometry, protected route, smoke detection, and fire-resisting doors below where required. Assess roof structure type (cut vs trussed) and any spread risk. Specify Loft insulation to meet thermal targets without blocking ventilation paths and risking condensation. Plan Roof window placement to satisfy daylight, privacy, and structural opening limits.
Choose the Best Mid-Terrace Loft Conversion Type
Once you’ve confirmed the loft can meet structural and fire-safety requirements, you need to pick a conversion type that fits your mid-terrace roof form, party-wall constraints, and master-suite brief without triggering unnecessary planning risk. If you’ve got a traditional pitched roof with adequate ridge height, a rear dormer usually gives the best headroom for a full-width bedroom and en-suite, while keeping works largely to the rear plane. If height’s tight, a hip-to-gable won’t apply on most mid-terraces, so consider a compact dormer plus lowered ceiling only where spans allow. A mansard maximises volume but increases build complexity and junction detailing at party walls. Shape the interior with lighting design and coordinated color schemes to manage low eaves and emphasise circulation routes.
Planning Permission and Building Regs (Mid-Terrace)
Although many mid-terrace loft master suites fall under Permitted Development, you still need to confirm that your proposal stays within PD volume limits, doesn’t breach roof-plane restrictions (especially on the front elevation), and won’t trigger planning conditions from conservation areas, Article 4 directions, or previous extensions on the property. Get a Lawful Development Certificate to de-risk resale and enforcement.
For Building Regs, you’ll submit plans covering structural design (new floor joists, steel beams, load paths), fire safety (protected stair route, FD30 doors, mains-wired alarms), and escape/egress where required. Demonstrate compliant Roof insulation U-values, ventilation, and condensation control. Check Party Wall duties to both neighbours early. Finally, verify Building height impacts: dormers mustn’t raise the ridge, and any roof alterations must preserve stability.
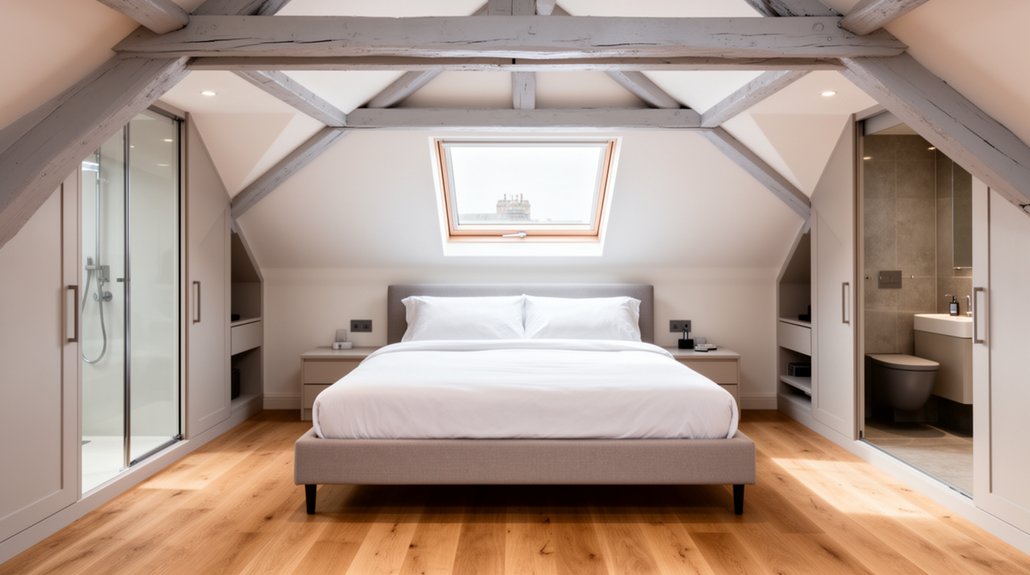
Design a Master Suite Layout Under Roof Slopes
You’ll set the bed under the eaves only where headroom works in practice, keeping clear routes to the stair enclosure and any required escape window. You’ll plan the bathroom zone around the highest ridge line to accommodate compliant ventilation, drainage falls, and safe access without stooping hazards. You’ll then run built-in storage along the knee walls, maintaining access to insulation and services while preserving the minimum clearances your Building Regs sign-off expects.
Bed Placement Under Eaves
Where should the bed go when the ceiling drops away under the eaves? Start by mapping standing-height zones: keep the circulation line and dressing side where you’ve got comfortable headroom, then push Bed placement into the low-slope area. Position the headboard on the tallest wall you can, so you can sit up without hitting plasterboard, and align the bed length parallel to the ridge to minimise low-clearance pinch points. Maintain safe access each side and avoid blocking rooflight escape routes or smoke alarm coverage. Use Eaves storage to reclaim the awkward void while keeping clear of insulation and ventilation paths.
- Place bedside switches at accessible height, not under the tightest slope
- Keep minimum walkway width for night-time egress
- Set wardrobes or drawers into eaves, behind fire-rated linings
Bathroom Zone Planning
Once you’ve fixed the bed and circulation line in the best headroom zone, lock in the bathroom footprint so the lowest slopes work for fixtures, not for walking. Put the shower and WC where standing height isn’t required; keep the basin and entry where you’ve got comfortable clearance. Align the soil stack with existing plumbing below to reduce boxing and comply with fall requirements on waste runs. Detail a fully tanked wet zone and specify a sealed Shower enclosure to control splash in tight eaves. Plan Bathroom ventilation to meet Building Regulations: route a ducted extractor to an external grille, size it for the room volume, and include overrun and backdraft protection. Maintain access to valves, traps, and inspection points for future servicing.
Storage Along Knee Walls
How do you reclaim the awkward low-slope margins without sacrificing headroom or access? Build a continuous Knee wall and turn the dead zone behind it into controlled Storage solutions, but keep the layout compliant and serviceable. Set the wall line where you still maintain clear circulation to the bed and egress routes, and don’t block roof ventilation paths. Use fire-rated linings where the new enclosure forms a protected route, and keep electrical junctions accessible via removable panels. Insulate and air-seal the knee wall face to prevent cold bridging and condensation in the void.
- Full-height doors at the gable ends for bulky items
- Drawer banks on heavy-duty runners for low-clearance access
- Lift-up hatch bays with moisture-resistant MDF and stop beads
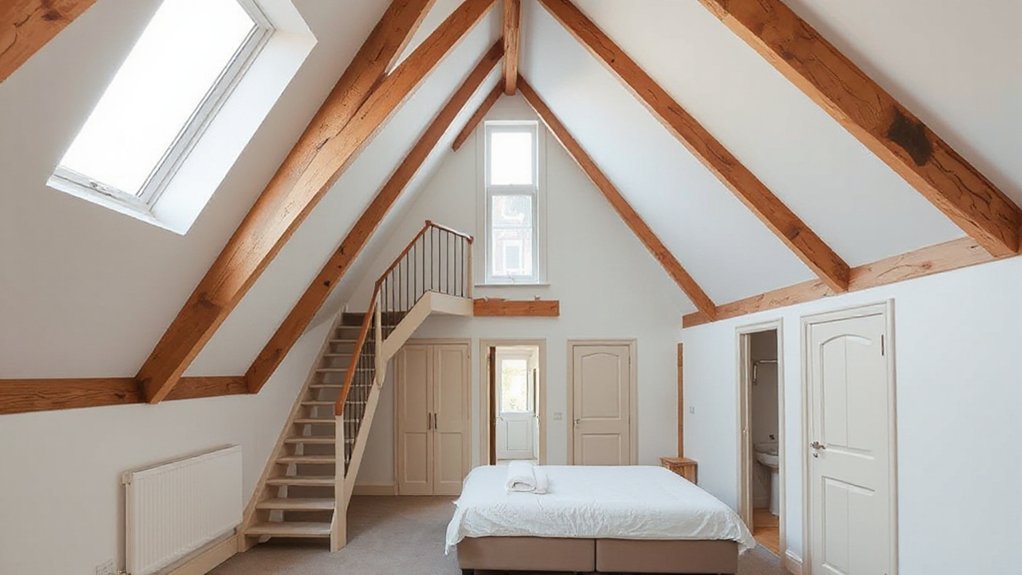
Fit Stairs in a Mid-Terrace Without Losing Space
Although mid-terrace layouts rarely offer spare circulation space, you can still fit a loft-stair by selecting a configuration that meets Part K and Part B requirements without sacrificing a full room. Set the stair over the existing flight to stack headroom zones, or use a compact winder where landing space is tight. Keep pitch at or below 42°, provide consistent rise/going, and maintain 2.0 m headroom where practicable (accepting reductions only where guidance allows). Use fire-resisting enclosure and a compliant escape route to satisfy Part B. Choose Staircase materials that keep structure slim: engineered timber strings, steel spine, or closed risers for smoke control. Integrate Loft lighting ideas with low-glare wall lights to avoid heat build-up.
Route Ensuite Plumbing and Drainage in Terraces
You’ll start by locating the existing soil stack and checking whether you can tie in at loft level without breaching fire-stopping or reducing required ventilation, in line with Building Regulations Part H. You’ll then set out pipe runs with compliant diameters and continuous falls, keeping horizontal distances short so you don’t need pumped waste or excessive boxing-in. You’ll route services internally where possible to minimize party wall chasing and noise transfer, and you’ll document any unavoidable work under the Party Wall etc. Act before you open up the structure.
Locate Existing Soil Stack
One practical starting point for an ensuite in a mid-terrace loft conversion is to locate the existing soil stack and plan your new WC and shower waste runs around it. In terraces, the stack often sits on a party wall or rear elevation, so you’ll need accurate tracing from the ground-floor WC through boxing and joist zones, without compromising structure or fire stopping.
- Check stack diameter, material, joints, and any existing rodding access points
- Confirm venting termination and whether an AAV is permitted under Building Regulations
- Map service routes and choose drainage solutions that minimise offsets and new penetrations
If you’re proposing new external pipework, consider soil analysis and local ground conditions for any alterations near foundations. Keep acoustic insulation and airtightness detailing in your boxing design.
Plan Pipe Falls Carefully
Before you finalise the ensuite layout, calculate pipe falls from each appliance back to the soil stack and check you’ve got the depth to achieve them within the joist zone without notching beyond permitted limits. Aim for 18–90mm per metre on 32–40mm wastes and keep 110mm soil gradients modest to prevent solids stranding. Keep runs short, minimise bends, and use swept fittings to reduce blockage risk. If you can’t maintain fall, redesign the plumbing layout, raise the tray, or form a boxed drop within the room rather than forcing flat sections. Specify rodding access at direction changes and near connections. Vent traps properly, keep branch lengths compliant, and coordinate pipe installation with structure, fire-stopping, and acoustic separation details throughout.
Minimize Party Wall Disruption
Once you’ve proved the pipe falls work, keep the new ensuite drainage and hot/cold feeds off the party wall wherever possible, because chasing, drilling, or notching a separating wall can trigger Party Wall etc. Act 1996 duties, neighbour notices, and disputes. Instead, route services in internal stud zones, within floor voids, or behind new independent linings so the existing masonry remains untouched. Use swept bends and accessible rodding points to meet Building Regulations Part H, and maintain isolation valves and service access for Part G. Treat every penetration as an acoustic weak point and rebuild the lining for soundproofing continuity.
- Box soil/vent stacks in an independent frame, not fixed to the Party wall
- Use acoustic pipe wraps and mineral wool in voids
- Seal collars and maintain fire-stopping to Part B
Insulation and Ventilation to Stop Condensation
Although a loft master suite feels warm and cosy, it can become a condensation trap if you don’t pair high-performance insulation with controlled ventilation. Meet Part L by insulating the rafters with rigid PIR or mineral wool to the specified U-values, and fit a continuous vapour control layer on the warm side, taped at laps and sealed at penetrations to maintain airtightness. Keep a ventilated void above insulation where required, using eaves vents and ridge or tile vents, so moisture can purge safely.
For condensation prevention, follow Approved Document F: install a humidistat-controlled extractor to the ensuite, ducted to an external terminal, and provide background trickle ventilation where specified. Choose insulated, short duct runs and add airtight grommets to stop cold-spotting and leakage.
Fire Safety and Party-Wall Soundproofing Rules
When you convert a loft into a master suite in a mid-terrace, you must treat fire separation and party-wall acoustic performance as core Building Regulations issues, not optional upgrades. You’ll typically need compliant escape provision (Approved Document B): a protected stair enclosure to a final exit, FD30S doors on habitable-storey rooms, and interlinked smoke/heat alarms. Any new steel or altered joists must meet required fire resistance via tested plasterboard build-ups and sealed service penetrations.
- Maintain 30/60-minute fire-resisting construction where the escape route demands it
- Upgrade the party wall soundproofing using independent linings, mineral wool, and resilient bars (Approved Document E)
- Seal flanking paths: eaves voids, sockets, downlights, and floor perimeter gaps to preserve acoustic and fire safety performance
Costs, Timeline, and Picking a Loft Conversion Builder
Before you price anything, map the scope and compliance items that drive cost and programme in a mid-terrace loft master suite—structural steel and floor upgrades, staircase formation, dormer/roof works, insulation and airtightness to Part L, drainage and ventilation to Parts H and F, plus the Part B/E fire and acoustic measures you’ve already allowed for. Then build a cost plan: prelims, design, Building Control, party-wall survey, and contingencies for hidden rafters/services. Your timeline typically runs 10–16 weeks on site after 4–8 weeks of design and approvals, depending on Roof window options, dormer complexity, and lead times. Vet builders for loft-specific refs, structural experience, and clear inclusions. Require an itemised quote specifying Loft insulation U-values, ventilation rates, and staged inspections. Use a written contract and payment schedule.
Frequently Asked Questions
Will a Loft Conversion Increase My Council Tax Band in a Mid-Terrace?
A loft conversion usually won’t raise your council tax band immediately; valuation often updates on sale. You must follow Building regulations, and Design considerations like added floor area and services can trigger reassessment by the VOA later.
How Much Added Resale Value Does a Master-Suite Loft Conversion Typically Bring?
You’ll typically add 10–20% resale value; like turning attic “ore” into gold, you’ll polish results with compliant Interior lighting. Secure Building permits, meet fire/egress regs, and local comps will set your uplift.
Can I Stay Living in the House Throughout the Loft Conversion Works?
Yes, you can usually stay, but expect disruption. You’ll need safe access, dust control, and compliant temporary fire separation. Plan furniture arrangement and lighting design early, and coordinate inspections and working hours.
How Do I Handle Disputes if Neighbours Object to the Construction Noise?
Like a telegram, you’ll document impacts and act fast: apply noise mitigation, schedule within permitted hours, and maintain neighbor communication. Issue written notices, log readings, offer respite, and escalate via council environmental health or mediation.
What Warranties or Guarantees Should I Expect From a Loft Conversion Builder?
You should expect a written workmanship warranty (typically 12–24 months), manufacturer guarantees, and insurance-backed cover if offered. Confirm Building permits compliance and Structural assessments sign-off, plus defect liability, snagging, and clear exclusions.
Conclusion
Convert your mid-terrace loft into a master suite by validating head height, structure, and party walls, then selecting a compliant dormer or mansard that meets Building Regulations (Structure, Fire, Part L). You’ll preserve floor area with a space-saver stair and route the ensuite to an existing soil stack to limit drilling and cost. Control moisture with continuous insulation and designed ventilation—UK data shows about 90% of condensation is caused by indoor moisture, not rain.


