
You’re starting with a structure that wasn’t built for comfort, so you’ll assess the cruck blades, tie-beams, and footings before you sketch any layout. You’ll look for rot at post bases, rafter spread, and patched joints that hide movement. If it checks out, you can keep the volume, route services discreetly, and zone living, work, and guest use with lightweight partitions or pods. The key decision comes next…
Key Takeaways
- Survey the cruck frame for geometry clarity, rot, and spread; stabilize bearings and footings before adding new structure.
- Plan a multi-functional layout that preserves the barn’s open volume and avoids cutting or loading principal cruck members.
- Route insulation and services through secondary zones and vapour-open build-ups to prevent interstitial condensation and timber decay.
- Use heritage-appropriate windows and doors with correct proportions, set-back reveals, and airtight taped junctions for comfort without visual harm.
- Secure permissions early—planning, listed consent, and Building Control—backed by heritage and method statements plus repair specifications.
Can Your Cruik (Cruck) Barn Be Converted?
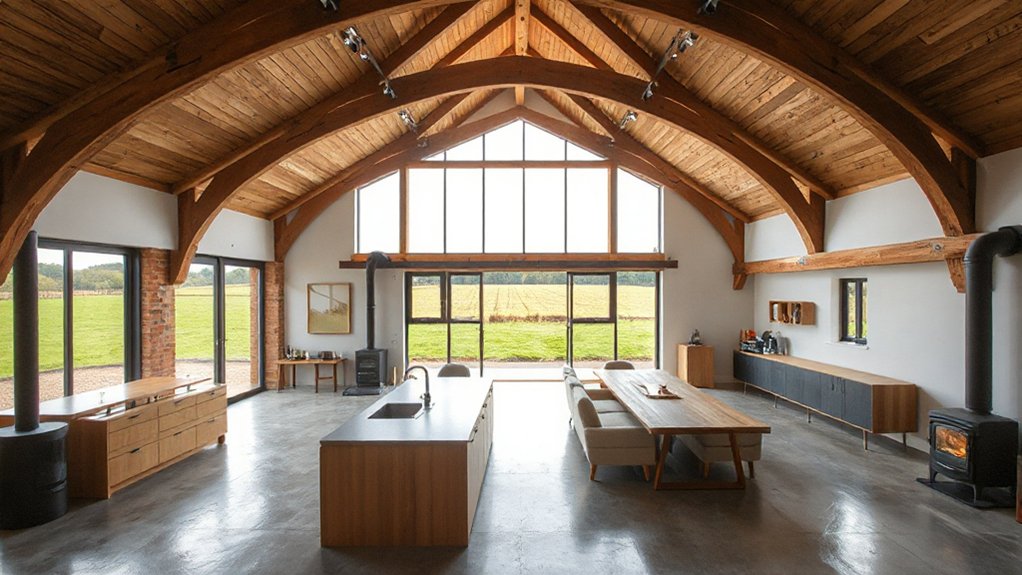
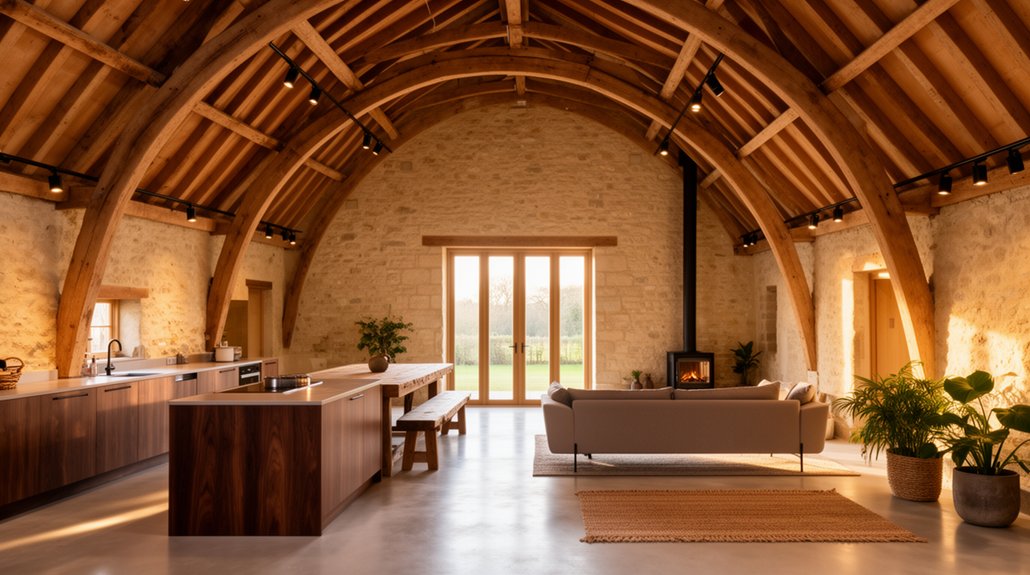
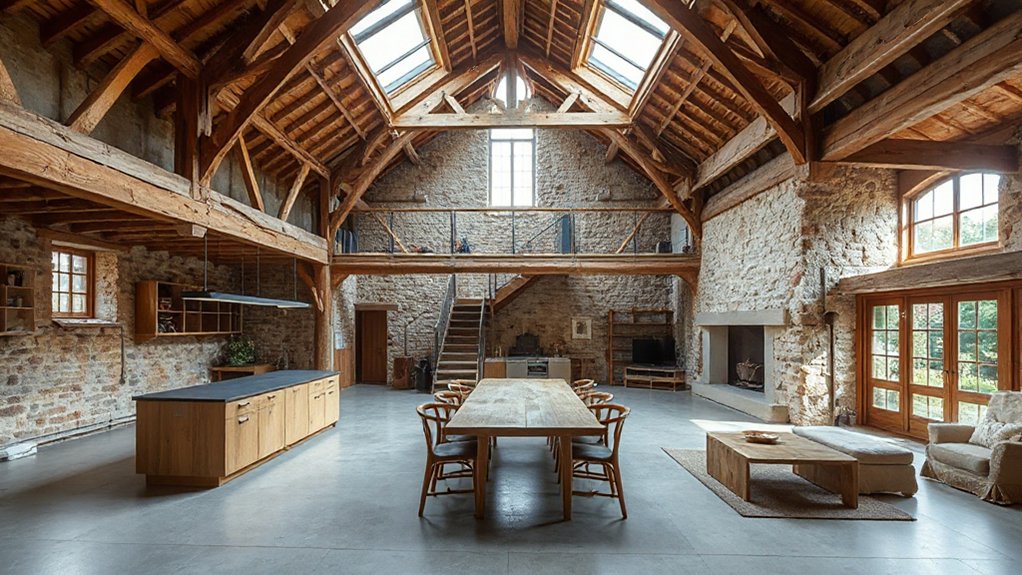
When can your cruik (cruck) barn be converted without fighting the structure? You can proceed when the frame’s geometry is legible: paired blades meet cleanly at the ridge, tie beams align, and bays repeat predictably, letting you plan rooms to the timber rhythm. You’ll map loads with a measured survey, then place new partitions so they don’t interrupt principal members. You can route services in secondary zones—purlin lines, between studs, or within floor build-ups—rather than notching blades. Respect Cruik barn history by keeping the volume readable and detailing junctions so old and new separate cleanly. Traditional craftsmanship guides your choices: reversible fixings, breathable linings, and minimal cutting, so the structure stays the organizer of the layout.
Top Red Flags: Rot, Spread, and Failed Footings
Before you commit to a conversion, you’ll need to flag three structural deal‑breakers: timber rot, frame spread, and failed footings. You can spot rot by probing posts and cruck blades at the base for softness, checking for dark staining, fungal growth, and active moisture paths, then confirming with a moisture meter. You’ll read spread and footing failure through out‑of‑plumb blades, racking, widening joints at the tie, stepped cracking in masonry, and settlement or heave at bearing points.
Timber Rot Warning Signs
Although a cruck barn’s massive timbers look indestructible, rot can advance quickly once moisture gets trapped at joints, sills, and footing interfaces. You’ll spot early timber decay by probing with an awl: sound wood resists; decayed fibers crush, flake, or feel spongy. Track moisture intrusion by checking for persistent staining, salt bloom on adjacent masonry, and darkened end grain around mortises, pegs, and scarf joints.
You should also watch for fungal indicators: white mycelium sheets, black fruiting bodies, and a musty odor in still air. Tap suspect members with a mallet; a dull thud often signals internal voiding. Measure moisture content; readings above ~20% sustain rot. Mark soft zones, map their edges, and recheck after rain to confirm active wetting, not old damage alone.
Footing Failure And Spread
Even if the frame looks plumb at eye level, footing failure can drive cruck spread because the thrust line at each blade wants to walk outward as soon as a sill, padstone, or pier loses bearing. You’ll often see crushed mortar, stepped cracking, or a rotated blade toe that no longer sits square. Check for differential settlement by shooting levels across opposing blade feet and measuring diagonal changes at tie points. Probe for voids under stones and listen for hollow sounds at piers. If you can slide a feeler gauge under a blade shoe, you’ve lost contact. For spread mitigation, you’ll stabilize bearing first: underpin to competent strata, re-bed padstones, and add a discreet tie or strap only after the load path’s restored.
Survey a Cruik Barn Safely (No Damage)
When you survey a cruck barn, treat it like a standing structure with unknown load paths and prioritize a non‑invasive inspection that won’t disturb the frame. Set exclusion zones, use soft‑sole footwear, and avoid leaning ladders on blades or tie beams. Photograph every bay, then mark a measured grid and record plumb, spread, and twist with a laser level, tape, and story pole.
Check joints with a mirror and torch, not a pry bar; probe only with a blunt awl at existing cracks. Map moisture with a meter, identify insect flight holes, and note fungal fruiting. Use binoculars for purlins and ridge. For Historical preservation and material sourcing, tag timbers by species, section, and tool marks so any future repairs match the original.
Planning, Listed Status, and Building Regs: What Applies
Before you sketch layouts or price steelwork, pin down which consent routes apply, because a cruck (or “cruik”) barn conversion often triggers overlapping controls: planning permission for change of use and external works, listed building consent if the structure is listed or curtilage‑listed, and building regulations approval for structure, fire safety, insulation, drainage, and access. Check the local plan, conservation area status, and any Article 4 directions; permitted development rarely covers barns. If it’s listed, you’ll need a heritage statement, method statements, and like‑for‑like repair specs to satisfy Historic preservation. Engage Building Control early for structural calculations, compartmentation, escape routes, Part L fabric upgrades, moisture risk, and SAP/PHPP evidence. Keep a consent matrix, programme realistic determination periods, and document legal compliance throughout.
Design the Multi-Use Layout Around the Barn’s Constraints
Once you’ve mapped out the consent routes, you can lock the layout to what the barn will actually tolerate—its structural frame, existing openings, and service limitations. Set “wet” rooms where drainage falls and incoming water can run shortest, then stack utility risers to minimise trenching. Use existing doorways for primary circulation and fire egress, and treat any new openings as exceptions driven by daylight or access needs. Zone by noise and heat: keep plant, workshop, and storage at the colder gable end, and place living/sleeping where you can insulate continuously. Specify Interior lighting to compensate for deep bays: dimmable linear runs and task spots on separate circuits. Tie entrances to Exterior landscaping so paths, levels, and runoff management support accessible thresholds.
Keep Cruck Frames Visible: While Meeting Safety Codes
Although the cruck (cruik) blades give the barn its character, you can’t treat them as purely decorative if you want sign‑off under Building Standards and fire safety rules. Get an engineer to verify section loss, joints, and thrust paths, then specify structural reinforcement that’s discreet: concealed steel flitch plates, resin anchors, or scarf repairs with graded timber and bolts.
Keep the frames exposed by running services in floor voids or perimeter trunks, not drilled through principal members. For fire compliance, apply an intumescent coating rated for timber, or use sacrificial charring allowances backed by calculations, while protecting fixings with fire‑rated collars where required. Control moisture to limit decay and specify Rust prevention on any new steelwork: hot‑dip galvanising, isolating pads, and breathable paint systems. Document all details for inspection.
Repair Stone Walls With Lime (Not Cement)
When you repair your barn’s stone walls, you’ll get better long‑term performance with lime mortar because it stays vapour‑permeable and flexible, whereas cement traps moisture and drives cracking and spalling. You’ll mix a compatible lime (NHL or hot‑lime) with sharp, well‑graded sand, pack it firmly into cleaned joints in thin lifts, and finish slightly recessed to shed water without smearing the stone faces. Then you’ll cure it slow—protect from sun, wind, and frost, mist as needed, and plan periodic repointing and gentle washing so the wall keeps breathing instead of failing brittle.
Why Lime Beats Cement
Because solid stone walls don’t behave like modern cavity construction, you’ll get more durable repairs by using lime mortar instead of cement: lime stays permeable and slightly flexible, so it lets trapped moisture evaporate and accommodates small seasonal movement without cracking. Cement’s density can trap water behind the pointing; in freeze–thaw cycles, that moisture spalls stone faces and breaks arrises, so apparent Cement durability can shorten wall life. Lime also self-heals: free lime can re‑carbonate and close hairline microcracks, keeping joints sacrificial rather than sacrificing the masonry. You’ll protect embedded timbers by lowering moisture retention at sockets and bearings. From a conservation angle, lime’s lower embodied energy supports Lime sustainability, and you can reverse future interventions without tearing out damaged stone.
Mixing And Applying Lime
Lime only pays off if you mix it to suit the wall and place it properly, so start by matching the binder and aggregate to the exposure and stone type. Use lime putty for softer masonry; choose a moderately hydraulic lime where you need faster set. Gauge clean, well-graded sharp sand; avoid salty or clayey fines. Follow consistent mixing techniques: knock up putty first, then add damp sand until you get a cohesive, buttery mortar that holds a hawk edge without slumping.
For Lime application, rake joints to sound material, mist the wall, then pack mortar in layers, fully compacting each pass. Keep the joint slightly proud, then finish with a stiff brush or wood float to open texture and match existing tooling. Avoid feather edges and over-trowelling.
Curing And Ongoing Maintenance
After you’ve tooled the joints, you’ll only get a durable lime repair if you control the cure: keep it damp, shaded, and protected from wind, direct sun, and frost so carbonation and hydraulic set can proceed without shrinkage cracking. Mist with clean water 2–4 times daily for 3–7 days, then cover with damp hessian and a breathable tarp for another week; extend in hot, dry weather. Don’t use plastic tight to the wall, and don’t force-dry with heaters.
Inspect after the first rains. You’ll expect slight hairlines; re-mist and rub in lime putty. If joints powder, you’ve dried too fast—rake back and repoint. Annual checks protect Exterior aesthetics and the wall’s historical significance; avoid cement patches that trap moisture.
Insulate a Cruik Barn Without Damp or Condensation
If you insulate a cruck barn without a moisture strategy, you’ll trap water vapour against cold stone, timber, and thatch and end up with interstitial condensation, mould, and rot. Start by mapping vapour flow: keep the structure vapour-open to the outside and control indoor humidity with steady ventilation. Choose insulation materials that buffer moisture, like woodfibre, hemp-lime, or sheep’s wool, and avoid impermeable foams against historic masonry. Build a continuous airtight layer on the warm side (taped membrane or parged lime plaster) so warm, moist air can’t bypass insulation into cold zones. Add a smart vapour retarder where seasonal reversal occurs. Maintain capillary breaks at floors, and keep external rainwater management sound for condensation prevention.
Windows and Doors: Heritage Look + Airtightness
You’ll need heritage-proportioned glazing that keeps the barn’s vertical emphasis—think narrow mullions, appropriate sightlines, and reveal depths—while still meeting your target U-values. Specify units that suit the opening geometry and accept discreet trickle vents only where your ventilation strategy requires them. Then you’ll lock in performance with continuous airtight seals at frames and thresholds, taped frame-to-wall junctions, and compression gaskets that stay effective under seasonal movement.
Heritage-Proportioned Glazing Choices
Because a cruik barn’s openings usually read as tall, narrow, and deliberately sparse, your glazing choices need to preserve those heritage proportions while delivering modern airtightness. Start by surveying existing reveals and lintel heights, then size units to sit within the original masonry rhythm. Specify Heritage glazing that keeps slender sightlines: narrow stiles/rails, putty-line profiles, and (where appropriate) astragal bars aligned to historic bays. For Proportioned windows, prioritise vertical emphasis and avoid widening apertures; use multiple lights within one opening rather than one broad pane.
- Choose timber or thermally-broken steel frames with low-profile sections.
- Use high-performance double glazing with warm-edge spacers and appropriate g-values.
- Set glazing back in the reveal to deepen shadow lines and protect external faces.
Airtight Door And Window Seals
Although the frame profiles and sightlines must stay lean to suit a cruik barn, the real performance gain comes from continuous, correctly compressed seals at every operable joint. Specify dual durometer gaskets: a firm carrier to hold shape and a soft bulb to maintain contact through seasonal movement. Use a continuous perimeter seal plus a secondary compression seal at meeting stiles to stop wind‑wash.
At doors, add an adjustable threshold with a compressible sill gasket, and fit a drop seal to the leaf so you don’t rely on brush strips. At windows, tape the inner perimeter to the air control layer for airtight sealing, then lap the outer tape to your weatherproof barriers so any leakage drains out. Check hinge shims and latch pull‑in to maintain even compression.
Heating Strategy: Zones, Stoves, UFH, and Heat Pumps
To keep a cruik barn comfortable without overspending on plant and fuel, design the heating strategy around distinct zones rather than a single “whole‑building” setpoint. Treat the double‑height hall as intermittent‑use, and keep bedrooms and bathrooms on tighter schedules with room stats and weather compensation.
- Use a stove in the main volume for fast radiant comfort; size it for peak load, not whole‑house base heat.
- Specify underfloor heating in well‑insulated slabs for low flow temperatures; pair it with an air‑to‑water heat pump to maximise COP.
- Add solar thermal to preheat DHW and buffer UFH shoulder seasons; fit mixing valves and a small thermal store.
Commission balancing, set night setbacks, and log temperatures to tune runtimes.
Route Plumbing and Electrics Without Chasing Masonry
Once you’ve set zones and emitters, you still need to get water, power, and control wiring around thick stone and lime mortar without hacking chases that weaken masonry or create damp paths. You’ll favor surface runs in service voids: studded linings with a 25–50 mm battened cavity, or a raised floor zone where you can clip pipes and cables clear of insulation. Keep plumbing routes on internal partitions where possible, sleeve every wall penetration, and use isolators at manifolds for maintenance. For Electrical wiring, run conduits in the void and drop to outlets in timber pattresses, not masonry. Use flexible metal conduit near stoves, and maintain separation from hot pipes. Fire‑stop all void crossings, label circuits, and add accessible inspection hatches.`
Zone Kitchen, Dining, and Lounge for Daily Flexibility
You’ll set up flexible kitchen work zones by mapping the hob, sink, prep run, and cold storage into a tight work triangle, then backing it with a secondary prep/landing surface that doubles as serving space. You can hold the dining area on the triangle’s edge with a movable table or peninsula that maintains 900–1100 mm clear circulation for busy days and larger gatherings. You’ll complete the dining‑lounge shift with consistent floor levels, layered lighting circuits, and low storage or a bench as a soft boundary that keeps sightlines open.
Flexible Kitchen Work Zones
Because a cruik barn’s open volume can feel undefined without careful planning, you’ll get better day‑to‑day performance by zoning the kitchen, dining, and lounge into distinct but reconfigurable work areas. In the kitchen zone, build flexibility into clearances, power, and lighting so you can prep, cook, and clean without crossing paths. Use absorptive surfaces near hard stone to manage barn acoustics, and integrate vintage decor as durable, wipeable accents rather than clutter.
- Put a 900–1200 mm circulation lane behind the main run and island, and keep fridge-to-sink travel under 2.7 m.
- Add a mobile butcher block on locking casters with a pop-up outlet and task beam.
- Layer dimmable 3000K task lights plus under-shelf strips to re-aim work zones fast.
Dining-Lounge Transition Strategies
Although the kitchen often anchors a cruik barn conversion, the dining‑to‑lounge seam determines whether the whole open plan feels purposeful or drafty. Set the dining table on the circulation line between prep and seating, then stop it with a low sideboard or open shelving to block cross‑views without killing light. Use Furniture placement to maintain 900–1100 mm clear paths and align chair backs parallel to primary beams for visual order.
Define each zone with layered lighting: pendants centered over the table, wall washers along the lounge wall, and dimmable task spots near any reading chair. Control acoustics by adding a wool rug under dining chairs and thick curtains at glazing. Tighten color schemes: keep walls continuous, shift upholstery tones one step darker in the lounge, and repeat timber notes across both zones.
Build a Compact Home-Office Nook That Feels Separate
When the living area and work zone sit under the same cruck frame, a compact office nook needs hard boundaries, not just a desk in a corner. Set it between posts so structure becomes a visual threshold, then size the bay to your chair clearance and door swing. Use a ceiling-height screen or pocket door with acoustic seals; line the inside face with cork or slatted timber over mineral wool to cut reverberation. For crafting cozy corners while maximizing natural light, keep the partition translucent above eye level and aim the desk perpendicular to glazing to reduce glare.
- Add a 600mm-deep built-in desk with cable grommets and a recessed power rail.
- Mount task lighting on the cruck tie, dimmable, 4000K.
- Specify storage to the side, not behind, to keep focus.
Add Guest Space With Mezzanines or “Room Pods
To add guest accommodation without chopping up your main volume, you can insert a mezzanine sleeping platform or a self-contained “room pod” that reads as furniture rather than permanent walls. For mezzanine design, you’ll span between primary frames, keep loads off fragile infill, and specify a shallow structural depth so you preserve headroom below. Set the deck height to meet safe stair pitch, then add a guard and a slim balustrade that won’t visually dominate the cruck.
With room pod placement, you’ll park the pod where it can borrow existing circulation, align its long face parallel to the bay, and leave a continuous perimeter gap for inspection and movement. Use demountable connections, acoustic lining, and integrated ventilation so guests get privacy without permanent partitions.
Lighting and Storage That Respect Old Barn Walls
Once you’ve added guest capacity with a mezzanine or room pod, the next pressure point is where lighting circuits and storage live without drilling, chasing, or sealing up breathable, irregular barn walls. For Barn restoration and historic preservation, keep services reversible and off the masonry or stone. Run surface conduit along new stud-free “service rails” fixed to floor and ceiling timbers, not the infill; you’ll protect lime joints and keep moisture paths open. Use low-heat LED strips in aluminium channels to avoid scorching old timber, and switch with wireless controls so you don’t cut boxes into heritage fabric. For storage, let freestanding systems take the load.
- Clamp-on track lighting to beams, with concealed cable trays.
- Modular wardrobes on plinths, leaving ventilation gaps.
- Peg rails and hooks mounted to new posts, not walls.
Frequently Asked Questions
How Long Does a Full Cruik Barn Conversion Typically Take?
You’ll typically need 9–18 months for a full cruik barn conversion, depending on Historical preservation demands and Structural engineering scope. You’ll spend time on surveys, consents, stabilization, services, insulation, fit‑out, inspections.
What Budget Range Should I Expect for a Multi-Functional Conversion?
You should expect $250–$600/ft² (£2,700–£6,500/m²), even if you worry it’s too pricey—historic preservation avoids costly redo work. You’ll control totals by phasing scope and specifying sustainable materials, plus contingencies.
Will Insurers Cover a Converted Cruik Barn, and at What Premium?
Insurers will cover it if you meet Insurance requirements and secure Conversion insurance during works. You’ll typically pay 10–30% higher premiums than standard homes, depending on construction type, fire protection, occupancy, and rebuild valuation.
Can I Live On-Site During the Conversion Work?
Yes—you can, but treat it like a telegraph-era worksite: you’ll need temporary habitable space, safe utilities, egress, and dust control. Coordinate Home decor staging, maintain historical preservation compliance, and follow permits, inspections, and contractor safety rules.
What Ongoing Maintenance Costs Should I Plan for Annually?
Plan 1–3% of property value yearly for Exterior upkeep (roofing, cladding, gutters, drainage, pest control) plus Utility expenses (heating fuel, electricity, water, septic servicing, broadband). You’ll also budget inspections, repainting, filter changes.
Conclusion
If you convert your cruik barn with care, you’ll keep its volume, structure, and character while gaining flexible day‑to‑day space. One compelling benchmark: well‑executed heritage conversions can cut operational energy use by 30–50% once you add high‑performance insulation, airtightness detailing, and efficient heating—without stripping original fabric. You’ll get there by fixing rot and spread early, using lime‑based repairs, routing services discreetly, and zoning with lightweight partitions that you can change later.


