
Roughly 35–40% of Victorian housing stock still shows active damp symptoms in survey reports, even after “modern” upgrades. You can’t start a townhouse renovation with paint charts; you start with a full survey, moisture mapping, and a clear heritage strategy. You’ll decide what’s worth restoring, what must be replaced, and how to sequence roof, chimneys, floors, and services without locking in future decay. The first inspection often reveals one detail that changes everything…
Key Takeaways
- Commission a full room-by-room survey with measured drawings, moisture tracing, and structural monitoring before designing any works.
- Confirm planning rules, Building Regulations, and Listed Building Consent early, supported by a heritage statement and documented existing conditions.
- Choose trades proven in traditional materials—lime plaster, joinery, and breathable repairs—backed by references and conservation credentials.
- Prioritise repair over replacement, matching Victorian details like sash proportions, cornices, tiles, and stair parts; use like-for-like materials when needed.
- Fix damp at the source by addressing gutters, flashings, and bridged DPCs, then improve ventilation through passive vents and controlled airflow.
Start With a Full Victorian Townhouse Survey

Before you lift a floorboard or strip a cornice, commission a full Victorian townhouse survey to map exactly what you’re working with. You’ll document original fabric and later alterations, then log defects room by room.
Insist on measured drawings, a condition schedule, and photographic elevations so you can read proportions typical of Victorian architecture. Ask your surveyor to trace moisture pathways, check subfloor ventilation, and test for salts, rot, and woodworm. You should verify structural movement with crack gauges, inspect roof coverings and flashings, and assess chimney stability. Request services mapping for wiring, pipework, and drainage runs, plus thermal imaging to locate cold bridges. If the house is listed or in a conservation area, include a Historic preservation statement and heritage impact notes to guide consent discussions.
Decide What to Restore (and What to Replace)
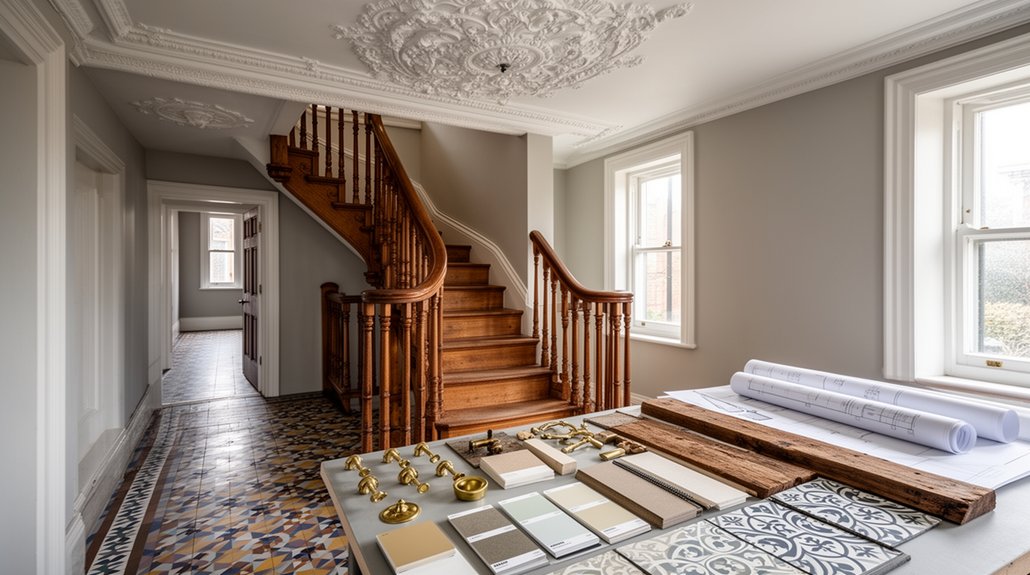
Your survey results give you a clear inventory of what’s original, what’s been altered, and what’s failing—now you need to decide where restoration will protect the house’s character and where replacement will solve long-term performance issues. Prioritise elements that define the Victorian read: joinery profiles, plaster cornices, stair balusters, encaustic tiles, and sash proportions. Replace components that can’t meet today’s standards without compromise, and specify like-for-like where it matters.
- Restore intact fireplaces, architraves, and ceiling roses; repair, don’t “improve” profiles.
- Replace irreparable sashes with matching sightlines, then add discreet Modern energy upgrades.
- Keep original floorboards; swap damaged sections with reclaimed timber and consistent patina.
- Let Contemporary decor choices sit lightly: paint, lighting, and furniture should emphasise, not mimic, heritage.
Common Victorian Townhouse Problems to Expect
Although Victorian townhouses were built to last, they tend to fail in predictable ways once you start stripping back layers. Expect damp-related decay where cement renders trapped moisture, salt blooms under paint, and timber skirtings feel punky at outside walls. You’ll often uncover outdated wiring routes, undersized consumer units, and overloaded spurs that don’t suit modern loads. Plumbing may mix lead, iron, and early plastic, so joints weep and flow rates vary room to room. Party-wall sound transmission is common, as are drafts from leaky sash boxes and ill-fitted doors. Decorative plaster can delaminate after years of vibration and poor repairs. Approach each issue through the lens of Victorian architecture and Historic preservation, then specify reversible, breathable upgrades where possible.
Check Roof, Chimneys, Floors: Key Warning Signs
Start your survey at the top: inspect roof coverings and flashings for slipped slates, failed leadwork, and staining that signals active leaks. Check chimney stack stability by looking for leaning pots, open joints, spalled bricks, and loose or missing caps that invite water ingress. Inside, test floors for sagging and bounce—uneven lines, springy boards, and cracking at skirtings often point to tired joists or compromised supports.
Roof Coverings And Flashings
Where do Victorian town houses most often reveal hidden defects—right at the roofline, where tired coverings and failed flashings let water track into chimneys, party walls, and upper floors. You’ll spot trouble first in slipped slate, cracked clay tiles, and uneven ridgelines that telegraph nail fatigue and deck movement. Check gable vents too: blocked or missing units trap moist air, accelerating rot and blistered paint at eaves. Prioritise precise flashing repairs—lead soakers, step flashings, and aprons should sit tight, dress cleanly, and terminate into sound masonry with proper wedges and sealant, not mastic smears.
- Look for pinholes, splits, and lifting at flashings
- Trace stains at rafters, purlins, and ceiling corners
- Test gutters for backfall, leaks, and overflowing joints
- Confirm underlay laps, eaves trays, and drip edges
Chimney Stack Stability
Up on the roof, how do you tell a Victorian chimney stack’s simply weathered from one that’s starting to move? Start with the geometry: look for a lean, stepped cracks through the brickwork, and opened mortar joints that run diagonally from the pot down to the shoulders. Check the lead soakers and back gutter for splitting or daylight gaps, then inspect the haunching around pots; failed fillets let water in and accelerate decay. Tap bricks lightly—soft faces and spalled arrises signal frost damage, not just age. Inside the loft, trace staining or soot marks that suggest flue breaches. If movement’s evident, plan Chimney reconstruction rather than patching, and pair it with Flue liner replacement to future-proof performance and meet safety expectations.
Floor Sagging And Bounce
Although a slight spring in old boards can be normal, you shouldn’t ignore a Victorian floor that sags between joists, dips toward a spine wall, or feels bouncy underfoot. Treat it as a structural clue, not a cosmetic quirk, and investigate before you commit to finishes, furniture placement, or interior lighting layouts.
- Measure the dip with a long straightedge and note changes room to room.
- Lift a board to check joist ends, wall plates, and any past notching for pipes.
- Look for telltales: cracked cornices, sticking doors, and skirting gaps tracking the slope.
- Plan remedies early: sister joists, added noggins, or discreet steel, then refit boards.
You’ll protect the building’s fabric and keep your design crisp, level, and quiet underfoot.
Planning, Listed Consent, and Building Regs: When?
Before you finalise layouts or book trades, map out which permissions your Victorian townhouse needs—because the timing affects cost, programme, and what you’re legally allowed to change. If you’re in a conservation area, check whether permitted development is restricted; even replacing windows, re-pointing, or altering rooflines can trigger planning. If the house is listed, you must secure Listed Building Consent before any works affecting character, fabric, or plan form—this is Historic preservation, not admin. Apply early, with measured drawings and a clear heritage statement that justifies Modern adaptations.
Building Regulations run alongside: structure, fire, insulation, drainage, electrics. Agree the route—full plans or building notice—before opening up floors or moving staircases, and schedule inspections into your programme.
Choose Trades Who Know Period Buildings
You can’t treat a Victorian town house like a blank-slate build, so you’ll need trades who understand lime plaster, traditional joinery, and breathable assemblies. Vet period-savvy contractors by asking for case studies on similar properties, inspecting finishes in person, and calling past clients about defects and aftercare. Verify heritage-work credentials—listed-building experience, conservation training, and insurer-backed guarantees—before you let anyone touch original fabric.
Vet Period-Savvy Trades
When a Victorian town house needs work, the right trades can protect its value—or erase its character in a weekend. You should vet for hands-on period judgement, not just generic renovation confidence. Ask them to walk you through how they’ll keep original fabric while meeting modern performance.
- Request photos of like-for-like repairs: sash cords, lime plaster patches, cornice runs
- Probe their approach to Historical paint analysis and edge protection before stripping
- Listen for material fluency: lime, soft brick, breathable insulation, cast-iron details
- Check site habits: dust control, careful lifting, salvage labeling, tidy storage
Then test communication: you want clear method statements, realistic sequencing, and respect for tolerances. Don’t forget exterior sensibility—someone who understands Victorian garden design won’t trench carelessly through paths, edging, or root zones.
Verify Heritage Work Credentials
Although plenty of builders claim they’ve “done old houses,” verified heritage credentials separate true conservation trades from confident generalists who’ll default to modern shortcuts. Ask for proof: conservation training (SPAB, IHBC-aligned CPD), listed-building references, and photos showing like-for-like repairs—lime plaster, timber scarfing, sash cord replacements—not wholesale rip-outs. Request method statements that explain how they’ll protect cornices, encaustic tiles, and stair balusters during work. Challenge any proposal that leans on Modern materials where breathable assemblies are required; the right contractor will justify alternatives with hygrothermal logic. Insist on Digital documentation: annotated surveys, pre-works condition reports, and staged photo logs. Finally, confirm they collaborate with conservation officers and specify reversible fixes, not permanent sealants or cement renders.
Set a Victorian Renovation Budget With Contingencies
Before any plaster comes down or cornices go back up, set a Victorian renovation budget that itemizes structural repairs, period-appropriate finishes, specialist labour, and compliance costs—and then protect it with a realistic contingency. Price the unknowns early: damp remediation, joist repairs, chimney flaunching, and outdated electrics can dwarf decorative spend. Specify finish allowances by room so you don’t “value-engineer” away character when quotes land. If you’re reinstating Victorian wallpaper or restoring cast iron fireplaces, budget for conservation cleaning, specialist installation, and sympathetic hearth details, not just materials.
- Commission measured surveys and intrusive investigations
- Separate “must-fix” fabric work from “nice-to-have” upgrades
- Include access costs: scaffolds, skips, parking, protection
- Hold 12–20% contingency, ring-fenced and approval-controlled
Create a Realistic Renovation Sequence and Timeline
Start by evaluating your scope and constraints—listed status, party walls, access routes, lead times, and which original features must stay. Then phase the work by priority, tackling structure, damp, and services before insulation, plaster, joinery, and finishes so your design intent isn’t compromised by rework. Build buffer into your timeline for surveys, approvals, hidden defects, and bespoke fabrication, because Victorian houses always reveal surprises once you open them up.
Assess Scope And Constraints
Once you’ve defined the brief, you need to lock down the project’s scope and constraints so your renovation sequence doesn’t collapse under surprises. Start with measured surveys and intrusive investigations where justified, then map what’s fixed versus flexible. Use historical context and original architectural styles to judge which elements you must conserve, replicate, or reinterpret without pastiche. Confirm statutory limits early, and translate them into buildable details, not vague intentions. Stress-test your budget against lead times and access realities typical of tight terraces.
- Verify planning/listed-building status and conservation-area controls
- Commission structural, damp, timber, and services reports
- Audit access, scaffolding, waste routes, and neighbor-party-wall impacts
- Log procurement risks: bespoke joinery, sash repairs, and period-accurate finishes
Phase Work By Priority
How do you keep a Victorian townhouse renovation moving without redoing work or stalling on long lead items? You phase the work by dependency: stabilize, open up, rebuild, then finish. Start with surveys and protection, then address structure, roof, masonry, and damp so you’re not sealing in problems common to Victorian architecture. Next, run primary MEP routes before you restore plaster, cornices, and stair details that carry the home’s historical context. Frame new layouts, insulate discreetly, and rough-in kitchens and baths before flooring goes down. Then close walls, fit windows and doors, and complete trim, paint, and decorative repairs. Order bespoke joinery, tile, and radiators early, and schedule installs to follow dry, dust-free milestones.
Build Buffer Into Timeline
Because Victorian houses hide their surprises behind lath, floors, and party walls, you’ll keep your renovation on track only if you build buffer time into a sequence that assumes discoveries, not perfection. Start with enabling works, then structure, then services, then finishes—yet pad every critical path item.
- Add 15–25% float for plaster repairs, damp, and joist issues
- Lock lead times early for sash windows, tiles, and bespoke joinery
- Schedule inspections and sign-offs before closing ceilings and floors
- Stagger garden landscaping after heavy access ends, not before
You’ll protect interior decoration by delaying paint, paper, and floor finishing until wet trades dry and snags clear. Keep a rolling three-week lookahead with your contractor, update decisions weekly, and treat delays as design management, not failure.
Fix Damp First: Diagnose Before You Treat
Before you strip plaster or spec new finishes, track down the damp’s source and confirm it with evidence—Victorian houses rarely suffer from “mystery moisture.” Start by distinguishing rising damp, penetrating damp, and condensation through telltale patterns (tide marks and decayed skirtings, localised staining after rain, or mould and streaming windows), then back it up with moisture readings, external checks (gutters, pointing, ground levels, air bricks), and internal clues (cold bridges, unvented bathrooms, blocked chimneys). Map affected zones room-by-room, photograph symptoms, and date them against weather. Prioritise Damp causes you can correct at the envelope: leaking flashings, failed render, bridged DPC, cracked downpipes. Use Moisture detection tools properly—calibrated meter, salts tests, and boroscope checks—before you specify lime plaster, breathable paint, or insulation.
Improve Ventilation to Stop Condensation and Mould
You’ll stop condensation and mould by treating ventilation as a planned system, not a patch: first, pinpoint moisture at its sources—cooking, bathing, drying laundry, and any cold-bridged corners. Next, upgrade natural airflow with working sash trickle vents, clear air paths under doors, and sensibly placed opening lights to create a reliable cross-breeze. Where the layout or lifestyle overwhelms passive measures, install mechanical ventilation—quiet, ducted extract to kitchen and baths, or a compact MVHR—sized to the rooms and detailed to suit the house’s fabric.
Identify Moisture Sources
Where’s all that moisture actually coming from? Before you tweak anything, map the sources so you’re not masking symptoms. In Victorian terraces, moisture migration often hides behind fresh paint and new plaster, then blooms as mould when surfaces cool. Walk the house at different times of day, note smells, fogged glass, and tide marks, and track patterns to specific rooms and habits. Your goal is targeted condensation control based on evidence, not guesswork.
- Drying clothes indoors without extraction
- Long showers, simmering pans, and kettles
- Leaking gutters, cracked render, or bridged damp courses
- Unvented tumble dryers, aquariums, and houseplants
Use a hygrometer to log RH, inspect cold corners with an IR thermometer, and check subfloor voids for damp timber.
Upgrade Natural Airflow
Once you’ve pinned down when and where moisture builds up, improve the house’s natural airflow so that damp air actually leaves instead of pooling on cold plaster and window glass. Start with Natural ventilation: open upper sashes a finger and lower sashes slightly to drive a steady stack effect without draughts. Keep internal doors ajar to connect rooms, but add discreet door undercuts where carpets allow. Clear chimney flues and reinstate passive vents if they’re blocked, using hit-and-miss grilles sized to the room. In kitchens and baths, crack windows during and after use, and keep transom vents operational. For airflow optimization, reduce obstructions: avoid full-height curtains over radiators, and place furniture off external walls so air can circulate and surfaces stay warmer.
Install Mechanical Ventilation
When natural airflow can’t keep pace with cooking, bathing, and drying laundry, mechanical ventilation gives you controlled, reliable extraction that stops humid air lingering on cold glass and plaster. In a Victorian town house, specify low-sone fans, short duct runs, and insulated rigid ducts to prevent winter condensation. Place continuous extract in bathrooms and utility spaces, and match it with discreet, planned supply air via door undercuts or trickle vents so you don’t backdraft fireplaces. Prioritise filters, humidity sensors, and commissioning: balanced airflow protects cornices, skirtings, and lime finishes while boosting Air quality.
- Humidity-triggered boost to suppress mould spikes
- Heat-recovery option to cut heat loss
- Hidden grilles aligned with joinery for a calm look
- Easy-access filters so performance doesn’t drift
Insulate Victorian Walls and Roofs Without Trapping Moisture
Although Victorian town houses feel solid, their solid-brick walls and leaky roof voids were designed to “breathe,” so you can’t insulate them like a modern cavity build without inviting condensation. Start with a moisture survey: check salts, peeling paint, and damp corners, then fix gutters, flashings, and pointing before you add any thermal layer. For Victorian insulation, favour vapour-open systems—wood fibre, cork, or lime-based insulated plaster—paired with meticulous airtightness at junctions, not plastic membranes. Keep reveals thin but continuous to avoid cold bridges around sash boxes and bay returns. In the roof, insulate between and below rafters with a ventilated void or breathable sarking, and add a smart vapour control layer only where detailing guarantees moisture management. Test with a hygrothermal model.
Update Electrics and Plumbing With Minimal Disruption
Because Victorian town houses hide decades of patchwork wiring and ad‑hoc pipe runs behind lath, floorboards, and cornices, you’ll get the cleanest upgrade by treating electrics and plumbing as a coordinated “first‑fix” package rather than two separate invasions. Start with a room-by-room survey, then open only the access zones you can reinstate neatly: under stair voids, chimney breasts, and service risers. You’ll improve Electrical safety by installing a modern consumer unit, RCD protection, and properly bonded metalwork, while keeping chases shallow and aligned with skirting lines. For plumbing upgrades, replace tired lead or microbore, add isolation valves, and route pipework through joist zones with grommets and acoustic sleeves.
- Map circuits and pipe routes before lifting boards
- Use dust-controlled chasing and staged shutoffs
- Specify fire-stopped penetrations and labeled valves
- Photograph every run before closing up
Design a Kitchen That Suits a Victorian Layout
Even if you’re aiming for a sleek modern finish, a Victorian town house kitchen works best when you design around its narrow footprint, tall proportions, and often-awkward service zones rather than trying to erase them. Keep the main run on one wall and use a slim island or peninsula only if circulation stays clear. Put tall storage at the darkest end to draw the eye upward and free the window wall for sink, prep, and sightlines. Specify full-height cabinetry, stacked uppers, and a mix of painted fronts and timber accents to echo Victorian aesthetics without pastiche. Integrate Modern appliances behind matching panels, then add a proper extractor and task lighting to compensate for deep-plan gloom. Prioritise durable worktops and tight tolerances for crisp, period-friendly lines.
Add Bathrooms and Finish With Period Details (Floors, Plaster, Joinery)
When you add bathrooms to a Victorian town house, you’ll get the cleanest result by treating plumbing routes and period fabric as one coordinated package, not separate jobs. Plan Bathroom installation around existing chimneys, joist directions, and service risers, so you don’t butcher cornices, skirtings, or floorboards. Specify breathable lime plaster in wet-adjacent zones and use proper tanking only where required.
- Hide pipework in boxed ducts aligned to architraves and panel lines
- Match reclaimed boards, then feather repairs and seal with hardwax oil
- Re-run skirting and picture rails, keeping original profiles and mitres crisp
- Finish joinery in satin or eggshell, and align reveals to existing door trims
Sweat the details: nickel taps, slimline radiators, and well-proportioned sanitaryware deliver Period details without pastiche.
Frequently Asked Questions
How Do I Source Authentic Victorian Fixtures and Reclaimed Materials Affordably?
Start with architectural salvage yards and local reclamation dealers, then monitor estate auctions, demolition sales, and online marketplaces for Vintage lighting and Reclaimed wood. Negotiate bundles, buy imperfect pieces, and restore them yourself to save.
Will Renovating a Victorian Townhouse Increase My Council Tax or Insurance Premiums?
Yes—renovate boldly and your council tax or premiums can skyrocket overnight if you trigger revaluation or higher rebuild costs. But you’ll often offset rises with Modern energy efficiency, while Historical preservation regulations add compliance-related insurance load.
Can I Live in the House While Renovations Are Ongoing?
Yes, you can live there during renovations if you phase rooms and isolate dust. You’ll keep Interior design decisions flexible, maintain Historical accuracy, and schedule noisy, utility-off work for daytime, ensuring safe access throughout.
What Hidden Asbestos Risks Exist in Victorian-Era Refurbishments?
You’ll often find asbestos in pipe lagging, boiler insulation, floor tiles, textured coatings, and cement panels hidden behind joinery. Prioritize Hazard identification before disturbing finishes; schedule licensed Asbestos removal to protect air quality and craftsmanship.
How Do I Handle Party Wall Agreements With Neighbouring Terraced Properties?
Like threading a needle, you’ll handle party wall agreements by serving proper notices early, following party wall procedures, appointing surveyors if needed, and documenting schedules of condition. You’ll steer neighbor negotiations calmly, aligning timelines, access, and design intent.
Conclusion
You’ve now got a clear route through your Victorian townhouse refresh: survey first, then choose what to lovingly keep and what to quietly retire. Tackle the usual suspects—roofing, chimneys, sagging floors, and “persistent moisture”—before you invite new services in. Use breathable insulation, reversible repairs, and consent-friendly detailing. Plan kitchens and baths around the existing geometry, then finish with crisp plaster, well-matched joinery, and period-true floors.


